1. Open an image in Photoshop Elements.
2. Choose a script from the File > Scripts sub menu or from the Scripts button on the control bar.
3. If the script displays an error message, it is probably not possible to run it in the current version of Photoshop Elements. If you have some JavaScript programming knowledge, you can try to edit the script file, e.g. in Notepad, and fix the problem.
1. Open an image in Photoshop Elements.
2. If no actions are loaded, choose Load Actions from File > Actions or from the Actions button on the control bar. For example, you can find the action files of Photoshop Elements 14 at /Library/Application Support/Adobe/Photoshop Elements/14.0/Photo Creations/photo effects/.
3. Choose an action from the File > Actions sub menu or from the Actions button on the control bar.
4. If the action displays a message that a certain command is not available, click the Continue button to run the action nevertheless.
1. Open an image in Photoshop Elements and carry out an image editing step, e.g. apply a filter from the Filter menu.
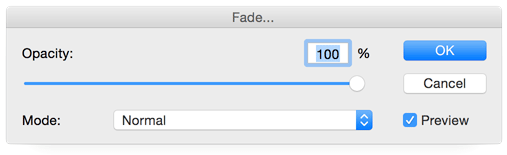
2. Choose Fade from the Edit menu.
3. Change the opacity and/or the blend mode and click OK.
1. Open at least two images in Photoshop Elements and copy them as layers into one document.
2. Select these layers in the Layers panel.
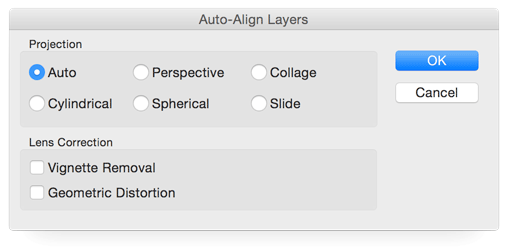
3. Choose Auto Align Layers from the Image menu.
4. In most cases you will be fine with the default options, otherwise adjust them. Finally click OK.
5. Create a layer mask for each layer and use the brush tool for making certain image areas of a layer visible or invisible. This way you can combine the best parts of each photo.
1. Open at least two images in Photoshop Elements.
2. Copy them as layers into one document.
3. Choose Image > Resize > Canvas size. Enter 200% for width if you have two images, 300% if you have three images and so on.
4. Use the Move tool to position the images next to each other. Make sure that the image layers overlap each other where they have the same image content.
5. Select these layers in the Layers panel.
6. Choose Auto Blend Layers from the Image menu.
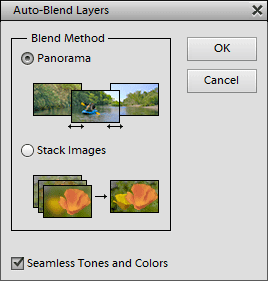
8. Select Panorama from the Blend Method options. If desired, activate the check box for seamless tones and colors. Finally press OK.
9. Use the Crop tool to crop away the superfluous borders of the images.
1. Open at least two images in Photoshop Elements and copy them as layers in one document.
2. Select all layers in the Layers panel.
6. Choose Auto Blend Layers from the Image menu.
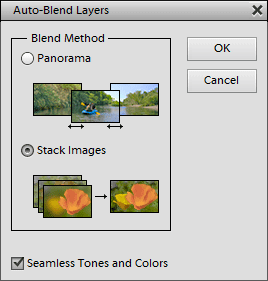
4. Select Stack Images from the Blend Method options. If desired, activate the check box for seamless tones and colors. Finally press OK.
2. From the Image > Channels sub menu choose the desired channel or channel combination.
3. If you want to see all channels while editing only one or two of them, select Image > Channels > Show All.
4. Now perform your image editing operation, e.g. applying a filter. It will only be applied to the selected channel(s).
5. To select all three channels again, choose Image > Channels > RGB or switch to another layer in the Layers panel.
1. If you want to store the whole image file into a smart object, please use the File > Open as Smart Object menu command. Otherwise open the image with File > Open.
2. If you did not open the image with File > Open as Smart Object and want to convert one or more of the layers into a smart object, do the following: Select the appropriate layers in the Layers panel and choose Layer > Smart Object > Convert to Smart Object. Alternatively you can click the smart object icon on the Layers panel.
3. If you want, you can now change the name of the smart object and adjust its opacity and blend mode in the Layers panel.
4. You can losslessly rotate and transform the image by using the Rotate, Transform and Resize sub menus of the Image menu. You can also use the Crop and Trim items on the image menu as well as the move tool. The embedded contents of the smart object are left untouched by these operations.
5. You can also add a layer mask to the smart object with Layer > Layer Mask > Reveal All (or click the layer mask icon on the Layers panel). Now you can edit the layer mask with tools and filters.
6. To edit the contents of the smart object, choose Layer > Smart Object > Edit Contents or double click the thumbnail of the smart object in the Layers panel.
6a. A new document with the contents of the smart object opens up. You can now edit the smart object document.
6b. After editing choose File > Save to update the smart object in the original document.
6c. Close the smart object document and return back to the original document.
1. After creating a smart object as described above, choose a filter from the Filter menu.
2. The filter dialog appears where you can edit the settings of the filter. Press OK.
3. The blending dialog appears where you can edit the blend mode and opacity of the filter. Press OK.
4. If you want, you can apply another smart filter from the Filter menu.
5. After applying a smart filter, the filter mask (one mask for all smart filters of a smart object) is automatically selected. Otherwise you can select it from Layer > Smart Filter > Select Filter Mask or by reselecting the smart object in the Layers panel.
5a. To edit the filter mask use a tool. For example, you can use the brush tool to remove the filter effect from certain image areas.
5b. To disable, enable or clear the filter mask use the appropriate options from the Layer > Smart Filter menu.
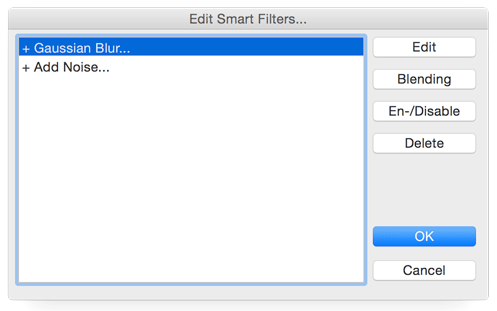
6. To edit the applied smart filter(s), choose the filter from the top of the Layer > Smart Filter menu. For more editing options choose Layer > Smart Filter > Edit Smart Filters or click the smart filter symbol in the Layers panel.
6a. In the Edit Smart Filter dialog select a filter in the list and click one of the buttons to either edit the filter settings or the filter blending, to enable or disable the filter or to delete it.
6b. To apply all changes that you performed with this dialog click the OK button. To remove all changes click Cancel.
1. Select one or more layers in the Layers panel.
2. Click the layer
group icon or choose Layer > Group
Layers. This creates a new layer group from the selected layers.
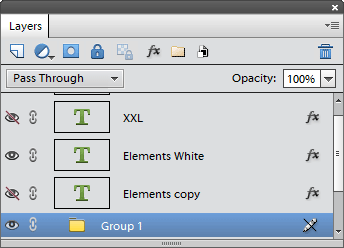
3. If you want, you can rename the group by double clicking its name, e.g. Group 1, in the Layers panel. Change the opacity and blend mode of the layer group if needed.
4. You can also add a mask to the layer group by clicking the layer mask icon or choosing Layer > Layer Mask > Reveal All.
5. To edit the layers of the layer group again click the layer group icon once more or choose Layer > Ungroup Layers.
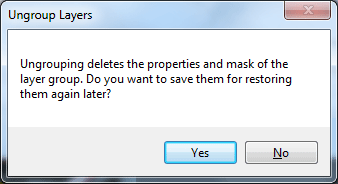
6. If the layer group has a mask, you will be asked if you want to store it. Click Yes.
7. Edit the ungrouped layers.
8. To restore the layer group again, select all of its layers in the Layers Panel and click the layer group icon or choose Layer > Group Layers.
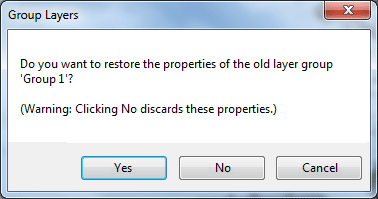
9. On the appearing dialog click the Yes button to restore the name, blend mode, opacity and mask of the old layer group.
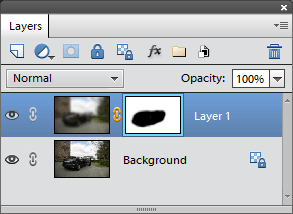
1. If there is only the background image displayed in the Layers panel, double click it to turn it into a layer.
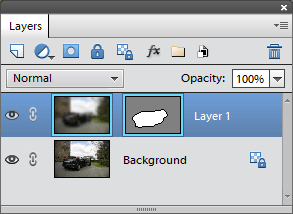
2. To use a selection for creating a layer mask, create the selection and choose Layer > Layer Mask > Reveal Selection or click the layer mask icon on the Layers Panel. If you do not want to use the selection for the layer mask, choose Layer > Layer Mask > Reveal All or delete the selection and click the layer mask icon on the Layers Panel. Now you can see the layer mask in the Layers panel.
3. To edit the layer mask apply a filter or tool. The Select > Refine Edges command is also quite useful for modifying a layer mask.
1. If there is only the background image displayed in the Layers pane, double click it to turn it into a layer.
2. You can now either draw a shape with the shape tool or create a selection with the lasso or marquee tool. This selection or shape will be converted into a vector mask.
3. Depending on whether you created a selection or shape choose either From Selection or From Shape from the Layer > Vector Mask sub menu. Now you can see the vector mask in the Layers panel.
4. You can now use the move tool or the shape selection tool to move, rotate and scale the vector mask. You can also use the Rotate and Transform sub menus of the Image menu to transform the vector mask.
5. To apply filters and other tools to it, you can convert the vector mask into a normal layer mask by choosing Layer > Vector Mask > Rasterize.
5a. To convert the layer mask back to a vector mask, choose Select > Selection From > Layer Mask, then Layer > Layer Mask > Delete and finally Layer > Vector Mask > From Selection.
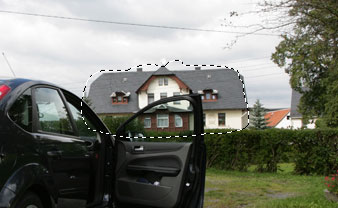
1. It is often useful to start by creating a rough selection, e.g. with the lasso or marquee tool. In Photoshop Elements 4 & 5 this is even required, otherwise Quick Mask Mode will not work.
2. Choose Select > Edit in Quick Mask Mode or in Photoshop Elements 11/ or 2 click on the Quick Mask icon at the bottom of the tool bar. If the current image is in 16-bit/channel mode, a new document called "Quick Mask Mode" is opened, which allows bypassing the 16-bit limitations of Photoshop Elements.
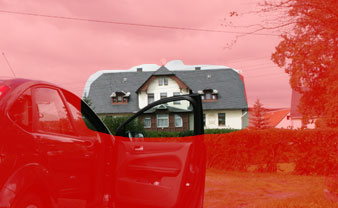
3. Now you will see the whole image (if no selection was created in step 1) or the unselected image areas (if a selection was available) colored red. This indicates that the selection was transformed into a mask.
4. If you want to change the mask properties choose Select > Quick Mask options. Usually you do not need them.
5. Use the available filters and tools to edit the mask. Select white as the foreground color at the bottom of the tool bar for extending the mask e.g. with the brush tool. A black foreground color lets you remove image areas from the mask.
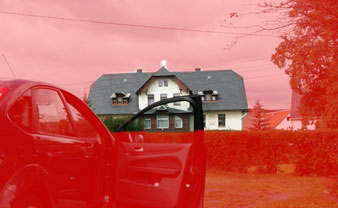
6. When you are satisfied, choose Select > Edit in Quick Mask Mode again. Alternatively, click on the Quick Mask icon at the bottom of the tool bar in Photoshop Elements 11 or 12.
7. The mask was converted back to a selection and you can now apply filters and tools to the refined selection.
1. Choose Proof Color from the View menu.
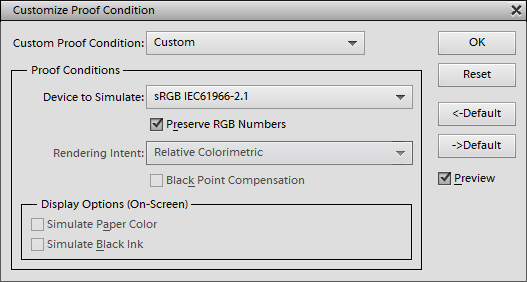
2. Choose an item from the Device to Simulate combo box.
3. If you have some color management knowledge, you can also deactivate the Preserve RGB Numbers check box and change the other options.
4. Click OK. The image is now displayed as it would look on the chosen device.
5. If you notice a color problem, fix it by using a color filter or another tool.
6. To restore the normal view of the image, choose View > Proof Colors again and click OK without changing a setting.