ElementsXXL adds five menu items and a sub menu to the Image menu of Photoshop Elements.
Requirements: At least two layers have to be selected in the Layers panel.
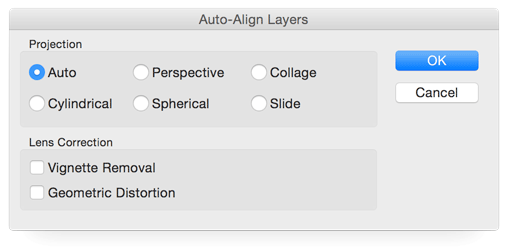
The Auto-Align Layers function lets you align two or more very similar photos in order to combine them to one image. This is quite useful if you want to combine multiple shots of the same subject, e.g. a group of people, or photos taken with different exposure or depth of field.
Firstly, you need to place each photo on a different layer. Then you select all layers in the Layers panel and run the Auto-Align Layers command. After the layers were aligned, you can use layer masks to only add the best parts of each layer to the final image.
In the Auto-Align Layers dialog you can choose between different options for making the projection of the images identical as well as performing automatic lens corrections.
The Auto option automatically performs the best projection for the corresponding image layers. If you select any of the other choices, only this item will be observed by the alignment process. An activated Vignette Removal Check box as well as Geometric Distortion performs the corresponding tasks.
Requirements: At least two layers have to be selected in the Layer panel.
The Auto-Blend Layers function enables you to put different images together in order to create either a panoramic scenery with seamless transitions or stack images one above the other in order to increase the depth of field of macro photos.
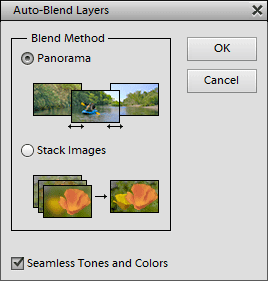
The Auto-Blend Layers dialog offers two blend methods to select. An activated checkbox grants smooth transitions and colors.
Requirements: The image has to contain a colored frame or a layer with transparent pixels.
The Trim menu item allows you to cut away the colored or transparent areas at the borders of the image. This is useful if you scanned a photo and want to remove extraneous areas.
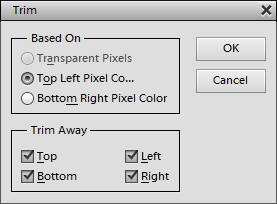
The Trim dialog box lets you select three options that the trimming is based on. You can either trim away transparent pixels on a layer or pixels of a certain color. The color can be picked up from the top left or bottom right corner. The four check boxes determine, where the empty areas are to be trimmed.
Requirements: An image with 8-bits per channel.
Normally Photoshop Elements only supports converting images with 16-bit to 8-bit per channel. ElementsXXL adds this feature to the Mode sub menu to let you convert 8-bit to 16-bit images. Please note that Photoshop Elements does not support layers for 16-bit images, so all layers will be flattened before doing this conversion. The selection is retained by the conversion.
Requirements: The image has to be in RGB mode.
Each image consists of three color channels: Red, Green and Blue. The Channels sub menu lets you view and edit the different color channels according to your preferences. Once having selected a certain channel, you can apply all tools and filters to it.
RGB
The RGB menu item, which is the default setting, selects and displays all three color channels.
Red, Green, Blue, Red + Green, Red + Blue, Green + Blue
These menu items let you view and select the different color channels and channel combinations. If you want to edit all three channels again, please choose the RGB item.
Show All
This menu item shows all channels, even if only one or two of them are selected. If you want to edit all three channels again, please choose the RGB item.
Requirements: An image needs to be opened.
The Apply Image menu item is aimed at the blending of two layers or images. This provides the option of image modification and enables the user to easily produce collage and layer effects. It applies the channels and selections of a source layer or a merged copy of all layers to the target layer with the help of certain blending and masking settings. The target layer is the layer that is selected in the Layers panel.
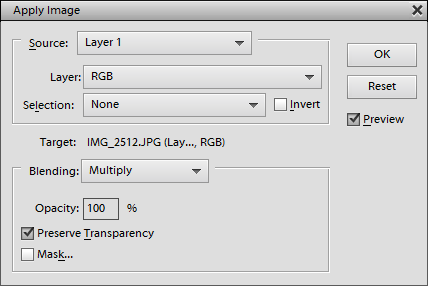
To carry out the Apply Image feature choose a source layer from the Source combo box, a channel from the Layer option and a selection, which was previously saved with the Select > Save Selection command. An activated Invert check box inverts the selection.
You can then define the blend mode, opacity and mask that will be used when applying the source image. When the Mask check box is activated, you can see more options for selecting a certain layer, channel and saved selection, which will then be used as a mask. Additionally the Preserve Transparency check box keeps the transparency of the target layer untouched.
With a bit of experimentation you will get a better feel for the controls.