ElementsXXL adds two menu items and two sub menus to the File menu of Photoshop Elements.
The Quick Mask icon is added at the bottom of the tool bar below the two color boxes. You can click it to start editing in Quick Mask Mode and click again to exit this mode. If you double click the icon, Quick Mask Mode is activated and at the same time the Quick Mask Options dialog is displayed.
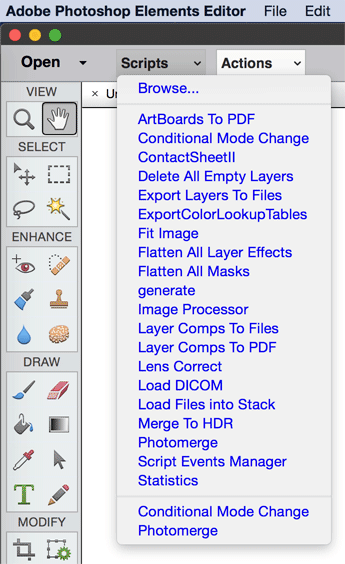 |
Two buttons, called Scripts and Actions, which display a menu, are added to the control bar at the left hand side.
These buttons display the Scripts and Actions sub menu of the File menu, so they allow you to access and run scripts as well as actions much faster. For more information about the items on these two menus see the Scripts and Actions sub menu of the File menu.
Depending on the version
of Photoshop Elements two or three icons are added to the top or bottom of the
Layers panel. Additionally double clicking different areas on a layer item triggers
certain functions.
This screenshot illustrates which features ElementsXXL adds to the Layers panel
and which areas can be clicked:
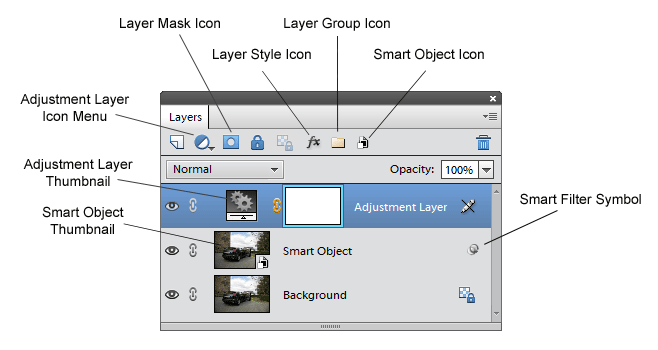
Layer Mask Icon
If a selection is present and you hold down the Cmd key when clicking the layer mask icon, then a vector mask is created instead of a layer mask. If you additionally hold down the Opt key, an inverted selection is added as a vector mask.
See the Vector Mask sub menus of the Layers menu page for more information.
Layer Style Icon
Click on the "fx" icon to display the Style Settings dialog for adding or editing layer effects. If the background is currently selected, you will be asked to convert it into a layer before continuing.
Layer Group Icon
Clicking this icon embeds all selected layers into a layer group. If a layer group is already selected when clicking it, the layer group is dissolved and the embedded layers are ungrouped again. You have to ungroup in order to edit the layers of a layer group. Then you can create the layer group again. See the Group/Ungroup Layers commands of the Layers menu for more information.
Smart Object Icon
You can click the smart object icon to embed the selected layers into a smart object. If a smart object has one ore more smart filters applied and you click this icon, then the Edit Smart Filters dialog appears.
Smart Filter Symbol
If a smart object has at least one smart filter applied, you can see a filter symbol at the right hand side of its layer item in the Layers panel. Click it to display the Edit Smart Filters dialog of ElementsXXL. There you can edit the smart filters.
Adjustment Layer Icon Menu
The new adjustment layers that were added to the Layer > New Adjustment Layer sub menu by ElementsXXL are also added to the menu of the adjustment layer icon.
ElementsXXL supports double clicking on the thumbnails of two types of layers in the Layer panel: adjustment layers that were added by ElementsXXL and smart objects that have one or more smart filters applied.
Double clicking the thumbnail of an adjustment layer that was added by ElementsXXL makes a dialog with the filter settings appear (just like it does for native adjustment layers added by Photoshop Elements itself). On this dialog you can change the settings of the adjustment layer as described on the Layer Menu page. This is the only way to edit ElementsXXL adjustment layers, because the "Edit Adjustment" item of the context menu does not work for them.
If you double click the thumbnail of a smart object, you can edit the content of the smart object. If the smart object has a raw file embedded, the Adobe Camera Raw dialog shows up and you can readjust its settings. If the smart object contains a normal image file, the contents of the smart object is opened as a new document. After editing, choose File > Save from the menu to commit the changes to the smart object and then close the document. Read the Edit Contents menu item for more information.