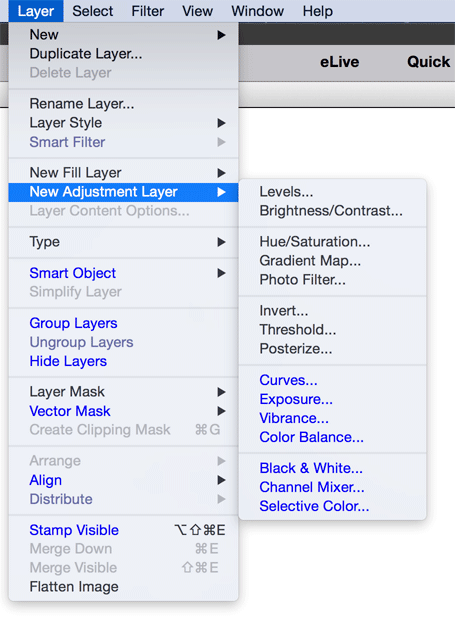
ElementsXXL adds 5 new sub menus and up to 42 menu items on 8 sub menus to the Layer Menu of Photoshop Elements.
Requirements: A smart object with an applied smart filter must be selected in the Layers panel
Smart filters allow readjusting their filter settings after they have been applied, so they make non-destructive image editing possible. On the other hand they can only be applied to smart objects. Read more about smart objects below.
The Smart Filter sub menu lets you edit the smart filters of a smart object. It is only accessible if at least one smart filter is applied to a smart object. To apply a smart filter to a smart object use the Filter menu.
Menu Items at the Top
The names of the smart filters that are applied to the current smart object are displayed at the top of this menu. By clicking the name of one of the filters, its dialog and blending options are displayed. So this is a fast way to change the settings of a smart filter.
The Edit Smart Filters dialog allows you to change the settings, blend mode and opacity of each smart filter that is applied to a smart object. Additionally you can enable, disable or delete each smart filter. You can experiment freely here, because you can undo everything again by pressing the Cancel button.
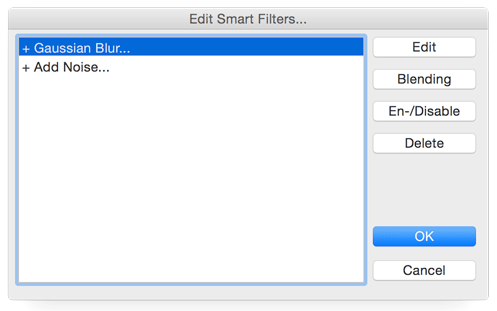
After selecting the smart filter that you want to edit from the list, you can use one of the four buttons at the right hand side. The Edit button displays the filter dialog for editing its settings again. The Blending button shows a dialog for adjusting the blend mode and opacity of the smart filter. En-/Disable disables an activated smart filter and enables a deactivated one. If a filter in the list has a minus sign in front of its name, it means that it is disabled. A plus sign indicates that the filter is enabled. The Delete button removes the selected smart filter. To apply the changes press OK. Cancel undoes all changes performed with this dialog.
Enable/Disable Smart
Filters
This item disables or enables all smart filters of a smart object.
Clear Smart Filters
This item deletes all smart filters of a smart object.
Requirements: An 8-bit/channel image needs to be opened.
ElementsXXL adds up to
seven
additional adjustment layers to the New Adjustment Layer sub menu: Curves,
Exposure, Vibrance, Black & White, Color
Balance, Channel Mixer and Selective Color. The
dialog is identical to the filter version of these adjustment layers, so please
read
the Enhance
Menu page for more information.
Filters are only applied to one layer whereas
adjustment layers affect all layers underneath them. Except, if they have
a clipping mask activated, they affect only the layer right below them.
Similar to smart filters the settings of adjustment layers can be readjusted. To do that please double click the thumbnail of the adjustment layer in the Layers panel.
Requirements: A text layer has to be selected in the Layers panel.
ElementsXXL adds several new features to the Type sub menu for influencing text layers.
Convert to Shape
This command converts a text layer to a shape layer. Text that was converted to a shape offers some creative freedom that is not possible with text layers. On the image below the Shape Selection tool was used to resize, rotate and reposition each letter individually.
On the other hand once
you converted a text layer to a shape, you cannot change the text contents anymore.
To
have a backup better duplicate the text layer before converting it to a shape.
Anti-Alias Off / Crisp / Sharp / Strong / Smooth
ElementsXXL adds three new text anti-aliasing methods. Anti-Alias Crisp replaces the original Anti-Alias On menu item, so it produces the same effect. The Sharp, Strong and Smooth methods produce a different degree of anti-aliasing, which makes the text look either sharper or smoother than the default Crisp setting.
Convert to Paragraph/Point Text
By default a text layer is set to point text, which means that the text area will expand when you enter more text. If you convert it to paragraph text, the text area will stay constant and not expand or shrink when changing the text. This is useful if you want to constrain a text layer to a certain area in an image.
Tracking
The Tracking dialog lets you adjust the distance between each letter of a text. Set the tracking to zero to have the default distance.
![]()
Requirements: An image needs to be opened.
A smart object is a special kind of layer that contains a document that is kept untouched. Thus a smart object can contain multiple layers and other information. All operations are applied to a flattened copy of the embedded document. Smart objects guarantee a non-destructive editing of image data as well as the use of smart filters.
This feature converts all selected layers into a single smart object. To embed a full image document you can also use the Open as Smart Object menu item from the File menu.
New Smart Object via
Copy
The "New Smart Object via Copy" menu item simply duplicates a smart object. You can also use the normal Duplicate Layer command instead.
The Edit Contents feature can also be triggered by double clicking the thumbnail of a smart object in the Layers panel.
If a raw file is embedded in the smart object, the Edit Contents command lets you readjust the Camera Raw settings of the raw file. When the Adobe Camera Raw dialog shows up, edit the settings and click the Open Image button to apply the changes.
If the smart object has no raw file embedded, the Edit Contents command opens the document that is embedded in the smart object for editing. To commit the changes to the smart object in the original document choose File > Save or press Cmd + S. If the smart object has smart filters applied to it, these filters are then rendered again.
If the smart object was created in Photoshop, the smart object will very likely have a .psb document embedded. As Photoshop Elements does not recognize this file extension, please do the following to make the smart object editable:
1. Use
the Export Contents command (see below)
to save the embedded .psb file,
2. Rename the file
extension of this file from .psb to .psd.
3. Use the
Replace Contents command (see below)
to embed the .psd file into the smart object.
4.
Try the Edit Contents command again.
Export Contents
If you want to save the contents of a smart object as a file, you can use this command. If the smart object was created in Photoshop, it is likely that it will be saved as a .psb file. Photoshop Elements does not support this file extension, so please rename its file extension to .psd to be able to open it again.
Replace Contents
Replace Contents enables you to replace the document that is embedded in the smart object while keeping the settings of the smart object including its smart filter untouched. Make sure that the new document has the same image size as the current one, otherwise it will be resized.
Supported by Photoshop
Elements 11-14, already built into Photoshop Elements 15 and higher
Requirements: One or more layers have to be selected.
The Group Layers command embeds the selected layer(s) into a layer group, which is displayed with a folder symbol in the Layers panel. Layer groups let you organize layers better and give you a better overview if you use a lot of layers. Another advantage of layer groups is that you can apply the same blend mode and opacity to all layers in a group. Even more, you can add a group mask in addition to the layer masks that each of the included layers may already use.
You can also click on the
layer group icon on the Layers panel to group (and ungroup again) the selected
layers.
Left: Multiple layers were selected for inclusion in a layer group. Right: The resulting layer group.
Unfortunately once the
layers are included in a layer group they cannot be edited anymore (which
is still possible in Photoshop) unless you ungroup them again. ElementsXXL
lets you store the properties of the last layer group (including its mask)
when
ungrouping
it, to avoid losing them. See the Ungroup Layers section below for
more information.
If the properties of an old layer group were saved, you will see the following message when trying to create a new layer group:
If you want to restore the properties of the old layer group, click "Yes". If you want to create a totally new layer group, click "No". In this case the properties of the old layer group will be lost. If you want to avoid that, click Cancel and recreate the old layer group before creating a second, totally new layer group.
Supported by Photoshop
Elements 11-14, already built into Photoshop Elements 15 and higher
Requirements: A layer group has to be selected.
If you want to edit the layers included in a layer group, you have to ungroup them with this command. Yo can also use the layer group icon on the Layers panel.
Ungrouping a layer group would normally mean that its properties are lost. If the layer group has no mask, then its name, blend mode and opacity are stored automatically - provided that you edited one of them. When creating a new layer group, you will be asked if you want to recreate the properties of the old layer group (as shown above).
If the group has a mask when ungrouping it, the above message will appear. Click Yes to store the mask and other properties of the layer group. Doing so will give you the option of restoring them again with the Group Layers menu command (see above). The main reason for this message is that the group mask is stored as a channel, which increases the document size. So you have the choice not to store it if you do not want to recreate a layer group.
Supported by Photoshop
Elements 11-14, already built into Photoshop Elements 15 and higher
Requirements: One or more layers have to be selected.
Normally you can only make single layers invisible or visible by clicking the eye symbol in the Layers panel. With the help of this menu item you can hide or show multiple layers that are selected in the Layers panel.
Requirements: A layer has to be selected.
Each layer can have a layer mask. A layer mask defines which areas of a layer are visible (opaque), partially visible (transparent) or invisible (fully transparent). Layer masks are basically grayscaled images and can be edited like them. White areas in the layer mask indicate full opacity whereas black area represent fully transparent areas. Gray mask areas mean partial transparency. Dark gray mask areas are more transparent that bright gray ones.
Layer masks are displayed as black & white thumbnails at the right hand side of the image thumbnail in the Layers panel. You can click their thumbnail to select them (which displays a colored frame around them) and start editing them instead of the layer image. You can modify a layer mask with all available tools and filters. To edit the layer image again click the image thumbnail.
From Transparency
The From Transparency command uses the transparency information of a layer (the so-called alpha channel) when creating a layer mask. The transparent layer areas will be black in the layer mask.
Requirements: A layer has to be selected in the Layers panel.
A vector mask is similar to a layer mask, but consists of vector graphics instead of normal image data. It also controls the transparency of a layer. A vector mask is resolution independent and can easily be scaled and transformed with the Shape Selection tool without getting pixelated. The downside is that you can only edit it with the shape tools and the commands from the Rotate and Transform sub menus of the Image menu. Even worse, it only offers fully opaque and transparent states and does not support partial transparency like a layer mask.
Vector masks are displayed as thumbnails at the right hand side of the image thumbnail in the Layers panel.
From Selection
Uses a selection to create the vector mask. The selected areas will also be visible and opaque whereas the other areas will be fully transparent.
From Shape
After creating a shape with the shape tool you can use this feature to create the vector mask from the shape. The shape area will be visible and opaque whereas the other areas will be fully transparent in the vector mask. The shape layer is removed when adding it as a vector mask to the layer underneath.
Delete
Removes the vector mask.
Rasterize
Transforms the vector mask into a normal layer mask, which is more flexible for certain tasks, but is resolution dependent.
Disable/Enable
Activates or deactivates the vector mask without removing it. You can do the same by holding down the Shift key and clicking on the vector mask thumbnail in the Layers panel.
Requirements: Either a selection has to be available or at least two layers have to be selected in the Layers panel
If a selection is present, the Align commands align a certain border of the selected layer(s) to the selection. If no selection is available, they aligns the bottom layer(s) to a certain border of the top layer. The items of this sub menu determine the border to which the layers are aligned.
You can find the same commands as icons on the tool options bar of the move tool.
Requirements: At least three layers have to be selected in the Layers panel
The Distribute commands distribute three or more layers equally by making sure that the same amount of space is between each layer. You can select in which direction the equal distribution is performed by choosing one of the items of this sub menu.
This feature work best with transparent image layers, which do not contain image data across the full width or height of the document. Otherwise there is no room for distributing the different layers.
You can find the same commands as icons on the tool options bar of the move tool.
Requirements: An image has to be opened
The Stamp Visible command adds a flattened version of all layers as a new layer on top of all layers. This is very useful if you want to apply a filter to the whole image while keeping all layers. It is an alternative to the Flatten Image command, which removes all layers.