Supported by Photoshop
Elements 13 and higher
Requirements: An image has to be opened.
Extended in ElementsXXL 4, extended in 5.0
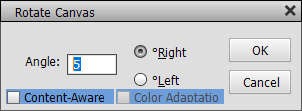
ElementsXXL adds Content-Aware and Color Adaptation check boxes to this dialog. The Content-Aware check box fills transparent or blank areas with image content after clicking OK. An activated Color Adaptation check box tells the content-aware algorithm to adjust colors in the process, so it only triggers a variation of the content-aware algorithm.
Supported by Photoshop
Elements 13 and higher
Requirements: An image has to be opened.
Extended in ElementsXXL 4, extended in 5.0
![]()
All of these menu items trigger the Transform tool. ElementsXXL adds Content-Aware and Color Adaptation check boxes to the Tool Options window of the Transform tool. The Content-Aware check box fills transparent or blank areas with image content after applying the tool. An activated Color Adaptation check box tells the content-aware algorithm to adjust colors in the process, so it only triggers a variation of the content-aware algorithm.
Supported by Photoshop
Elements 13 and higher
Requirements: An 16-bit image has to be opened.
Extended in ElementsXXL 4
Normally these five menu items can only be used with images with 8-bit per channel. ElementsXXL allows applying them to 16-bit images too.
Supported by Photoshop
Elements 13 and higher
Requirements: An 16-bit image has to be opened.
Extended in ElementsXXL 4, extended in 5.0
The non-content-aware version of these two menu items automatically straightens (and crops) images by detecting uneven lines. As a result the image will be rotated, which produces blank or transparent image areas. ElementsXXL adds content-aware versions of these two menu items, which automatically fill the blank or transparent areas with image content.
An dialog with a Color Adaptation check box is displayed by this command. The Color Adaptation check box makes the content-aware algorithm adjust colors if needed. Sometimes the result may look better with or without the check box activated.
Supported by Photoshop
Elements 11 to 2021, already built into Photoshop Elements 2022 and higher
Requirements: An image has to be opened.
Added in ElementsXXL 3.0, extended in 4.0, 5.0 and 8.0
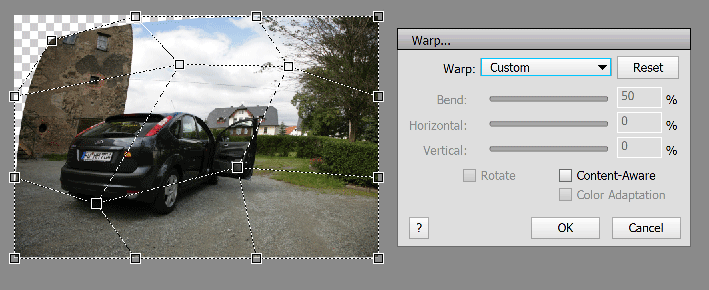
The Warp function offers 16 methods for bending an image. The Custom option displays a 16-point-grid over the image. By dragging each of the 16 handles, you can precisely define which areas of the image will be warped. If there are transparent layer areas or if a selection is available, the Warp tool displays its mesh around it/them and does not place it over the whole image as usual.
The 15 other warp option from the Warp combo box apply different warp shapes, which can be edited with the three sliders and a check box. The Bend slider changes the warp shape and the H and V sliders squeeze the ends of the warp shape horizontally and vertically. The Flip check box rotates the warp shape by 90 degrees thus switching between horizontal and vertical orientation. The Content-Aware check box fills transparent areas with image content after applying the Warp tool. An activated Color Adaptation check box tells the content-aware algorithm to adjust colors in the process, so it only triggers a variation of the content-aware algorithm.
Click the Reset button to start from scratch. It will switch the 16-point-grid to its original state and reset the sliders to their default values. Once you are finished click the OK button or press the Enter key. The Cancel button and the Esc key will undo the operation.
Supported by Photoshop
Elements 13 and higher
Requirements: An image has to be opened.
Added in ElementsXXL 3.0, extended in 4.0, 5.0 and 8.0
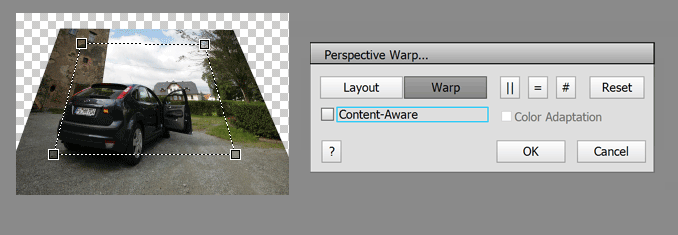
The Perspective Warp function lets you bend the image prospectively. This feature has two modes. First of all you draw a rectangle on the image, which activates Layout mode. Now use the four handles of the rectangle to modify the source rectangle. If the image is prospectively wrong, you should adjust the source rectangle to follow the tilted lines in the image. If the image has a correct perspective and you want to change that, best leave the source rectangle as it is.
To continue to Warp mode either hit the Enter key or click the Warp button on the Perspective Warp dialog. Now you will see the destination rectangle which is the same rectangle that you drew. If you move its four corner handles, you will immediately see the effect of the perspective warp feature. The three small buttons on the Perspective Warp dialog let you adjust the destination rectangle vertically, horizontally or both. The Reset button will undo your adjustments and lets you start again. The Content-Aware check box fills transparent areas with image content after applying the Perspective Warp tool. An activated Color Adaptation check box tells the content-aware algorithm to adjust colors in the process, so it only triggers a variation of the content-aware algorithm.
You can switch between Layout and Warp mode with the appropriate buttons any time and readjust both rectangles. To apply the effect hit the Enter key or click the OK button. Cancel it with the Cancel button or the Esc key.
Supported by Photoshop
Elements 11 and higher,
already available in Photoshop
Requirements: If only one layer is selected, all layers are automatically selected.
If you want to process only certain layers, please select them first in the
Layers panel.
Added in Version 1.0, enhanced in 12.0
The Auto-Align Layers function lets you align two or more very similar photos in order to combine them to one image. This is quite useful if you want to combine multiple shots of the same subject, e.g. a group of people, photos taken with different exposure or depth of field or if you want to create a panorama image from multiple shots.
Firstly, you need to place each photo on a different layer. Best use Open As Layers or Place Documents As Layers for this task. Then you select all layers in the Layers panel and run the Auto-Align Layers command. After the layers were aligned, you can use layer masks to only add the best parts of each layer to the final image.
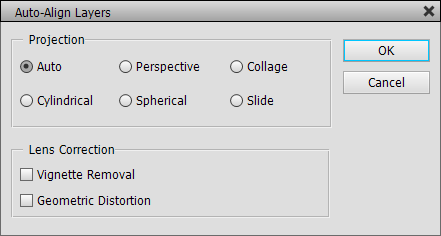
In the Auto-Align Layers dialog you can choose between different options for changing the projection of the images. The Auto option tries to find the best option for the corresponding image layers. It chooses between Perspective or Cylindrical projection. When creating a panorama it may choose the Perspective method, which is not always the best choice, so we recommend activating the Cylindrical option. For stacked images it is best to keep the Auto option.
The Perspective option chooses a layer as the reference image (usually the middle layer) and perspective stretches the other layers to match it. The Cylindrical option avoid the “bow-tie” distortion of the Perspective option by placing the layers on an unfolded cylinder. The Spherical option is meant for photos with wide fields of view, thus it spherically transforms the layers. The Collage option aligns the layers without changing the shape of the layers. Finally, Reposition makes sure that matching image contents overlap by simply repositioning the layers, so no transformation is applied.
An activated Vignette Removal check box tries to remove shadows at the corners of the layers. Geometric Distortion compensates barrel, pincushion or fisheye distortions.
Supported by Photoshop
Elements 11 and higher,
already available in Photoshop
Requirements: If only one layer is selected, all layers are automatically selected.
If you want to process only certain layers, please select them first in the
Layers panel.
Added in Version 1.0, enhanced in 12.0
The Auto-Blend Layers function enables you to put different images together in order to create either a panoramic scenery with seamless transitions or to increase the depth of field of macro or other types of photos. The individual photos have to be available as layers (Best use Open As Layers or Place Documents As Layers) and these layers have to be selected for this functionality to work.


The left and middle
image are two of eight photos that were combined
with the Stack Images feature to create the right image result.
If you are trying to blend panorama photos or want to combine macro shots taken
without a tripod it is advisable that you apply the Auto-Align Layers feature
beforehand in order to have the layers correctly positioned. Otherwise
the result may not be as expected.
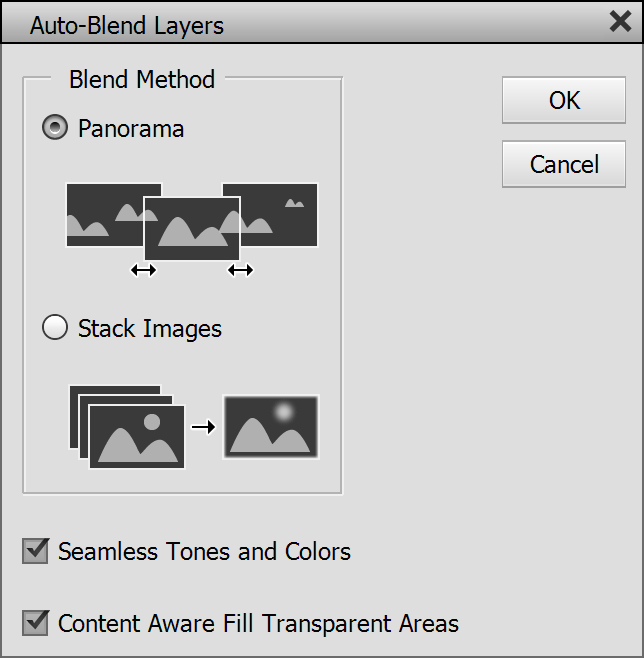
The Auto-Blend Layers dialog offers two blend methods to select. If you want to create a panorama images, activate the Panorama option. If you want to increase the depth of field, choose Stack Images.
An activated Seamless Tones and Colors checkbox grants smooth transitions and colors. The Content Aware Fill Transparent Areas check box fills any transparent areas with image content. This may work fine with little details at the borders, but look strange in other cases. It works similar to the Content-Aware Fill check box of the Remove Transparency feature.
Supported
by Photoshop CS2, CC, 2020 and higher
Supported
by Photoshop Elements 11 and higher
Requirements: One or two layers have to be selected
Added in ElementsXXL 7.0
Blend Pro is similar to the Fade Pro feature. Instead of blending the current layer and last history step like Fade Pro it blend two layers. If you want to blend a layer and the layer beneath it, you only have to select the top layer. If you want to blend two non-neighboring layers, you have to select both of them in the Layers panel.
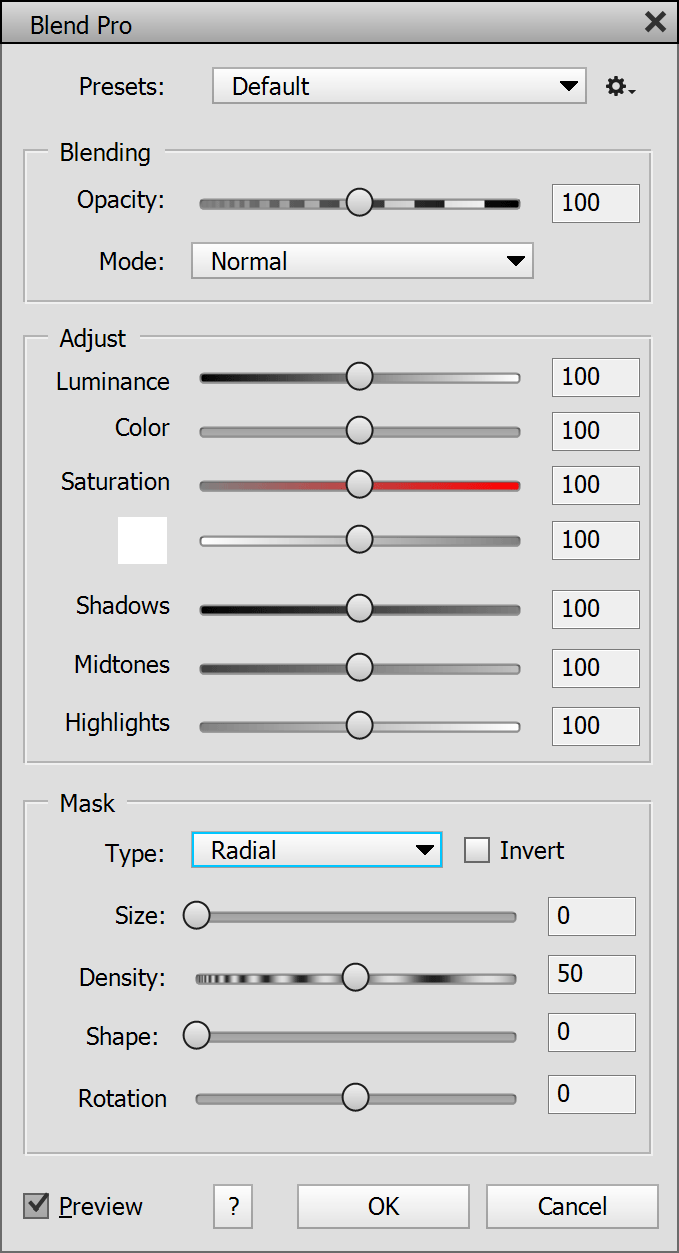
You can set the Opacity slider to below 100 to make the layer below shine through. If you increase the opacity above 100 up to 200% to increase the intensity of the blend effect.
New Blend Modes
The Mode combo box offers the standard blend modes of Photoshop Elements plus 39 new ones. Assuming that you know the standard blend modes here are some explanations of the new modes: The Subtract and Divide blend modes are also available in Photoshop and subtract and divide the pixel values of one layer from/by the other. Rather extreme effects, but useful for certain techniques.
The Exposure blend mode is not available in Photoshop and can be used to transform blur effects into sharpening and contrast enhancement effects. The image should be blurred for this purpose. Exposure 2 uses the luminosity channel only, so the result is less saturated and without potential color artifacts. Overexposure also adds a negative look but to the image of the bottom layer. In the case of a blurred image, it produces a negative edge look. Highpass produces a grayish result which looks similar to the Highpass filter if the top layer is blurred. Otherwise it produces a more visible negative effect than the Exposure modes. Reveal Shadows and Reveal Highlights make the the shadows or highlights of the top layer transparent if the opacity slider is below 100. The Opacity slider limits the shadow area that is used.
Soft Mood and Hard Mood are softer versions of the Soft Light and Hard Light blend modes. Reflect, Glow, Freeze and Heat are variations of the Color Dodge mode. Helow uses the Heat for the highlights and Glow for the shadows, Frect does the same with Freeze and Reflect, Gleat mixes Glow and Heat and Reeze combines Reflect and Freeze.
Color Burn 2 and Color Dodge 2 are variations of the original blend modes with a slightly different effect. Solarize, Equivalence and Negation produce color inversions. Soft Mix is a much softer versions of the Hard Mix blend mode. The two Penumbra modes are variations of the Hard Mix mode. The Red, Green, Blue, Cyan, Magenta and Yellow modes combine certain color channels of the top and bottom layers. XOR, AND, OR apply the corresponding binary operations. For photos you rather get a popart-esque result with them. The four Modulo blend modes produce similar exotic effects by using variations of the modulo operation.
Adjust Sliders
The sliders in the Quick group let you reduce the Luminance, Color and Saturation (like the blend modes of the same name) of the last applied pixel effect. You can also fade a certain color, which can be selected by clicking the color box left of the slider. Additionally the Shadows, Midtones and Highlights sliders fade the effect in these image areas. This is basically like applying 7 additional blend modes at the same time. You can also use a slider value above 100 for increasing the intensity of the previously applied effect.
Mask Controls
The Type combo offers Tonal, Linear and Circular masking features. Tonal lets you choose a tonal range via the slider knobs below the histogram, which will not be blended. The Smoothness slider blurs the edges of this tonal area for smooth transitions. The Invert check box uses the inverse of the selected tonal range.
The Linear and Radial options use a linear or circular gradient for gradually fading certain image areas. The Offset slider shrinks or expands the linear gradient and moves it towards the top or bottom of the image thus making the gradient cover less or more of the image. For the Circular option the slider moves the circular gradient towards the corners of the image. The Density slider controls the softness of the gradient edge. A low slider value will produce a hard edge between the unmodified image areas and the gradient and a high value will result in a soft transition. For the Circular option you have an additional Elliptical slider, which transforms the gradient from a circular to an elliptical one. Finally, the Rotation slider rotates the gradient. It has no effect on circular gradients, only on linear and elliptical ones.
The Invert check box makes the gradient cover the parts of the image that it did not cover before. A linear gradient then runs from bottom to top instead of top to bottom and a circular one covers the center of the image instead of the corners.
Supported by Photoshop
Elements 11 and higher
Requirements: The image has to contain a colored frame or a layer with transparent
pixels.
Added in ElementsXXL 1.0
The Trim menu item allows you to cut away the colored or transparent areas at the borders of the image. This is useful if you scanned a photo and want to remove extraneous areas.
The Trim dialog box lets you select three options that the trimming is based on. You can either trim away transparent pixels on a layer or pixels of a certain color. The color can be picked up from the top left or bottom right corner. The four check boxes determine, where the empty areas are to be trimmed.
Supported by Photoshop
Elements 11 and higher
Requirements: An image has to be opened.
Extended in ElementsXXL 5.0
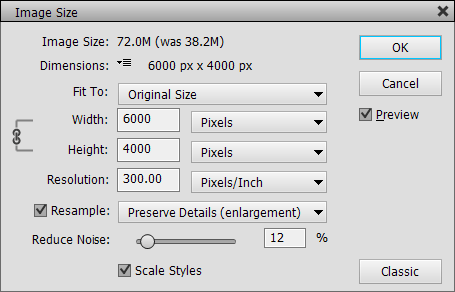
ElementsXXL replaces the Image Size dialog of Photoshop Elements with a dialog of its own which looks and works like the one from Photoshop CC. This dialog also makes new resampling options available and is more straight-forward to use. If you nevertheless prefer the original dialog, you can access it via the Classic button or activate the Image Size check box under Edit > Preferences > ElementsXXL > Classic.
The Image Size label shows how much RAM the new image will occupy in contrast to the current RAM size. The Dimensions label displays the final image size. Its menu icon lets you choose between various units from pixels, percent, inches, centimeters, millimeters to more exotic units like points, pica and columns. The selected unit will be used to display the image site.
The Fit To combo box offers various image size presets as well as option to load, save and delete your own image size presets. There is also an Auto-Resolution option which displays a dialog.
The Width, Height and Resolution text boxes let you enter the final image size and resolution. At the right hand side of the text boxes are combo boxes for switching to other units like percent, inches etc. If the Resample check box is activated, the actual pixel dimensions of the image will be changed. If it is deactivated, only the resolution value is changed, but the pixel dimension remain the same.
With an activated Resample check box you can see a bracket sign at the left hand side of the Width and Height text boxes, which means that the image proportions remain the same and the width or height are automatically adjusted accordingly. If you click on the knot symbol of the bracket, you can make the bracket disappear thus making the width and height independent of each other. Now the image proportions are not protected anymore. If the Resample check box is deactivated the bracket will span the Width, Height and Resolution text boxes, which indicates that they dependent on each other. If you enter a value in one of the three text boxes, the other two are adjusted accordingly.
The Resample combo box at the right hand side of the Resample check box offers various resampling methods, also called interpolation algorithms. The Automatic option automatically choose the best method for the current settings. There are two methods specifically meant for enlargements, one meant for image size reductions and three methods that work fine for either. The Preserve Details options only works in Photoshop Elements 13 and higher and is meant for big enlargements, e.g. 400% and higher, and also offers a Reduce Noise option that avoids that noise pixel become visible when enlarging the image. It also works fine for reducing the image size. This feature only works in Photoshop Elements 13 and higher. Otherwise the Bicubic option is used.
The Bicubic Smooth option produces smooth gradients for enlargements, but also blurs smaller details. Bicubic Sharper sharpens the image after changing the image size which works best for reducing the image size. If you prefer to apply the sharpening yourself, better use the Bicubic option.The Bicubic option is the best all-purpose method and works fine for reductions as well as image enlargements up to 400%. We do not recommend using the Bilinear option for photos, because it is less effective than Bicubic. It may have its uses for computer graphics. The Nearest Neighbor method produces a very coarse result, so better only use it if you really want to produce a pixelation effect via image enlargement.
If your document contains layers with layer styles, keep the Scale Styles check box activated, otherwise the style effect will not be resized and appear too small or too big.
Supported by Photoshop
Elements 13 and higher
Requirements: An image has to be opened.
Extended in ElementsXXL 4
and 5.0
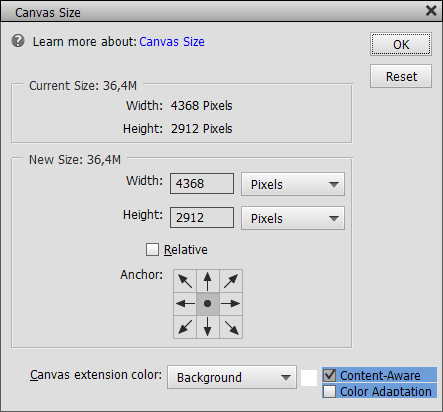
The Canvas Size dialog allows increasing or decreasing the image dimensions without altering existing image pixels. It only adds or crops a certain amount of pixels to/from the image. ElementsXXL adds Content-Aware and Color Adaptation check boxes to this dialog. The Content-Aware check box fills transparent areas with image content after clicking OK. An activated Color Adaptation check box tells the content-aware algorithm to adjust colors in the process, so it only triggers a variation of the content-aware algorithm.
Supported by Photoshop
CS2, CC, 2020 and higher
Supported by Photoshop
Elements 11 and higher
Requirements: An image has to be opened
Added in ElementsXXL 4.0, extended in ElementsXXL 5.0
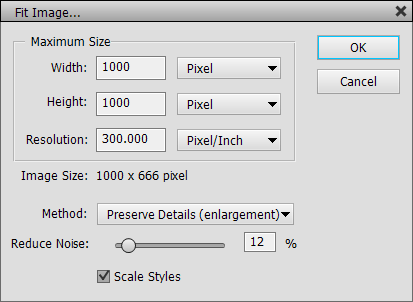
The Fit Image dialog lets you resize an image and change its dpi setting. Unlike the Image Size dialog you only define a maximum size here, which will be used as the bounding rectangle in which the image will be fit. This has the advantage that you do not need to calculate the actual image size yourself, e.g. if you want to place an image into an empty space in another document or if you want multiple image with different proportions to have similar image dimensions.
Please enter the maximum
width, height and resolution in the appropriate text boxes. The combo boxes
at their right-hand side let you switch between various units, e.g. pixel, inch,
cm, megapixel or pixel per inch or pixel per cm. If you choose Megapixel, you
can only enter one instead of two values for the width and height. The width
and height will then be calculated according to the proportions of the current
image.
The final width and height in pixels is displayed in the Image Size
label below the three text boxes. The Method combo box
lets you choose between seven methods for resampling the image. Automatic is
the recommended choice. The Preserve Details option enables the Reduce Noise
slider, which determines how much noise is reduced while resizing the image.
It only works in Photoshop Elements 13 and higher.
Otherwise the Bicubic option is used.
The Scale Styles check box decides if layer effects (also called style settings) will be scaled too.
Supported by Photoshop
Elements 11, already built into Photoshop Elements 12 and higher
Requirements: A layer has to be selected
Added in ElementsXXL 4.0
The Reveal All command make hidden layer areas visible again. These layer areas moved outside the image borders, e.g. with Canvas Size, Scale, Rotate, Transform, Crop or similar features.
Supported by Photoshop
Elements 13 and higher
Requirements: An image has to be opened
Added in ElementsXXL 7.0
When cropping the image with deactivated "Delete Cropped Pixels" check box or when reducing the canvas size of the document, the pixels outside the document borders are not deleted and only hidden. The Reveal All menu item on the Resize sub menu increases the image width and height to make the pixels outside the image border visible again. The Delete Hidden Pixels on the other hand removes these pixels and reduces the document size. This also avoids making hidden pixels visible, which may not what you want, if you plan to enlarge the canvas size.
Supported by Photoshop
Elements 11 and higher
Requirements: Requires a 16-bit image
Added in ElementsXXL 2.0, extended in 4.0 and 5.0
The Render commands enable you to process an image with 16 bits per channel with the help of smart filters, adjustment layers and other layer types. Photoshop Elements normally does not support smart filters and layers for 16-bit images, but ElementsXXL makes it possible by working in 8-bit mode and later rendering the special 8-bit document to a 16-bit image.
There is also a Render menu
button on the control bar for accessing all Render commands quickly.
Prepare 8-bit Document
 |
 |
|
| The original 16-bit document | The prepared 8-bit document with a smart object that has the 16-bit data embedded |
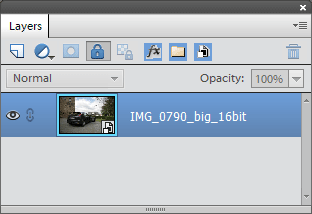
The Prepare 8-bit Document command converts a 16-bit image into a 8-bit document with a smart object that contains the 16-bit image data. The path of the original file is added in brackets to the layer name of the smart object, which is required by the "Render 16-bit to Lightroom" command. This smart object can later be used to recreate the original 16-bit image. So make sure that you do not rename, delete, simplify or rasterize this smart object, otherwise rendering to 16-bit will not work. You can also save the prepared document in PSD or TIFF format and render it to 16-bit at a later time.
In previous ElementsXXL versions the 16-bit data was split into two layers. The new smart object method makes the document is easier to handle, preserves the meta data and allows editing the 16-bit image data anytime (without rendering back to 16-bit via the "Render 16-bit Document" command). The old "format" with the two Image Base layers is still supported, so you can still render such files.
After your prepared the document you can add smart filters, adjustment layers, other types of layers and smart objects to it. We recommend that you use the other menu items for adding smart filters and adjustment layers, because not all of them support 16-bit images, so they will not applied when rendering to 16-bit. The Add Smart Filter and Add Adjustment Layer menu items make sure that you only use supported ones.
Add Smart Filter
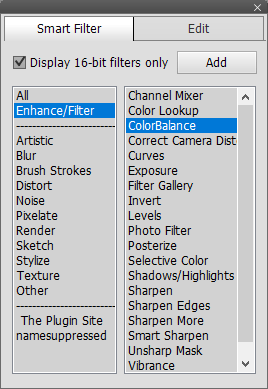
The Add Smart Filter command displays the Smart Filter panel that lists all usable smart filters. The "Display 16-bit filters only" check box is automatically activated to make sure that only smart filters that support images with 16-bit per channel are displayed. Please keep it activated to make sure that the smart filters are really applied when using the Render 16-bit Document command later. The left list box shows the filter groups, which you know as sub menus from the menu bar. The All group contains all available filters in the right list box whereas the other groups only display their own filters.
To apply a smart filter double click it in the right list box or select it and click the Add button. As a result the filter dialog appears. After adding smart filters you can immediately edit them again by clicking on the Edit tab button at the top. For more information see the Window Menu page.
When you are finished you can either close the panel with the cross icon at the top right or keep the panel open as you prefer.
Add 16-bit Layer
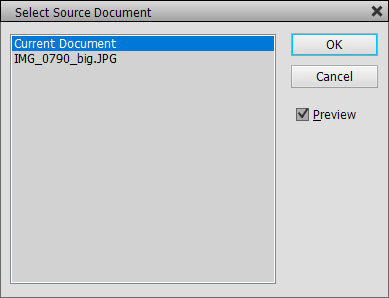
The Add 16-bit Layer command lets you choose another 16-bit document or open a 16-bit image file (e.g. TIFF, PSD, PNG or Camera Raw), which will be added as a smart object to the document.
If no other 16-bit document is open, a file dialog for opening a 16-bit image file appears. Otherwise a Select Source Document dialog shows up. If you choose the "Add Layer from File" list item on this dialog and click the OK button, a file dialog appears. Alternatively select one of the document names in the list box. If the Preview check box is active when you select another document, then the selected document is automatically displayed. This way you can be sure to select the right document in case you do not remember its file name or title.
Alternatively you can also
use the File > Place or File > Place
Linked menu items, which also embeds a 16-bit image file in a new smart
object, provided this feature was not deactivated in the ElementsXXL Preferences.
The newly created smart object will have the 16-bit image data embedded. This
way you can emulate 16-bit layers via smart objects and make sure that the final
rendered image will contain true 16-bit data. You can now adjust the opacity
or blend mode, add a layer mask, apply smart filters and do many other things
with it. To edit the embedded 16-bit image data itself, double click on the
thumbnail in the Layers panel. Just make sure that you do not simplify, rasterize
or otherwise convert the image data of the smart object to 8-bit.
Add Adjustment Layer
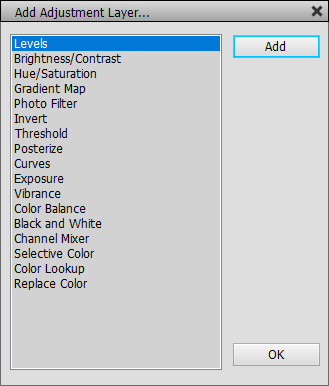
The Add Adjustment Layer dialog lets you apply all adjustment layers that are supported for 16-bit rendering. Double click a list item or select one and click the Add button to apply it. As a result the dialog of the adjustment layer will appear. After you applied all adjustment layers click the OK button.
You can edit the adjustment layers any time by double clicking their thumbnail in the Layer panel. You can also edit their blend mode, opacity and layer mask there.
Color fill, gradient fill and pattern fill adjustment layers are supported, but only applied as rasterized image data and not rendered via filters to the 16-bit image. That is why they are not included in this dialog.
Add Dodge/Burn Layer
This menu item creates a special type of layer that is meant for dodge and burn operations with the dodge and burn tools. When choosing this menu item the dodge tool is automatically activated. You can switch to the burn tool on the Tool Options bar or by pressing the O key. Now brush over the image to selectively brighten or darken certain image areas.
You can also add a layer mask to this layer or change its blending mode to Soft Light or Hard Light for softer or hard effects. To vary the intensity of the effect either change the layer opacity or adjust the Exposure slider on the Tool Options bar.
When rendering the 16-bit document, the dodge/burn layer is blended with the 16-bit image. Although the layer itself is 8-bit, the blending makes sure that the result is still be 16-bit.
Add Tool Layer
The Add Tool Layer command simply adds an empty layer and displays some instructions. Alternatively you can also create such a layer by clicking on the New Layer icon of the Layers panel or use the Layer > New > Layer menu command.
You can use various tools on this empty layer. In some cases you have to activate the Sample All Layers check box on the Tool Options bar. Here is a list of tool that can be used:
It is a good idea to create more than one tool layer if you use multiple tools.
When the document is rendered to 16-bit, tool layers usually add 8-bit data to the 16-bit image. Only if the layer opacity or tool opacity is less than 100% and the blending mode is not Normal, then the 8-bit data is blended and produces true 16-bit image data. If the image data on a tool layer is fully opaque, it is added with 8-bit depth to the rendered 16-bit image.
Adding other layers
Apart from the options of the Render menu you can also add other types of layers to the document. For example, you can add a text layer with the text tool, a shape layer with the shape tool and add a layer with the smart brush tool.
Check Bit Depth
The Check Bit Depth command displays the number of tonal values and bits per channel that the currently selected layer contains. If you apply this command to an 16-bit image or a smart object, you can investigate if it contains true 16-bit data or not.
If the "Actual bits/channel" value is 12.0 or higher, you can be sure that the image is a true 16-bit image or that the selected smart object contains true 16-bit image data. If the displayed value is below 12.0, the image may have been upsampled from 8-bit and may not contain true 16-bit data. If the value is 8.0 or lower, you can be 100% sure that the image was upsampled. Please note that the maximum displayed values are 32768 and 15.0, because Photoshop and Photoshop Elements always cut off the 16th bit for performance reasons.
You can also make use of this function after rendering the 16-bit image. This way you can be sure, that the bit depth was not impaired by the rendering.
Render 16-bit Document
The Render 16-bit Document command produces a 16-bit image from the prepared 8-bit document. Supported adjustment layers and smart filters as well as smart objects with embedded 16-bit image data are rendered with 16-bit precision. Normal image layers may add 8-bit data if they are fully opaque and use a Normal blend mode. A text or shape layer means no problem, but opaque areas that were covered e.g. by the healing brush or clone stamp may loose their 16-bit depth. To avoid that you could set the layer opacity between 90 to 99% or choose another blend mode than Normal.
When triggering the Render 16-bit Document command ElementsXXL recreates the original 16-bit image from the bottom smart object and applies the other smart objects, smart filters, adjustment layer and image layers of the 8-bit document to it. A progress window is displayed in the top left corner, which indicates which layer is currently processed and the percentage of the completed work.
Rendering the 16-bit document can take several seconds depending on how big the image is and how many smart filters and layers have to be applied. The result is a new 16-bit document with one background layer. In the History panel you can see which filters and other operations were applied to it to reproduce the look of the 8-bit document.
If the look of the rendered 16-bit image differs from the look of the 8-bit document, please check if you did not apply an adjustment layer that is not supported or a smart filter that does not support 16-bit images. You may also get one ore more message if there is something wrong with the prepared 8-bit document.
Render 16-bit to
Lightroom
The Render 16-bit to Lightroom command works similar to the Render 16-bit Document described above. Except that it does not display the newly rendered 16-bit document in Photoshop Elements, but instead overwrites the original file provided by Lightroom. If this file cannot be found, a file dialog is displayed, which lets you select it or another file. Please only use this command if you previously opened a file from Lightroom in Photoshop Elements. If Lightroom is not running, this command does not work.
By activating the check boxes from the Lightroom Options command you can additionally make the Render 16-bit to Lightroom command automatically save the prepared document, close it and switch to Lightroom.
Lightroom Options
The Lightroom Options command lets the "Render 16-bit to Lightroom" command perform three additional automatic tasks: saving the prepared document, closing the prepared document and switching to Lightroom. These options are displayed as check boxes in the Lightroom section of the ElementsXXL Preferences dialog.
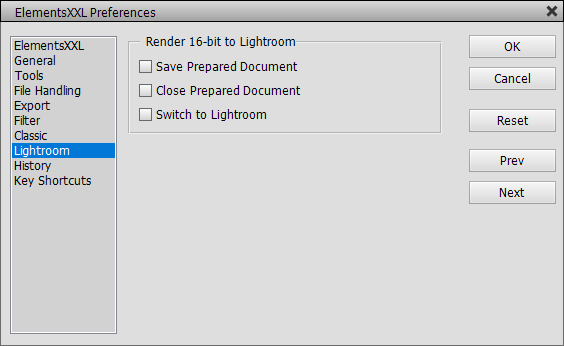
The "Save Prepared Document" check box automatically saves the prepared document. If you did not save it before using the Render 16-bit to Lightroom command, the prepared document will be saved as a PSD file in the same folder as the original file with a "_render" suffix added to the file name. If you already saved it to to another folder, it will be updated there if necessary. In rare cases when a save folder cannot be determined, a file dialog will show up.
The "Close Prepared Document" check box closes the prepared document. If you activated this check box without the "Save Prepared Document" check box, you will loose the prepared document if you did not manually save it.
The "Switch to Lightroom" check box automatically switches to the Lightroom window, where you can see the rendered result. This saves you a click on the task bar.
Supported by Photoshop
Elements 11 and higher
Requirements: An image needs to be opened. For blending two images you need
to open two images with the same dimensions and mode.
Added in ElementsXXL 1.0, extended in 2.0, 4.0 and 5.0
The Apply Image menu item allows blending a channel with a layer or layer mask. It enables the user to easily create collage and layer effects as well as produce or modify masks. If a layer thumbnail is selected in the Layers panel, a channel (or the merged channels) is applied to the selected target layer with the help of certain blending and mask settings. If you select a layer mask in the Layers panel, the layer mask is modified. If the filter mask of a smart object is selected, then the filter mask will be changed.
If at least two image with the same dimensions and image mode are open in Photoshop Elements, the Select Source Document dialog will appear. Here you can choose another document as the source for the actual blending operation. If you keep "Current Document" selected here, you will only be able to use a layers from the active document. If the Preview check box is active and you select another document, then the selected document is automatically displayed. This way you can be sure to select the right document in case you do not remember its file name or title. After clicking OK the main Apply Image dialog appears.
To carry out the Apply Image feature choose a source layer from the Source combo box and a channel from the Layer combo box. Unfortunately the Selection combo box has no functionality (because it is a remnant of Photoshop's Apply Image feature), so please ignore it. An activated Invert check box inverts the selection.
You can then define the blend mode, opacity and mask that will be used when applying the source channel. When the Mask check box is activated, you can see more options for selecting a layer and channel, which will then be used as a mask. The appearing Channel combo box is another Photoshop remnant and can be ignored. Additionally the Preserve Transparency check box keeps the transparency of the target layer untouched.
Supported by Photoshop
Elements 11 and higher
Requirements: An image needs to be opened, but multiple images can be used.
Added in ElementsXXL 4.0
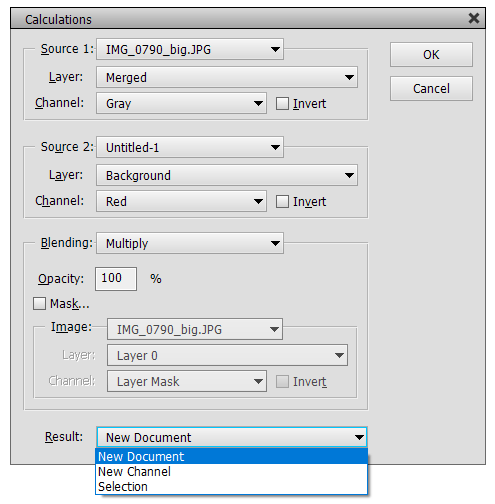
The Calculations menu item lets you create a new document, channel or selection by combining two channels and, if required, one mask. It is a convenient way to create a black & white variation of the current image, achieve a double-exposured black & white effect or produce a channel or selection for masking. Without it a lot of tedious operations would be necessary to achieve a similar result.
In the Source 1/2 combo boxes you can select one of the currently opened documents. If you select different documents, make sure they have the same size, otherwise the smaller image will be center aligned and does not fully cover the new document or channel. Under Layer you can select one of the layers of the document or the background. Under Channel you choose the red, green or blue channel or a "Gray" option, which is a combination of all RGB channels or the gray channel of grayscaled images. If you select a layer, you also get a Transparency option, which is the alpha channel of the layer. If the layer has a layer mask, there is a "Layer Mask" option. Finally, if the layer is a smart object with a smart filter applied to it, you can also choose its filter mask. The Invert check box inverts the tones of the channel and produces a negative version of it.
The channels selected under Source 1 and 2 will be blended with the blend mode of the Blending combo box and the Opacity value below it. If you activate the Mask check box, you can additionally choose a third channel, which will be used as a mask when blending the two channels. The Invert check box creates a negative version of the mask.
The Result combo box determines if the combined channels will be placed in a new document, added as a new channel to the current document or made available as a selection in the current document. If you decide to create a new channel, you can use the Select > Load Selection menu item to produce a selection of it or you can use ElementsXXL's Channels panel to work with it.
Supported by Photoshop
Elements 11 and higher
Requirements: An image with 8-bits per channel.
Added in ElementsXXL 1.0, improved in 2.0 and 3.0
Normally Photoshop Elements only supports converting images from 16-bit to 8-bit per channel. ElementsXXL adds this feature to the Mode sub menu to also let you convert 8-bit to 16-bit images. Please note that Photoshop Elements does not support layers for 16-bit images, so all layers will be flattened when doing this conversion. The selection is retained by the conversion.
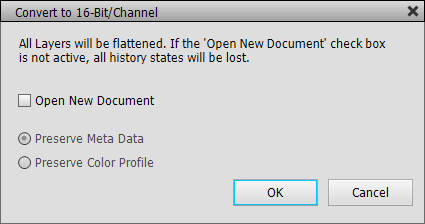
After triggering this command you will see a dialog with three options. The Open New Document check box opens a new window when converting the image to 16 bits per channel and retains the original 8-bit document with all layers and history states. Otherwise you lose them.
If an image does not use the sRGB or Adobe RGB color profile, you have to choose if you rather want to preserve the meta data or the color profile of the image during the 16-bit conversion. Then the Preserve Meta Data and Preserve Color Profile radio buttons will be enabled. If both options are disabled, both the meta data and color profile will be preserved.
Supported by Photoshop
Elements 11 and higher
Requirements: An image has to be opened.
Added in ElementsXXL 3.0
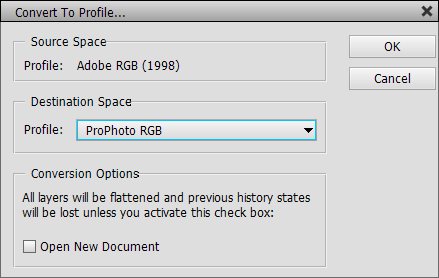
The Convert To Profile function lets you convert the image from the current color profile (shown under Source Space) to another profile, which is selectable under "Destination Space". As a result the image will use the new color profile while still looking (more or less) the same. This feature is useful if you want to display or print an image on a device that uses a different color space.
This conversion flattens all layers and makes previous history states inaccessible. To avoid that you have to apply this operation right after opening an image, which is highly recommended. Alternatively you can activate the "Open New Document" check box. Then the image will be duplicated and the profile conversion will be performed on the new document.
Supported by Photoshop
Elements 11 and higher
Requirements: An image has to be opened.
Added in ElementsXXL 3.0, accelerated in ElementsXXL 5.0
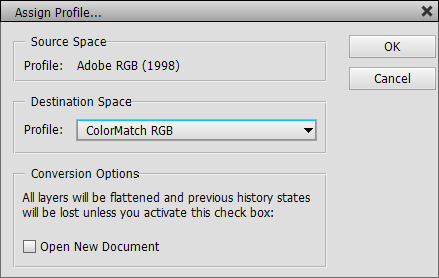
The Assign Profile function assigns a new color profile as selected under "Destination Space" to the current images. While the "Convert To Profile" command changes the pixel values to keep the look of the image (more or less) the same, the Assign Profile command keeps the pixel values unchanged, which results in a changed image look because of the new color profile. So Assign Profile has two main areas of application: You can use it to add a color profile to an image that is missing one or you can abuse it for color effects.
This command flattens all layers and makes previous history states inaccessible. To avoid that you have to apply this operation right after opening an image, which is highly recommended. Alternatively you can activate the "Open New Document" check box. Then the image will be duplicated and the profile assignment will be performed on the new document.
Supported by Photoshop
Elements 11 and higher
Requirements: The image has to be in RGB mode.
Added in ElementsXXL 1.0
Each image consists of three color channels: Red, Green and Blue. The Channels sub menu lets you view and edit the different color channels according to your preferences. Once having selected a certain channel, you can apply all tools and filters to it.
The RGB menu item, which is the default setting, selects and displays all three color channels. The Red, Green, Blue, Red + Green, Red + Blue and Green + Blue menu items let you view and select the different color channels and channel combinations. If you want to edit all three channels again, please choose the RGB item. The Show All menu item shows all channels, even if only one or two of them are selected for editing.
A more advanced alternative to the Channels sub menu is the Channels panel, which can be displayed from the Window > Channels menu.
Supported
by Photoshop CS2, CC, 2020 and higher
Supported by Photoshop
Elements 11 and higher
Requirements: An image needs to be opened.
Added in ElementsXXL 3.0, extended in 4.0 and 7.0
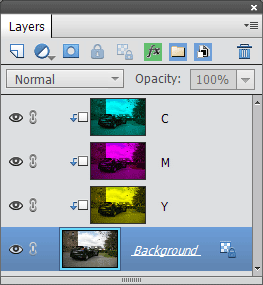
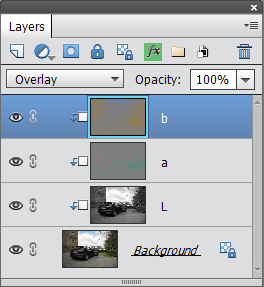
The Split Layer sub menu offers menu items for splitting the current layer into various "channels". These "channels" will be added as new layers on top of the current layer and are linked to it with clipping masks. So adjusting these new layers will only affect the original layer. With the help of these new layers you can change the look of the original layer. After selecting a layer you can apply a filter or use a tool on it.
You can split a layer into RGB, CMY, CMYK, Lab, HSL, YCbCr, Luminosity & Color and two types of Frequency separation layers. The RGB, CMY and CMYK options are nice for colorizing effects. The Lab, YCbCr and Luminosity & Color options are useful for sharpening and noise reduction. The HSL layers are meant to selectively adjust the hue, saturation and lightness. Finally, the the Frequency separation layers are great for portrait retouching.
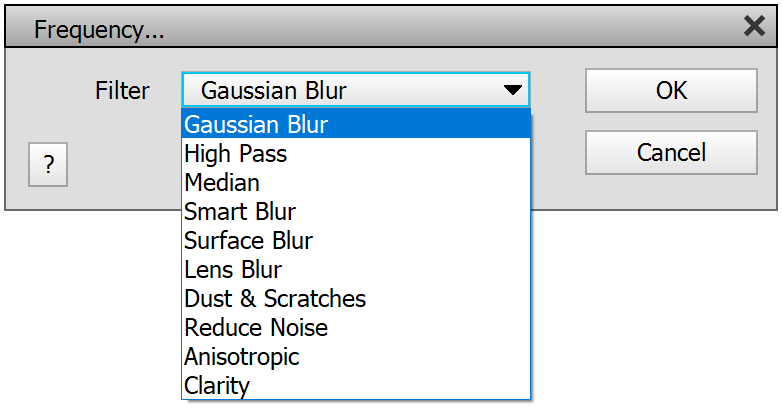
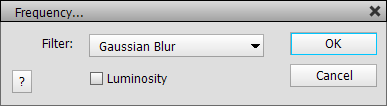
When you select the Frequency menu item you will see a dialog with two options. The Filter combo box offers 10 different filters for performing the frequency separation from Gaussian Blur to Clarity. Each of these filters produce an individual separation effect, which also results in a different look e.g. when retouching a portrait. An activated Luminosity check box applies the frequency separation to the luminosity channel, which can avoid color problems. After clicking OK you will see the dialog of the chosen filter for selecting parameters in case the filter offers any parameters. Check out the Retouching a portrait tutorial for more instructions.
After you are finished with your adjustments, you can remove the split layers by selecting them as well as the original layer and choosing Layer > Merge Down.
Supported
by Photoshop CS2, CC, 2020 and higher
Supported by Photoshop
Elements 11 and higher
Requirements: An RGB image
has to be opened
Added in ElementsXXL 4.0
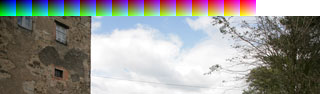
This menu item expands the image canvas and adds a lookup pattern at the top left corner of the image. No image pixels are overwritten this way. This lookup pattern is only necessary if you want to use a 16-bit image (e.g. for more precise color values) or want to capture the effect of a filter. A lookup pattern is not needed if you use a 8-bit image and only add adjustment layers for producing an effect.
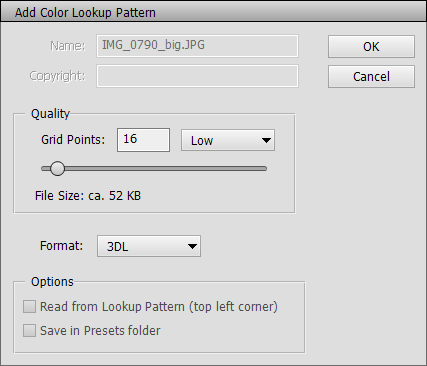
You have to choose a grid point value and a lookup format with the appropriate controls. The higher the grid point value, the more colors will be sampled, which results in a better quality but the larger the lookup file will be. We recommend values between 16 (4096 colors, 50-100K file size) and 32 (32768 colors, 400-800K file size). The 3DL format produces file sizes that are half as large as CUBE or CSP.
After you added the lookup pattern by clicking the OK button, you can apply filters to the image thus producing a desirable effect. This effect can be saved as a lookup file with the File > Save > Color Lookup Table command and applied to any image with the Color Lookup filter or adjustment layer.
Please note: The grid point value and format have to be the same on the Add Color Lookup Pattern dialog and the Color Lookup Table dialog, otherwise the produced lookup file will contain nonsense values that do not reproduce the effect.
Supported
by Photoshop CS2, CC, 2020 and higher
Supported by Photoshop
Elements 11 and higher
Requirements: An 8-bit
image has to be opened
Added in ElementsXXL
6.0
The Replace Background dialog provides instructions and tools that are needed for cutting out an object (e.g. a person) from one photo and adding a new background (e.g. from another photo). It also does a lot of things automatically in the background as you proceed from one step to another. This saves you a lot of time and manual work. For a step by step example about fine hair masking see here.
The dialog offers up to 8 steps which should be executed in this order by clicking one or more of the buttons below each step. Going back to a previous steps or jumping ahead to one of the next steps should cause no problems though. If you want to cut out an object with a clearly defined shape, you should activate the Hard Edges tab sheet. If you like to cut out a person with protruding fine hair, you should switch to the Fine Hair tab sheet. Depending on your choice some steps or tools are disabled. But you can switch between both tab sheets anytime.
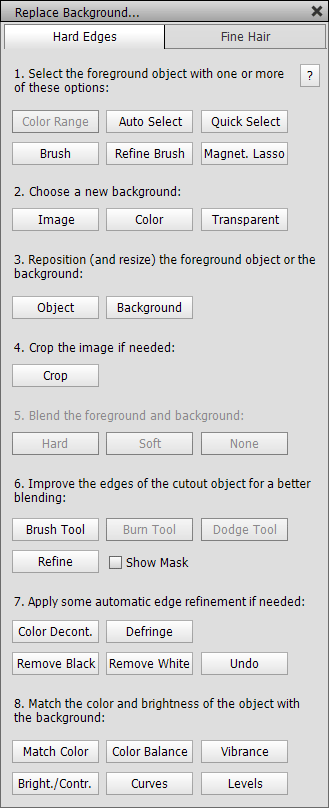
Step 1 offers tools for cutting out the object. For fine hair you can only use the Color Range dialog whereas for hard edges you can choose between five tools. The result should be a precise selection around the object.
In step 2 you can choose an image from a file dialog or a plain color, which will replace the old background outside the selection. If you choose the Transparent option you will see a checkerboard pattern, which indicates a transparent background. You can then add another background later manually. This step turns the selection of step 1 into a layer mask.
Step 3 lets you click on the Object or Background button for selecting one of these two layers. Additionally the Move tool is automatically activated, which can be used for repositioning and scaling. Step 4 lets you activate the Crop tool and crop away unnecessary or blank areas, which may have been produced by repositioning and scaling.
For fine hair you can use step 5 to blend the fine hair with the background. This works almost magically and makes it look as if the fine hair was really a part of the background. This steps places the background layer above the object layer and moves the layer mask to the background layer.
For hard edges you can use the brush tool to enhance the edge masking in step 6. For fine hair you should only use the burn or dodge tools with their Range option set to Shadows or Highlights. This makes sure that the fine hair structure is preserved while you enhance its edges. The Refine dialog offers some more features for fine-tuning the edges if needed.
Step 7 offers some automatic edge enhancement option in case you are not satisfied with the result of the previous step. All of these steps remove or blend 1-2 pixel large seams around the object. In case these features overdid it and you do not like the result, you can click the Undo button. Please also notice that these steps remove the layer mask (which was created after step 1) and make the object layer transparent. In case you want to keep a layer mask, you should skip this step.
In step 8 you can finally adjust the color, brightness and contrast of the object to the background. The Match Color dialog lets you do that semi-automatically whereas the other options offer a great deal of manual control.
After you went through these steps you can close the dialog and can make some more manual adjustments on your own if you want. Please reopen the Replace Background dialog again for every new background composition to make sure that it correctly readjusts itself to a new image.
For further instruction on the ElementsXXL tools on this dialog see here: Color Range, Color Decont., Defringe, Remove Black, Remove White, Match Color, Color Balance, Vibrance, Curves.
Supported
by Photoshop Elements 11 and higher, Photoshop CS3 and higher
Requirements: At least one layer has to be available
Added
in Version 2.0
The Remove Transparency command is meant to remove the transparent areas that are created by the Auto-Align Layers command. It takes the transparent areas of all layers in the current document including their layer masks and vector masks into account.
Remove Transparency either crops the transparent areas of all layers or fills a new layer with image content that hides the transparent areas. However, filling only works in Photoshop CS5 as well as Photoshop Elements 13 and higher.
If you use Remove Transparency for cropping the image, it spares you the work of manual cropping with the crop tool, which often requires multiple cropping steps, because transparent areas of one layer may be hidden behind other layers. Unlike the Trim command of Photoshop and ElementsXXL it removes not only rectangular areas but all transparent areas including irregular ones. If you use Remove Transparency for filling the image with the content-aware feature, it still saves you several clicks compared to doing it manually.
![]()
Remove Transparency offers two cropping methods. The Panorama option works best on layers that are horizontally aligned as a panorama image. The Stacked Images option is meant for stacked layers that are used e.g. for increasing the depth of field, creating HDRs and denoising. With “Stacked Images” it crops the smallest inner rectangle of all visible layers, because stacked image overlap mostly. With “Panorama” it crops the combined inner rectangle of all visible layers, because a panorama is distributed over multiple layers that only overlap very little. If there is only one layer, both options produce the same result.


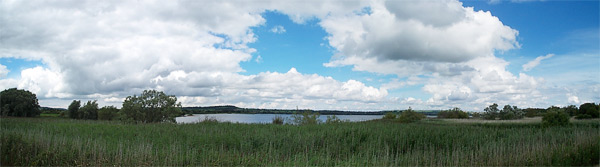
The left image shows eight layers that were auto-aligned,
which resulted in very different transparent areas.
The middle image shows the eight layers on top of each other. After applying
the Remove Transparency
command with the "Stacked Images" method (and deactivated "Content-Aware
Fill" checkbox),
the image on the right was the result.
The Content-Aware Fill check box (which only works in Photoshop
CS5 as well as Photoshop Elements 13 and higher) adds a new layer with image
content that hides the transparent areas. Content-aware Fill works nicely if
the image borders contain textures with little details, e.g. clouds, still
water, grass, earth, plain walls etc. It does not work very well if there are
very fine details in the border areas, e.g. wires, tiles, people. In such cases
it is usually better to either crop away the transparency (by deactivating
the Content-Aware Fill check box) or to manually fill in the details with the
clone stamp or healing brush tools.
Supported by Photoshop
Elements 11 and higher, Photoshop CS3 and higher
Requirements: One, two or three layers have to be selected in the Layers panel.
Added in Version 1.0, enhanced in 2.0
The HDR-Combine Layers feature combines two or three photos of the same scene taken with different exposure settings. You get the best HDR results if you shoot three photos of the same scene with -2/+2 or -3/+3 exposure adjustment and then use HDR-Combine on these three photos. But you can also use single photos, preferably a raw file. So here is a ranking ranging from best to worst results:
1. Three raw files of the
same scene taken with different exposure.
2. Three jpeg files of the same scene taken with different exposure.
3. One raw file
4. One jpeg file
However, sometimes you may get a slightly better result with number 3 than number 2. You may get a very similar result with all four approaches, if the photographic scene is not illuminated by an extreme light source like the sun or a lamp at night, which is when HDR makes the biggest difference. You usually get better results with raw files than with jpegs or tiffs, because raw files have a higher dynamic range, so when ElementsXXL automatically produces exposure variations it extracts all details from shadows as well as highlights of the raw data.


The left image is a standard raw conversion. The right image was produced
by combining three exposure variations of the same raw file.
Instead of combining images to a 32-bit HDR image and tone mapping them back
to 8-bit, this feature takes a different approach. It omits the 32-bit
step and combines the images directly with the help of layer masks. As
a result you get more a natural looking image that provides a higher dynamic
range. Additionally you are also able to improve the result by manually
editing the layer masks.

If only one layer is selected in the Layers panel, two other layers with -2/+2 EV exposure variations are automatically created. We only recommend taking this approach if you do not have differently exposed photos or do not have at least a raw file. Otherwise please use the Open as Layers command to open the photos or to automatically create exposure variations from a raw file. This certainly produces better HDR results.
If you have two or three layers selected, they are sorted and named "HDR Shadows", "HDR Midtones" and "HDR Highlights". The brightest layer is named "HDR Shadows", because it offers the most shadows details, and the darkest layer is called "HDR Highlights", because it contains the most details in the brightest image areas. After this first processing step, the HDR-Combine Layers dialog appears.
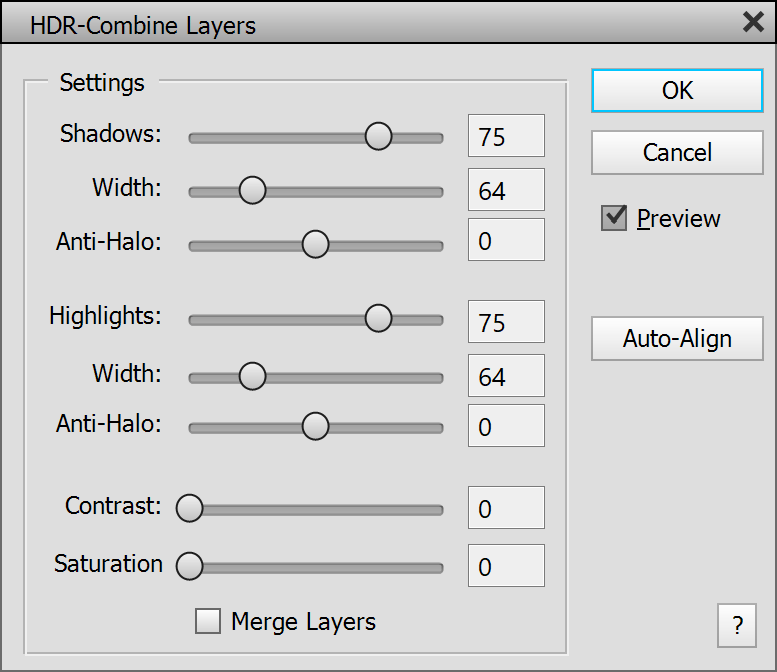
The Shadows and Highlights sliders adjust the opacity of the shadows and highlights layers. They control the intensity of the effect. The Width sliders adjust the masks of the shadows and highlights layers. The higher the value of the sliders, the more image areas from the shadows or highlight layers are introduced in the combined image. The Anti-Halo sliders enable you to remove halos in the shadows or highlights if necessary. For some images you have to use positive slider values, for others you need negative values in order to remove halos.
The Contrast and Saturation sliders control the general contrast and saturation. The Merge Layers check box combines all selected layers into one layer. This is more or less a convenience option, because you can also do that from the Layers menu later.
The Auto-Align button runs the Auto-Align Layers command discussed above. Thus it matches the image content of the selected layers. Usually it is better to auto-align layers before using the HDR-Combine Layers command. If the necessary alignment is not to extreme, it will also work fine from this dialog.
After you clicked the OK button, you can still go back to the HDR-Combine Layers dialog and change its settings. To do that make sure that you have all two or three HDR layers selected and choose Image > HDR-Combine Layers from the menu again. If you activated the Merge Layer check box before clicking OK, you have to undo the HDR-Combine Layers step in the History panel before you can enter the dialog again.
Click the Cancel button to stop everything. If you want to reset the sliders to their default settings, hold down the Alt key and click the Cancel button.
Supported by Photoshop
Elements 11 and higher, Photoshop CS3 and higher
Requirements: If only one layer is selected, all layers are automatically selected.
If you want to process only certain layers, please select them first in the
Layers panel.
Added in Version 1.0, enhanced in 2.0
Basically the Expose Layers feature automatically adjusts the opacity and blend mode of the selected layers in order to produce different effects including denoising and multiple exposure.
 |
 |
 |
The two photos on the left were combined with the Multi-Expose option of Expose Layers.
The Denoise option calculates the average of all layers thus
reducing high ISO noise. The two Multi-Expose options create
an effect that is known as multiple exposure in traditional photography. They
allow you to combine two or more different scenes into one photo. The Light
Trail option adds light trails from photos into one image. It can
also be used to combine other night shots. Whereas
the Denoise, Multi-Expose and Light Trail options use predefined blend modes
and opacity settings, the Other option lets you freely adjust
the Mode combo box and Opacity slider.
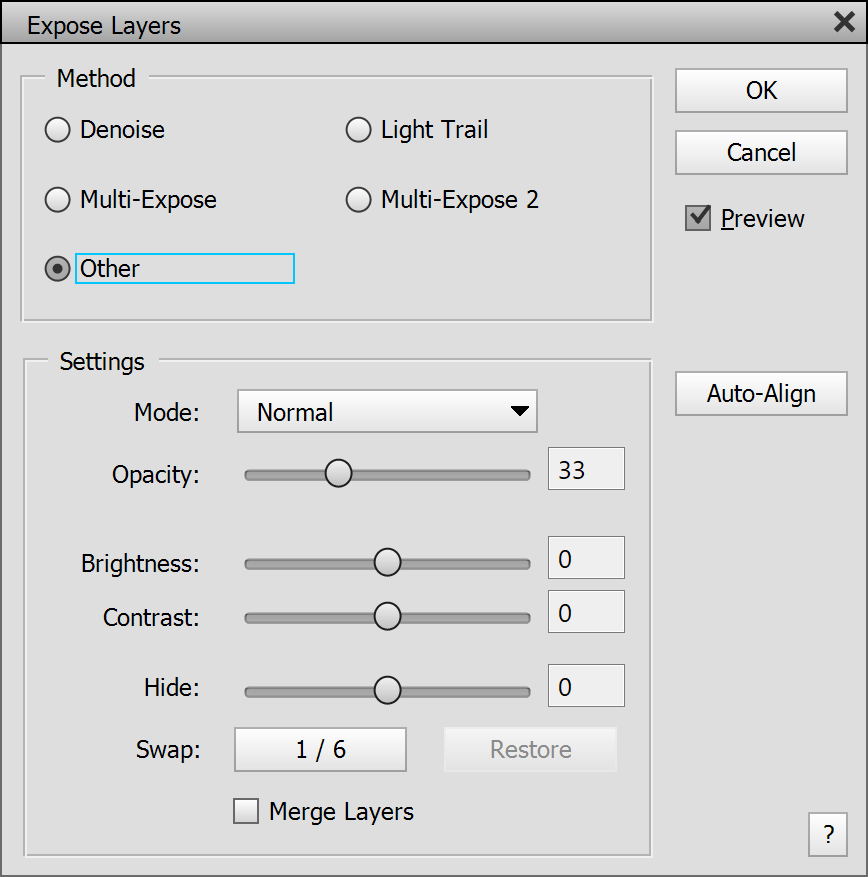
The Mode combo box contains all blend modes known from the Layers panel of Photoshop Elements. The Opacity slider represents the option with the same name on the Layers panel. But here you are changing the blend mode and opacity of multiple layers and not just one layer. Nevertheless the bottom layer will always be set to Normal blend mode and 100% opacity to produce an usable effect.
The Brightness slider increases or decreases the brightness of the effect. Usually it is necessary for compensating the brightening or darkening effect of the Exposure option as well as certain blend modes. The Contrast slider adjusts the contrast of the combined layers.
Sometimes it may be necessary to deactivate certain layers to achieve a better effect. But you do not need to exit the Expose Layers dialog to do that. You can use the Hide slider instead, which lets you exclude certain layers from the effect. For example, a value of 1 hides the top layer and a value of 2 excludes the two top layers. On the other hand a value of -1 ignores the bottom layer and a value of -2 hides the two bottom layers. This slider is only usable if more than two layers have been selected. It can be quite helpful with the Light Trial option for animating the light trail.
The Swap button is meant to be used for creating variations when using the Multi-Expose methods, but can also be used with the other methods. Each time you click the button the layers will be swapped, which, means that their positions will change. The first number of the button text is the current layer position. The second value is the the total number of possible positrons. So for two selected layers with two possible positions, you will see "1 / 2", "2 / 2" and again "1 / 2" when you click the button twice. For three selected layers there are six possible positions, so you have to click the Swap button six times to check them all out. So the button text will display "1 / 6" up to "6 / 6". For n selected layers there are n * (n-1) possible positions, so for 4 layers that means 12 and for 10 layers already 90 possible positions. To restore the original layer position you have to make sure that a "1" is displayed as the first number on the button. The easiest way to do that is to click the Restore button.
The Merge Layers check box combines all selected layers into one layer. This is more or less a convenience option, because you can also do that from the Layers menu later. The Auto-Align button runs the Auto-Align Layers command discussed above. Thus it matches the image content of the selected layers.
Click the Cancel button to end everything. If you want to reset the sliders to their default settings, hold down the Alt key and click the Cancel button.
Supported by Photoshop
Elements 11 and higher, Photoshop CS3 and higher
Requirements: If only one layer is selected, all layers are automatically selected.
If you want to process only certain layers, please select them first in the
Layers panel.
Added in Version 2.0
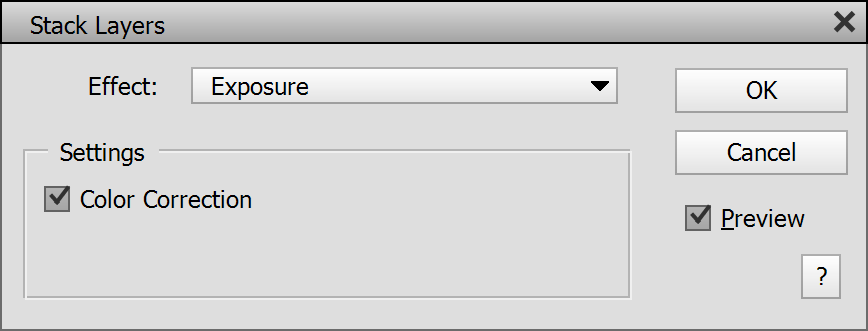
The Stack Layers submenu lets you apply various stack modes to all layers or the selected layers in the current document. Stack modes work similar to blend modes. But while blend modes only work with two layers at a time, stack modes can process the pixels of all layers together. This offer many more possibilities, but also takes longer to render.
The Options menu item displays the above dialog. It lets you select the stack modes from the Effect combo box. The Settings group displays options for adjusting the stack mode. The Exposure stack mode offers a Color Correction check box for activating a color correction feature. The Median stack mode displays a Sharpen check box, which may add a sharpening effect or artifacts depending on the used images. Apart from additional options the Options dialog also makes it easier to test all stack modes instead of choosing them one after the other from the Stack Layers sub menu. Try the cursor up/down keys once you selected the combo box for quickly switching between them.
ElementsXXL offers a dozen stack modes. Some of them are not available in Photoshop. The native stack modes in Photoshop are applied to a smart object, whereas the stack modes of ElementsXXL are like filter effects that are rendered directly to a pixel layer. So after applying a stack mode you will see a new layer called "Stacking Result" at the top in the Layers panel. This layer contains the final result of applying a stack effect. Stack modes also support selections, so if you only want to apply it to a certain image area the rendering time is also reduced greatly.
The Median stack mode chooses the median pixel value of all layers. This is useful for removing pixels that are not present in all layers, which allows you to remove moving objects, remove noise or increase the image resolution. The Mean stack mode renders much faster than Median and averages the pixels on all layers. This is also useful for denoising and image resolution increase, but produces a slightly different result. The Exposure stack mode (not natively available in Photoshop) fixes the exposure of underexposed photos by combining the information that is available from multiple layers.
The Minimum stack mode selects the lowest pixel value of all layers. It works similar to the Darken blend mode. ElementsXXL uses it for removing moving objects if there is an even number of layers. The Maximum stack mode works like the Lighten blend mode outputting the brightest pixel of all layers.It produces a bright look and may enlarge overexposed areas.The Summation stack mode simply adds up the pixels of all layers. This results in overexposure unless you use very dark images. You could use it for a hi-key look, but it is not recommended for fixing underexposure as that is too tedious to achieve with it.
The Range, Standard Deviation and Variance stack modes select pixels according to these statistical principles. They are less useful for photo effects and more for scientific purposes. The Mask stack mode is similar to the Range stack mode, but produces a grayscaled result. You can adjust the result further to produce a mask for masking image areas that are present in all layers.
The Least Objects stack mode tries to select the layer with areas that differ the least from the other layers and copies it as a new layer. This does not work always but often enough. The Combine (Experimental) stack mode combines the different objects of all layers into one image. This feature is still experimental, so it usually adds noise and other artifacts to the output, especially if the objects of various layers overlap. We only recommend to use it only as a template or guide and combine the objects manually.
The 5 features below use various of these stack modes and offer more sophisticated features for applying them for various image processing tasks.
Supported by Photoshop
Elements 11 and higher, Photoshop CS3 and higher
Requirements: If only one layer is selected, all layers are automatically selected.
If you want to process only certain layers, please select them first in the
Layers panel.
Added in Version 2.0
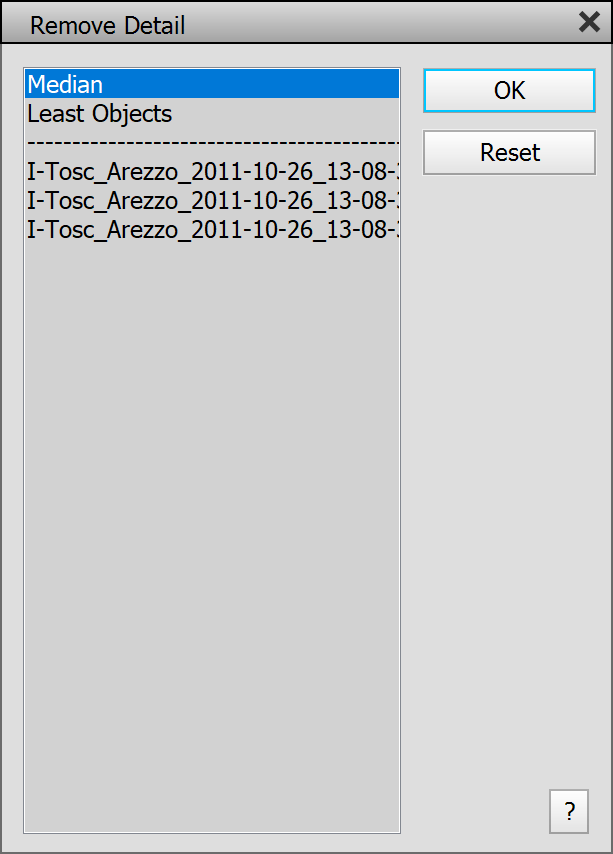
The Remove Detail allows you to remove an image area by utilizing image content from other layers, which contain different images of the same scene. For this feature to work you first need to create a selection around the object or detail that you want to remove. The feature only works if another layer contains the necessary image content. If it is available, Remove Detail works much better than the Content-Aware Fill feature of Photoshop (Elements), because it uses real-life image data and does not reconstruct the area by patching together textures.
By default the Median option is selected, which essentially uses the Median stack mode to replaced the selected area. Depending on the available image material this may work more or less good. The Least Objects applies the stack mode of the same name, which tries to find the layer with the least objects or details. If both do not produce the desired result, you can click on the layer names below to copy the content of certain layers into the selected area.
Supported by Photoshop
Elements 11 and higher, Photoshop CS3 and higher
Requirements: If only one layer is selected, all layers are automatically selected.
If you want to process only certain layers, please select them first in the
Layers panel.
Added in Version 2.0
The Moving Object Removal tries to create a version of all layers that has moving objects or differing details removed.
The result highly depends on the available material. If you took too few photos and all photos have the same background detail covered, it will still leave ghost artifacts of the moving objects behind. So it is important to take as many photos as possible that contain alls background details in the first place. If an even number of layers is selected or exists in the current document, you get a warning message, because a less effective method has to be applied to get a more decent result. Then best remove or hide one of the layers and try again.
If nothing helps, you can also try the Remove Detail feature above. It often succeeds when this feature fails because of insufficient image material. The final measure is to manually remove artifacts, e,g, with the healing brush.
Supported by Photoshop
Elements 11 and higher, Photoshop CS3 and higher
Requirements: If only one layer is selected, all layers are automatically selected.
If you want to process only certain layers, please select them first in the
Layers panel.
Added in Version 2.0
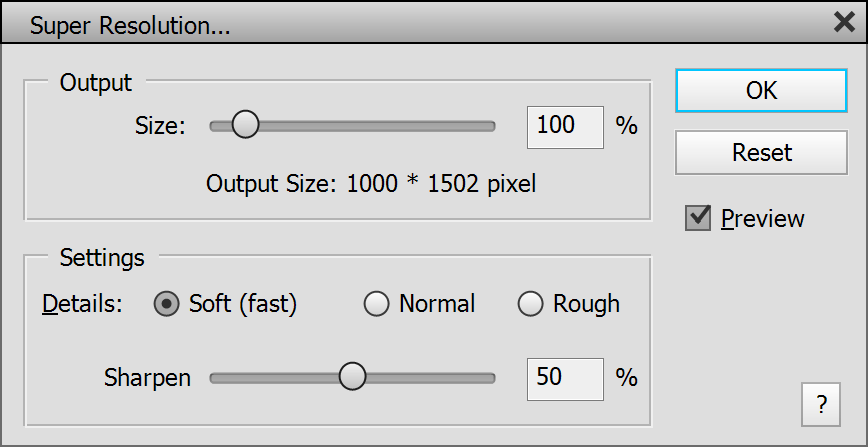
The Super Resolution feature lets you increase or decrease the image size more effectively by using pixels from various identical photos of the same scene. As the camera moves very slightly when quickly shooting multiple photos, each photos contains slightly different image information. But the photos have to be aligned first, which is normally done when using the Open As Layers, Place Documents As Layers or the SuperResolution task features. Otherwise you need to run the Auto-Align Layers feature. SuperResolution also works with photos from a tripod, so handheld shots are not mandatory.
Super Resolution works much better than using only one photo, because it is able to use more image data and also decrease noise during the process.
The Size slider adjust the image size in percentage terms. The new pixel size of the image is displayed below the slider. You can increase as well as decrease the image size.
The Settings group offers three Details settings. The Soft option renders quickly and produces softer details. The Normal option renders slower and the result looks a bit less soft. The Rough option may look more natural but also contains more imperfect details. It usually is a matter of taste which option is preferred.
As the resulting image usually is a bit soft it is recommended to sharpen it. This also makes smaller details much more visible and improves the image quality. You can adjust the sharpening intensity with the Sharpen slider.
Supported by
Photoshop Elements 11 and higher, Photoshop CS3 and higher
Requirements: If only one layer is selected, all layers are automatically selected.
If you want to process only certain layers, please select them first in the
Layers panel.
Added in Version 2.0
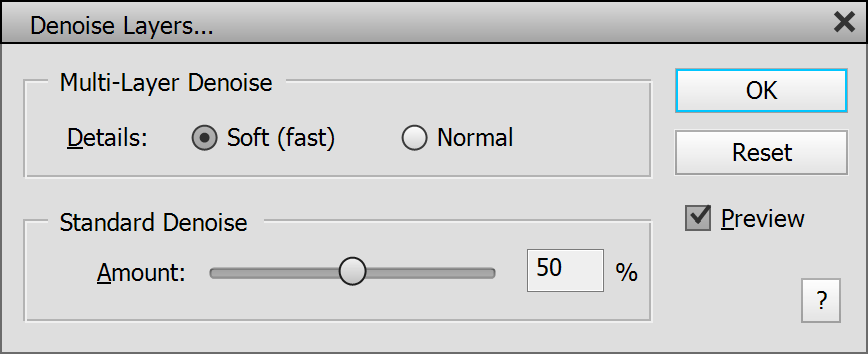
The Denoise Layers feature combines multiple layers with photos of the same scene to remove noisy pixels. This is called Multi-Layer Denoise here and works more effectively than using only one image. But the dialog also offers a standard denoise which can be additionally applied to further remove noise.
The Multi-Layer Denoise group offers two options: Soft produces a more soft result and removes more details while also rendering faster. It is similar to the Denoise option of the Expose Layers feature. The Normal option keeps more details but also slightly more noise. But the difference between both options is rather subtle.
The Standard Denoise group offers an Amount slider for adjusting the noise reduction intensity. The Standard Denoise functionality may smooth away details, so it is better to not apply too exaggerate it.
Supported by
Photoshop Elements 11 and higher, Photoshop CS3 and higher
Requirements: If only one layer is selected, all layers are automatically selected.
If you want to process only certain layers, please select them first in the
Layers panel.
Added in Version 2.0
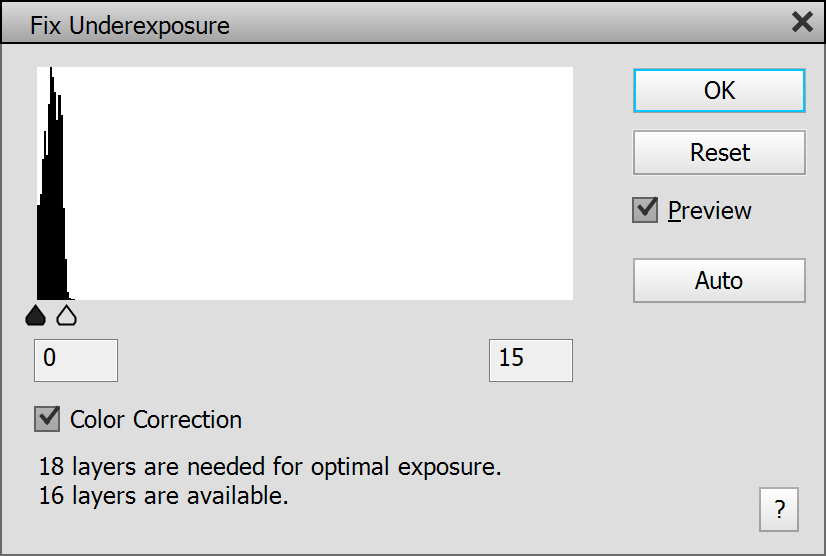
The Fix Underexposure feature uses multiple photos of the same scene that are underexposed (e.g. because there was not enough light available). The result is an optimally exposed image, which is not overwhelmed with noise. Brightening only one underexposed photo inevitably amplifies the noise in the image and makes degraded image details appear. This can be avoided by taking multiple photo quickly after each other and using this feature.
At the bottom of the dialog you can see how many photos would be needed to produce an optimally exposed image. If you use much less photos, the noise will be more visible. If you only use one or two less photos, there is usually no adverse effect.
The diagram at the top shows the combined histogram of all image layers.The two slider knobs at the bottom of it are automatically set to produce optimal exposure. But you can move the white knob to the left if the result still looks too dark and you do not mind a few overexposed highlights. Use the black knob to darken shadow areas. If you adjusted the slider knob and are not satisfied with the result, click the Auto button to restore the default settings.
The Color Correction check box fixes color problems which often occur for underexposed images. In some cases this correction is disadvantageous and it is better to manually correct the colors.
Supported
by Photoshop Elements 11 and higher, Photoshop CS3 and higher
Requirements: None
Added
in Version 2.0
The Tasks sub menu offers seven items for almost automatically performing certain tasks, which start with opening one or more images and end with the final image result.
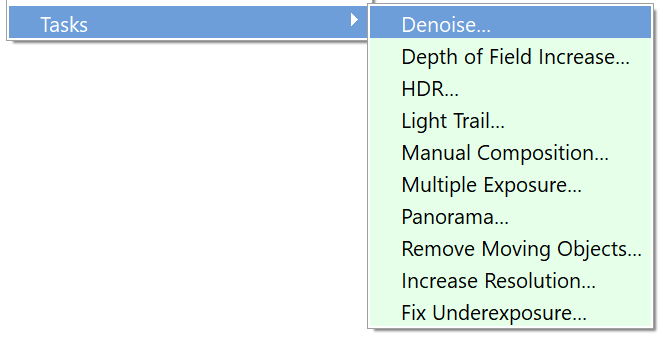
The Denoise task lets you combine multiple photos of the same scene taken with the same camera settings in order to reduce high ISO noise. The Depth of Field Increase task removes blur by using photos taken with a different focus point. The HDR task increases the dynamic range of a photo by overlaying multiple photos taken with different exposures. When opening only one file, exposure variations are automatically generated by ElementsXXL. The Light Trail task combines various light trial photos or night shots to produce a more impressive effect.The Manual Composition task opens multiple photos and adds layer masks for starting with a manual composition.
The Multiple Exposure task lets you create an analog multi-exposure effect by blending different photos. Panorama stitches panorama photos together. The Remove Moving Objects task tries to remove image areas that are different in each image. Increase Resolution lets you effectively increase the image size by utilizing the pixels in all images. The Fix Underexposure task combines a series of underexposed images to produce correct exposure while reducing noise.
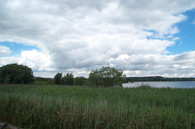
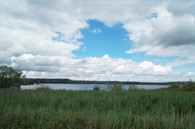
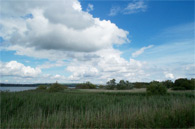
The top images were taken hand held. The bottom result was produced by using
the Panorama task.
Each task performs the following steps:
1. Lets you select or open
the images or files that the task is applied to. See below.
2. Auto-Align Layers (no dialog is shown)
3. Depending on the task a dialog is shown or not. No dialog is shown for these
tasks: Depth of Field Increase, Manual Composition, Panorama, Remove
Moving Objects.
4. Remove Transparency (No dialog is
shown except for the Panorama task; for the HDR task this
command is executed before step 3)
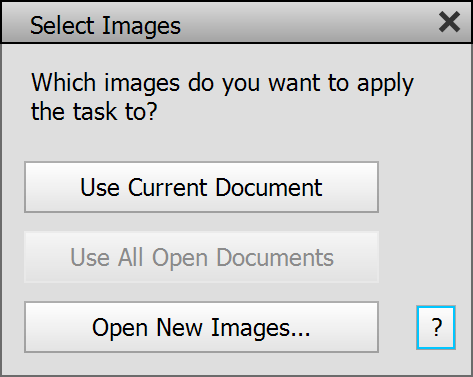
After executing the task command, ElementsXXL checks if one or more documents exist that it can be applied to. If there is none, the Open as Layers command is triggered showing a file dialog for selecting image files.
If it finds one, the Select images dialog is displayed. The Use Current Document button applies the task to the layers of the currently active document. The Use All Open Documents button automatically creates a new document and puts all documents as layers in it by using the Place Documents as Layers command. The Open New Images button runs the Open as Layers command and displays a file dialog for selecting image files.