1. Open an image in Photoshop Elements.
2. Choose a script from the File > Scripts sub menu or from the Scripts button on the control bar.
3. If the script displays an error message, it is probably not possible to run it in the current version of Photoshop Elements. If you have some JavaScript programming knowledge, you can try to edit the script file, e.g. in Notepad, and fix the problem.
1. Open an image in Photoshop Elements.
2. If no actions are loaded, choose Load Actions from File > Actions or from the Actions button on the control bar. For example, you can find the action files of Photoshop Elements 11 at C:\ProgramData\Adobe\Photoshop Elements\11.0\Photo Creations\photo effects\.
3. Choose an action from the File > Actions sub menu or from the Actions button on the control bar.
4. If the action displays a message that a certain command is not available, click the Continue button to run the action nevertheless.
1. Open an image in Photoshop Elements and carry out an image editing step, e.g. apply a filter from the Filter menu.
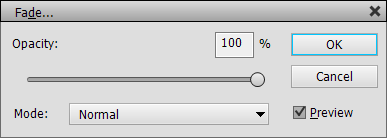
2. Choose Fade from the Edit menu.
3. Change the opacity and/or the blend mode and click OK.
1. Open at least two images in Photoshop Elements and copy them as layers into one document.
2. Select these layers in the Layers panel.
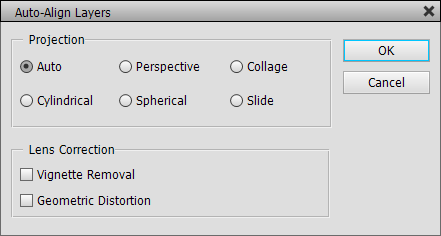
3. Choose Auto Align Layers from the Image menu.
4. In most cases you will be fine with the default options, otherwise adjust them. Finally click OK.
5. Create a layer mask for each layer and use the brush tool for making certain image areas of a layer visible or invisible. This way you can combine the best parts of each photo.
1. Open at least two images in Photoshop Elements.
2. Copy and paste them as layers into one document.
3. Select the layers of the document in the Layers panel.
4. Choose Auto Align Layers from the Image menu. For normal panoramas best choose the Cylindrical option of the Projection group, because the Auto option is sometimes a bit unreliable. The other options position and distort the panorama images differently. Click OK.
5. Choose Auto Blend Layers from the Image menu.
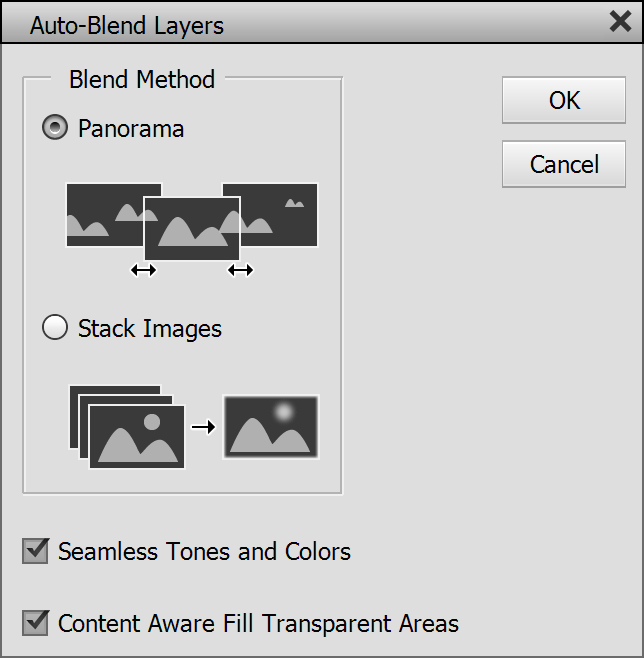
6. Select Panorama from the Blend Method options. If desired, activate the check box for seamless tones and colors. Finally press OK.
7. Use the Crop tool to crop away the superfluous borders of the images.
1. Open at least two images in Photoshop Elements and copy and paste them as layers in one document.
2. Select all layers in the Layers panel.
3. Choose Auto Blend Layers from the Image menu.

4. Select Stack Images from the Blend Method options. If desired, activate the check box for seamless tones and colors. Finally press OK.
2. From the Image > Channels sub menu choose the desired channel or channel combination.
3. If you want to see all channels while editing only one or two of them, select Image > Channels > Show All.
4. Now perform your image editing operation, e.g. applying a filter. It will only be applied to the selected channel(s).
5. To select all three channels again, choose Image > Channels > RGB or switch to another layer in the Layers panel.
2. Choose Window > Channels to display the Channels panel.
3. Click on the Red, Green or Blue list item to select one of the three color channels. To select an additional color channel hold down the Shift key and click on it. If you want to see all three channels while editing only one or two of them, click on the struck out eye symbol of the RGB item.
4. Now perform your image editing operation, e.g. applying a filter. It will only be applied to the selected channel(s).
5. To select all three channels again, click on the RGB item of the Channels panel.
1. If you want to store the whole image file into a smart object, please use the File > Open as Smart Object menu command. Otherwise open the image with File > Open.
2. If you did not open the image with File > Open as Smart Object and want to convert one or more of the layers into a smart object, do the following: Select the appropriate layers in the Layers panel and choose Layer > Smart Object > Convert to Smart Object. Alternatively you can click the smart object icon on the Layers panel.
3. If you want, you can now change the name of the smart object and adjust its opacity and blend mode in the Layers panel.
4. You can losslessly rotate and transform the image by using the Rotate, Transform and Resize sub menus of the Image menu. You can also use the Crop and Trim items on the image menu as well as the move tool. The embedded contents of the smart object are left untouched by these operations.
5. You can also add a layer mask to the smart object with Layer > Layer Mask > Reveal All (or click the layer mask icon on the Layers panel). Now you can edit the layer mask with tools and filters.
6. To edit the contents of the smart object, choose Layer > Smart Object > Edit Contents or double click the thumbnail of the smart object in the Layers panel.
6a. A new document with the contents of the smart object opens up. You can now edit the smart object document.
6b. After editing choose File > Save to update the smart object in the original document.
6c. Close the smart object document and return back to the original document.
1. After creating a smart object as described above, choose a filter from the Filter menu. Alternatively you can choose Filter > Add Smart Filter, which automatically creates a smart object, and then double click one of the filters on this dialog.
2. The filter dialog appears where you can edit the settings of the filter. Press OK.
3. In the case of a native filter the blending dialog appears. There you can edit the blend mode and opacity of the filter. Press OK.
4. If you want, you can apply another smart filter from the Filter menu.
5. After applying a smart filter from Filter > Add Smart Filter, the filter mask (one mask for all smart filters of a smart object) is automatically selected. Otherwise you can select it from Layer > Smart Filter > Select Filter Mask or by holding down the Alt key and clicking the smart object icon of the Layers panel.
5a. To edit the filter mask use a tool. For example, you can use the brush tool to remove the filter effect from certain image areas. You can also apply filters from the Enhance and Filter menu (as well as Image > Apply Image) to the filter mask.
5b. To deselect, disable, enable or clear the filter mask use the appropriate options from the Layer > Smart Filter menu.
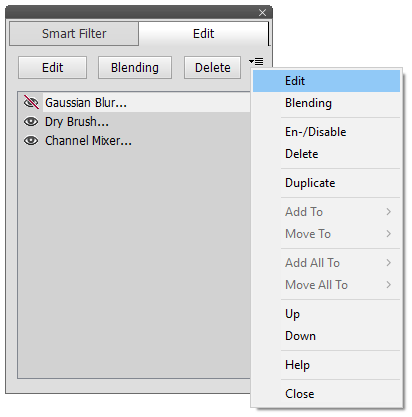
6. To edit the applied smart filter(s), choose the filter from the top of the Layer > Smart Filter menu. For more editing options choose Layer > Smart Filter > Edit Smart Filters or click the smart filter symbol in the Layers panel.
6a. In the Edit Smart Filter dialog select a filter in the list and click one of the buttons to either edit the filter settings or the filter blending, to enable or disable the filter or to delete it.
6b. To apply all changes that you performed with this dialog click the OK button. To remove all changes click Cancel.
1. Open an image with 16 bits per channel in Photoshop Elements.
2. Choose "Prepare 8-bit Document" from the Image > Render sub menu or the Render button menu of the option bar in Photoshop 11 and higher. This converts the current 16-bit document into a special 8-bit document that has the 16-bit data embedded in a smart object.
3. If you want to add a new 16-bit layer to the document, choose the "Add 16-bit Layer" menu item from the Render menu. On the appearing file dialog choose a file with 16-bit per channel and click the Open button. The 16-bit image is then added as a smart object with embedded 16-bit data to the document. You can now add a layer or vector mask, change the opacity or blending mode as well as apply smart filters to the new smart object.
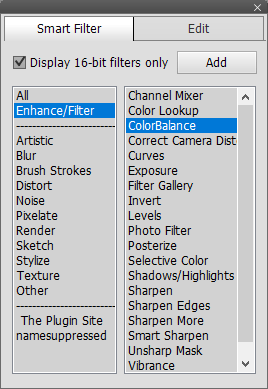
4. If you want to apply a filter to one of the smart objects, choose the Add Smart Filter command from the Render menu. In the displayed dialog you will only see filters that also work with 16-bit images. This is indicated by the "(16-bit)" suffix on the Add tab sheet. Double click a filter to apply it. If you switch to the Edit tab sheet you can edit the applied smart filters. Leave this dialog with the OK button. If you want, you can now you use the brush tool, gradient tool or other tools to restrict the effect of the smart filters to certain image areas.
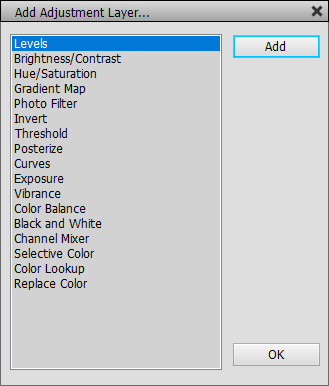
5. If you want to apply an adjustment layer, use the Add Adjustment Layer command. Double click an item from the list to apply it. When you have finished click the OK button. The added adjustment layers are displayed in the Layers panel where you can also edit their layer mask. Please do not manually add other adjustment layers, because they will not be rendered to the final 16-bit image. You can add fill layers though.
6. To selectively brighten and darken certain image areas choose the Add Dodge/Burn Layer command from the Render menu. The dodge tool is automatically activated and you can start using it on the image to brighten up certain details. To darken image areas switch to the burn tool. You can also use the brush - best with reduced opacity - on the dodge/burn layer if you like. To undo changes it is best to use the brush tool with a mid gray color. You can also use the eraser tool, but we advice against it.
7. If you want to use a tool, activate the Add Tool Layer command. Now select your tool and start using it on the image. Some tools only work if a "Sample All Layers" or a "All Layers" check box is activated on the tool options bar. If you want, you can later adjust the blend mode and opacity of the tool layer on the Layers panel as well as add a layer mask to it.
8. You can also add other types of layers to the document. For example, you can add a text layer, shape layer or a fill layer.
9. Save the document as a PSD file in order to edit it later and render new 16-bit images from it.
10. Choose "Render 16-bit Document" from the Image > Render sub menu (or the Render button menu). As a result a new 16-bit document is created and the previous image operations (the layers and smart filters) will be rendered to it.
1. Select one or more layers in the Layers panel.

2. Click the layer
group icon or choose Layer > Group
Layers. This creates a new layer group from the selected layers.

3. If you want, you can rename the group by double clicking its name, e.g. Group 1, in the Layers panel. Change the opacity and blend mode of the layer group if needed.
4. You can also add a mask to the layer group by clicking the layer mask icon or choosing Layer > Layer Mask > Reveal All.
5. To edit the layers of the layer group again click the layer group icon once more or choose Layer > Ungroup Layers.
6. If the layer group has a mask, you will be asked if you want to store it. Click Yes.
7. Edit the ungrouped layers.
8. To restore the layer group again, select all of its layers in the Layers Panel and click the layer group icon or choose Layer > Group Layers.
9. On the appearing dialog click the Yes button to restore the name, blend mode, opacity and mask of the old layer group.
1. If there is only the background image displayed in the Layers panel, double click it to turn it into a layer.
2. To use a selection for creating a layer mask, create the selection and choose Layer > Layer Mask > Reveal Selection or click the layer mask icon on the Layers Panel. If you do not want to use the selection for the layer mask, choose Layer > Layer Mask > Reveal All or delete the selection and click the layer mask icon on the Layers Panel. Now you can see the layer mask in the Layers panel.
3. To edit the layer mask apply a filter or tool. The Select > Refine Edges command is also quite useful for modifying a layer mask.
1. You can either draw a shape with the shape tool, create a selection with the lasso or marquee tool or create a path with the Text on Path tool (in Photoshop 10 and higher only). This selection, shape or path will be converted into a vector mask.
2. Depending on whether you created a selection, shape or path choose either From Selection, From Shape or Current Path from the Layer > Vector Mask sub menu. Now you can see the vector mask in the Layers panel.
3. You can now use the move tool or the shape selection tool to move, rotate and scale the vector mask. You can also use the Rotate and Transform sub menus of the Image menu to transform the vector mask.
4. To apply filters and other tools to it, you can convert the vector mask into a normal layer mask by choosing Layer > Vector Mask > Rasterize.
4a. To convert the layer mask back to a vector mask, choose Select > Selection From > Layer Mask, then Layer > Layer Mask > Delete and finally Layer > Vector Mask > From Selection.
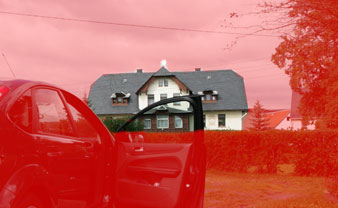
1. It is often useful to start by creating a rough selection, e.g. with the lasso or marquee tool.
2. Choose Select > Edit in Quick Mask Mode or in Photoshop Elements 11 (or higher) click on the Quick Mask icon at the bottom of the tool bar. If the current image is in 16-bit/channel mode, a new document called "Quick Mask Mode" is opened, which allows bypassing the 16-bit limitations of Photoshop Elements.
3. Now you will see the whole image (if no selection was created in step 1) or the unselected image areas (if a selection was available) colored red. This indicates that the selection was transformed into a mask.
4. If you want to change the mask properties choose Select > Quick Mask options. Usually you do not need them.

5. Use the available filters and tools to edit the mask. Select white as the foreground color at the bottom of the tool bar for extending the mask e.g. with the brush tool. A black foreground color lets you remove image areas from the mask.
6. When you are satisfied, choose Select > Edit in Quick Mask Mode again. Alternatively, click on the Quick Mask icon at the bottom of the tool bar in Photoshop Elements 11 (or higher).
7. The mask was converted back to a selection and you can now apply filters and tools to the refined selection.
1. Choose View > Proof Setup > Custom from the menu.
2. Choose an item from the Device to Simulate combo box.
3. If you have some color management knowledge, you can also deactivate the Preserve RGB Numbers check box and change the other options.
4. Click OK. The image is now displayed as it would look on the chosen device.
5. If you notice a color problem, fix it by using a color filter or another tool.
6. To restore the normal view of the image, choose View > Proof Setup > Off.
1. Create a new document or open an image that you want to use as the background for the web page.
2. Use the text tool to insert the main text or text for buttons. You can add content on multiple layers if you want.
3. After you have finished designing and editing the web page, you can begin marking various areas of the the document that should be clickable hyperlinks. Start by activating the slice tool from Edit > Tools > Slice Tool or by using the icon menu at the bottom of the tool bar in Photoshop Elements 11 and higher.
4. With the slice tool draw a rectangle over an area that you want turn into a hyperlink. Such an area is called a user slice. While creating a user slice, Photoshop Elements automatically splits up other image areas into so-called auto slices. Alternatively to produce a slice, you can also create a selection and choose Edit > New Slice. Placing guides and selecting Edit > Slices From Guides is yet another method to slice up the document.
5. To link a slice to an URL or html file, right click on the slice and choose Edit Slice Options from the context menu. On the Slice Options dialog enter a html file or http web address in the URL field and click OK.

6. To select another already existing slice hold down the Ctrl key and click on it. You can edit its size by dragging the handles of the slice rectangle. To remove all slices and start again, choose View > Clear Slices. If you activate the Slice Select tool, you will find further options on its tool options bar, e.g. the Hide Auto Slices button that only keeps the user slices visible.
7. Save the whole document including the slices as a PSD file, so that you can edit it later.
8. Choose File > Save > HTML to save the web page as an html file plus a sub folder of image files.
9. Now you can design additional pages in the same manner and link to them from the main web page that you already created.
1. Open an RGB image in Photoshop Elements.

2. Choose Image > Split Layer > Luminosity & Color. Now you see additional L and C layers in the Layers panel.
3. Zoom to 100% to be able to adjust the sharpening and color reduction effect more effectively.
3. Click on the L layer and apply the Unsharp Mask or Adjust Sharpness filter from the Enhance menu.
4. Click on the C layer and apply the Surface Blur filter from the Filter > Blur sub menu. Raise the Radius and Threshold value until the color noise vanishes.
5. To combine the layers again, select all three layers and choose Layer > Merge Down.
1. Open an RGB image in Photoshop Elements.
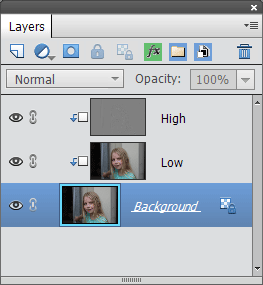
2. Choose Image > Split Layer > Frequency. Keep the setting on the appearing dialog. Now you see additional High and Low layers in the Layers panel. The High layer contains the skin texture whereas the Low channel holds the global skin gradation.
3. Select the Low layer to remove larger highlight or shadow areas from the skin or generally reduce the color contrast of various skin areas. Create a feathered selection on a skin area and apply the Gaussian Blur filter to it. The radius of the Gaussian Blur should be almost twice as large as the radius that was used for frequency separation. So that would be around 24 to 32 pixels. Repeat this process on different areas of the face until you are satisfied.
4. To remove skin imperfections select the Low layer and use the stamp tool or healing brush on it. Make sure that the All Layers check box is deactivated in the Tool Options panel. For a more extreme make-up effect you can also paint with mid gray colored brush that has opacity of 10 to 50%.
5. To combine the layers again, select all three layers and choose Layer > Merge Down.
1. Open an RGB image in Photoshop Elements.
2. Choose the Shadows++ item on the Select > Select From sub menu. Now go to Layer > New Adjustment Layer > Curves, name it "Shadows" and click OK twice. Now you have a Curves adjustment layer with a shadows mask.
3. Repeat this step for the Midtones++ and Highlights++ items. As a result you will now have three adjustment layers with a shadows, midtones and highlights mask each.

4. Now you can start editing the shadows, midtones and highlights of the images by double clicking the thumbnails of each adjustment layer to display the Curves dialog. The highlights curve should reduce the brightness, the midtone curve should have a sombrero shape for emphasizing the midtones and the shadows curve should slightly increase the brightness.
5. You can also apply the Curves or Levels filter on each of the layer masks in order to enhance the masks.
6. To combine the layers again, select all four layers and choose Layer > Merge Down.
1. Open an RGB image in Photoshop Elements.
2. If there is no background layer, run Layer > Flatten Image. If the image is 16-bit, choose Image > Mode > 8 Bits/Channel.
3. Add one or more adjustment layers until you are satisfied with the effect.
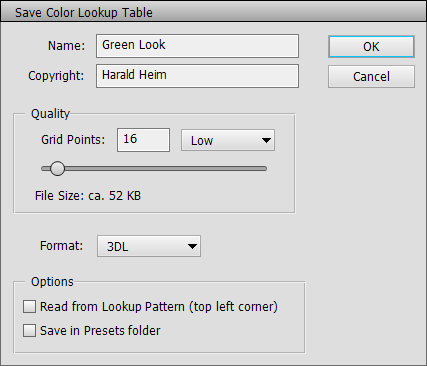
4. Choose File > Save > Color Lookup Table. Enter the name of the effect and your name at the top of the dialog. Decide on the number of grid points and the format you want the lookup file to have. We recommend 16 and 3DL settings for small files and 32 and CUBE or CSP settings for slightly better quality but larger files.
5. Make sure that the Read from Lookup Pattern check box is deactivated. If you activate the Save in Preset folder check box, the lookup file will appear as a preset on the Color Lookup dialog, but only after you restarted Photoshop Elements.
6. Press the OK button. If you did not activate the Save in Preset folder check box, a file dialog will appear for saving the lookup file. Otherwise you will see a message box mentioning the location where the file was saved.
7. Undo the adjustment layers in the History panel or delete them in the Layers panel. Alternatively restart Photoshop Elements and open the same image file again.
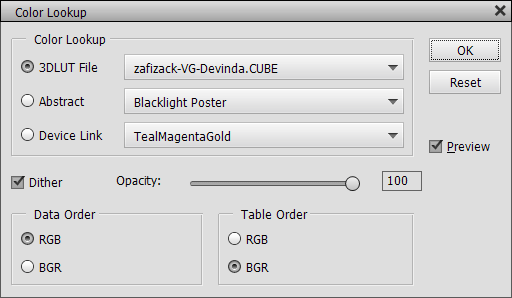
8. Choose the Color Lookup adjustment layer from Layer > New Adjustment Layer > Color Lookup. If you restarted Photoshop Elements and previously used the Save in Preset folder check box, you will find the lookup file on the 3DLUT File combo box. If not, click on the 3DLUT File combo box and choose the top "Load 3D LUT" item. On the appearing file dialog select your previously saved lookup file.
9. Now you can see the recorded effect applied. Press OK to close the dialog.
1. Open an RGB image in Photoshop Elements.
2. For producing more precise color values in the lookup file choose Image > Mode > 16 Bits/Channel. But only do that if the filters that you want to apply support 16-bit images and if you do not want to additionally use at least one adjustment layer.
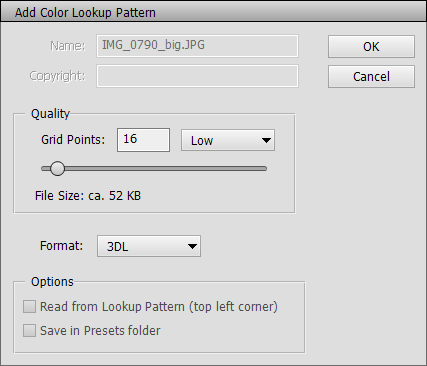
3. Choose Image > Add Color Lookup Pattern. On the appearing dialog you have to decide on the number of grid points and the format you want the lookup file to have. You cannot change these settings later, because then the lookup file will contain false values. We recommend 16 and 3DL settings for small files and 32 and CUBE or CSP settings for slightly better quality but larger files.
4. After clicking OK, you will see the lookup pattern at the top of your image. For larger grid points value the added pattern is larger.
5. Now apply your filters (and adjustment layers) to the image. Only apply filters that change the color, brightness, contrast, hue and saturation. Effects like blur, sharpening, noise, painting, distortion etc. cannot be recorded. You can also duplicate the layer and use blend modes. Producing a correct lookup file will be possible as long as the lookup pattern is still visible.
6. Choose File > Save > Color Lookup Table. Enter the name of the effect and your name at the top of the dialog. Do not change the Grid Points and Format settings. They have to stay the same, otherwise the lookup file will not reproduce the desired effect.
7. Make sure that the Read from Lookup Pattern check box is activated. If you activate the Save in Preset folder check box, the lookup file will appear as a preset on the Color Lookup dialog, but only after you restarted Photoshop Elements.
8. Press the OK button. If you did not activate the Save in Preset folder check box, a file dialog will appear for saving the lookup file. Otherwise you will see a message box mentioning the location where the file was saved.
9. Undo the filters and the lookup pattern in the History panel. Alternatively restart Photoshop Elements and open the same image file again.
10. Choose the Color Lookup adjustment layer from Layer > New Adjustment Layer > Color Lookup. If you restarted Photoshop Elements and previously used the Save in Preset folder check box, you will find the lookup file on the 3DLUT File combo box. If not, click on the 3DLUT File combo box and choose the top "Load 3D LUT" item. On the appearing file dialog select your previously saved lookup file.
11. Now you can see the recorded effect applied. Press OK to close the dialog.
1. Open a portrait photo or photo of an object in Photoshop Elements.
2. Go to Image > Replace Background.

Photo Credits: Opolja
/ Dreamstime
3. Click the Fine Hair tab sheet if the person in the photo has fine hairs that are visible against the background.

4. Click the
Color Range button (step 1). Then click on the image until you masked
out the hair as good as possible. The hair and the person have to be white in
the grayscale preview and the background has to be black. If you can only mask
by clicking on a uniform background, activate the Invert check box to get
the
person
and hair white again. You can hold down the Shift
and Alt key when clicking
to add or remove certain colors.
In the example above it was quite difficult
to mask the black hair from the black background. I clicked on the
hair until the hair stood out from the spot light. Additionally I activated
the Invert
check box to get the hair white. As the background is also white and
the person contains black areas, we have to do some additional brush work later.

Background Photo Credits:
Chunhahca / Dreamstime
5. Click on the Image button (step 2) and select a new background image from the file dialog. If you want to manually add a background later, you can also click the Color or Transparent buttons instead. The masked person is now displayed masked above the new background image.

6. Click the Object or Background button (step 3) to select the person or background and then use the automatically activated move tool to resize or reposition it. In the example case we increased the size of the background to remove the transparent borders..
7. You can also crop away a part of the image (step 4) by clicking the Crop button and using the crop tool. In the example this was not necessary.
8. You can try Hard and Soft blending (step 5) by clicking the appropriate button. If you do not like the result, click the None button, which was done here.

9. Now we have to do some more manual brush work (step 6). Activating the Show Mask check box helps a lot to see where brushing is actually needed. For fine hair brush work you normally only need the Burn and Dodge tools. In the example there is a lot more rough masking to do, so I clicked the Brush Tool button. Then I used the brush tool with white color to mask the person while leaving the outer hairs untouched. Then I used a black color brush to paint over the white background areas. The hair area were left untouched for now. You can see the result above.

Now I used the Burn and Doge tools (by clicking the appropriate buttons which automatically activates the required tool options) to refine the borders of the mask and make the hair stand out.

After deactivating the Show Mask check this result is shown.
10. If there are some thin border pixels that you did not manage to remove manually, you can use the buttons in step 7 to automatically remove them. If you do not like the results, you can click the Undo button. In the example it was not necessary.
11. Now we have to adjust the color and brightness of person to the background (step 8) with one of the various options. In the example it does not look good to give the person the blue cast of the background, because the skin tones get unattractive that way. But increasing the vibrance makes the person match better to the background photo.
12. After you are finished you can click on the x icon in the title bar of the Replace Background dialog. You will see the person and background as layers in the Layer panel and can do some manual step if needed.

In the example I wanted to improve the look of the background. I could have done that in step 3, but the background was too opaque back then (because of the incomplete masking) to effectively adjust it. So I moved the person to the middle of the image, moved the background to the left to reveal the tower on the left hand-side. To fill the transparent area on the right-hand side, I duplicated the background layer and flipped it horizontally to make it seamless. Then I moved the duplicate background layer to the right hand-side. I hid the seamless border, which looks too artificial, behind the person.
1. Click one of the buttons on the button bar at the top.
This way you can switch between the All, Favorites and Edit view. Most of the time you will be using All or Favorites view. The Edit view is mainly for editing the filters in Favorites view.
In All view:
1. Click on a group to expand it.
2. Click on a filter to select it or double click to run it.
3. Hit the enter key or click on the Run button to run it.
In Favorites view:
1. Click on a filter to select it or double click to run it.
2. If you only selected a filter, hit the enter key or click on the Run button to run it.
In Edit view:
1. If you want to run a filter from the All list, click on a group node to expand it.
2. Click on a filter to select it or double click o run it.
3. If you only selected a filter, hit the enter key to run it.
1. Choose "Duplicated" or "Stamped" from the Target Layer combo box.
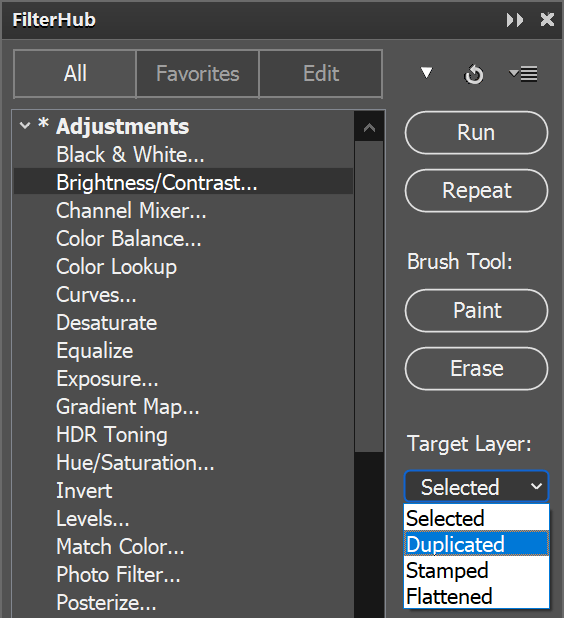
2. Run the filter as described above.
1. Select a filter from the list.
2. Click on the Paint or Erase button.

3. Adjust the settings on the filter dialog and click OK (or Apply on some filters).
4. If you clicked Paint in step 2, the filter effect is hidden now. Paint on the image to make it visible. If you clicked Erase in step 2, the effect is now visible. Paint on the image to erase it. Press the X key to switch between painting and erasing.
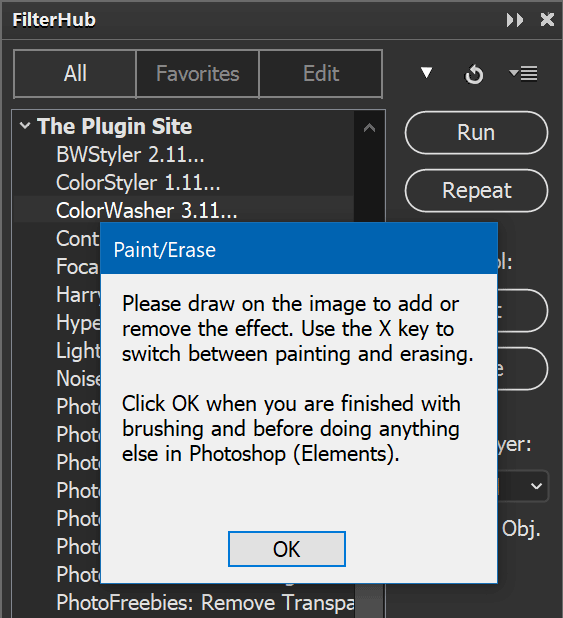
5. When you are finished click the OK button of the panel message to let the panel perform the finishing operation.
1. Click the Edit button on the button bar at the top.
2. Click on a certain node in the All list to expand it and click on a filter to select it. You can select multiple filters by holding down the Shift or Ctrl key.
3. Click on the > button to copy the selected filters to the Favorites list.
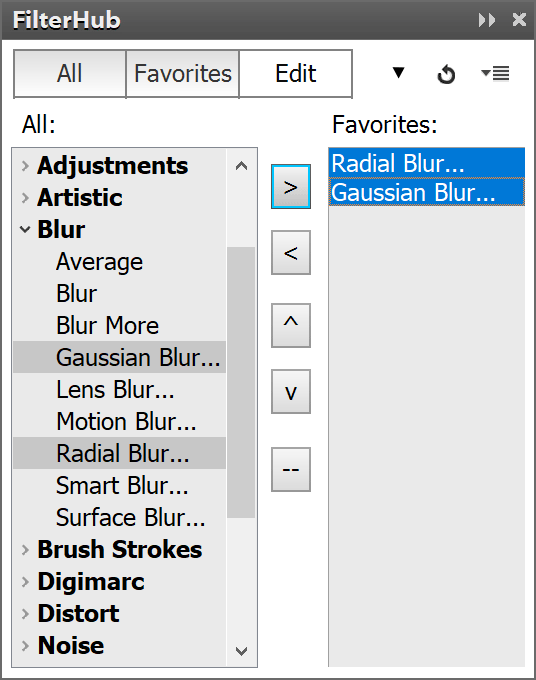
4. To reposition a filter in the Favorites list select it and use the arrow up and down buttons to move it up or down in the list. You can select multiple filters by holding down the Shift or Ctrl key.
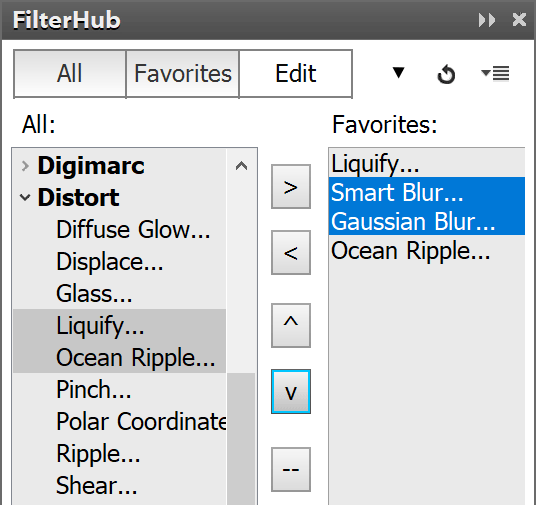
5. To remove a filter from the Favorites list select it and click on the < button.
1. Click the Favorites button on the button bar at the top. If you did not add a filter to the Favorites yet, please see the previous step.
2. Click on a filter in the list.
3. Hold down the Shift or Ctrl key and click on another filter. Alternatively you can also click and drag to select multiple filters.
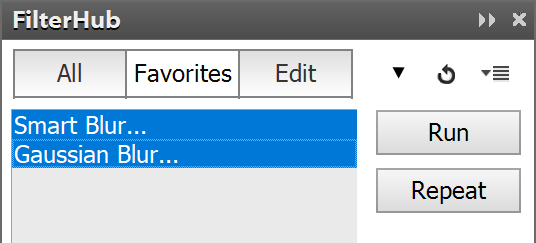
4. After you selected your filters click on the Run button or press the Enter key.
5. The filter dialogs of each selected filter will be displayed one after the other. Adjust their settings and press their OK button.
1. In the Layers panel click on a layer item.
2. Hold down the Shift or Ctrl key and click on another layer.
3. In the FilterHub select a filter from the list and press the Run button or hit the Enter key.
4. In the appearing message click the "Apply To All Layers" button.
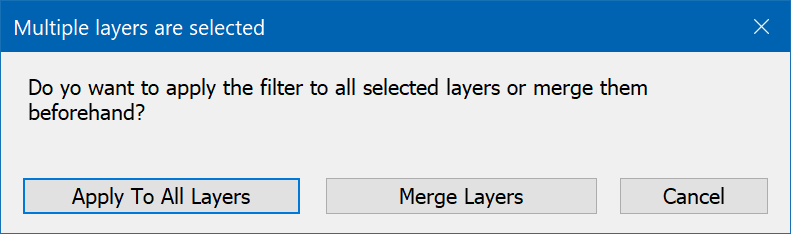
5. Adjust the settings on the filter dialog and click OK (or Apply on some filters).
6. The filter effect is now applied to each of the selected layers.
1. Open an image in Photoshop Elements.
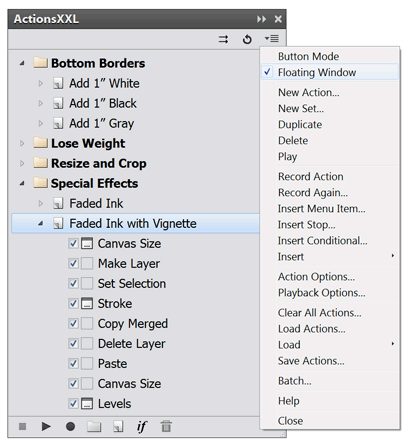
2. If the action that you want to apply is not already displayed in ActionsXXL, click on the menu icon at the top right of the ActionsXXL panel window to display the panel menu. On the panel menu choose Load Actions and on the appearing file dialog choose your action file.
3. Select the action in the ActionsXXL panel window and click the play icon.
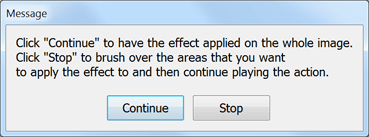
4. If the action displays a dialog or message, click the OK or Continue button. Some actions display a message with a Stop button. In this case you have to do some manual step and then click on the play icon again to continue with the action.
5. After the action finished have a look at the result.
1. Open an image in Photoshop Elements.
2. If the action that you want to apply is not already displayed in ActionsXXL, click on the menu icon at the top right of the ActionsXXL panel window to display the panel menu. On the panel menu choose Load Actions and on the appearing file dialog choose your action file.
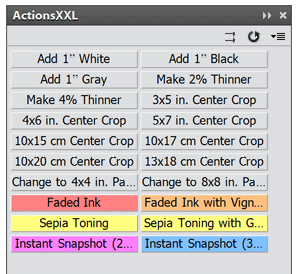
3. To switch to Button Mode open the panel menu again and click on the Button Mode menu item. Now all actions are displayed as buttons. Click one of the buttons to run an action.

4. If the action displays a dialog or message, click the OK or Continue button. Some actions display a message with a Stop button. In this case you have to do some manual step and then click on the action button again to continue.
5. After the action finished have a look at the result.
1. Open an image in Photoshop Elements - unless you want the action to open or create an image itself.
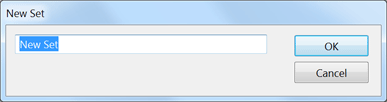
2. If you have not already created your own actions set, click the set icon at the bottom of the ActionsXXL panel window. Alternatively click on the icon at the top right of the panel window and choose "New Set" from the panel menu. On the appearing dialog enter a name for your set, e.g. "John's Actions".
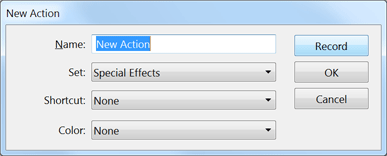
3. Create a new action by clicking the action icon at the bottom of the ActionsXXL panel window. Alternatively choose "New Action" from the panel menu. On the appearing dialog enter a name for your action, e.g. "My Special Effect 1". You can also choose a set where the action will be placed, a key shortcut for triggering the action and a color for button mode.
4. Click the record icon at the bottom of the ActionsXXL panel window. Alternatively choose "Record" from the panel menu.
5. Now perform the steps in Photoshop Elements that you want to record to an action. After each step you will see a new step item added to your action in the ActionsXXL window. If a certain menu item cannot be recorded, choose the "Insert Menu Item" item from the panel menu and try again.
6. If you recorded a step with wrong settings, click the delete icon at the bottom of the ActionsXXL panel window to remove the step and try again.
7. When you have finished, click the stop icon next to the record icon.
8. Now you can click the undo icon at the top of the ActionsXXL window and play your recorded action. To play the actions more slowly or to make the actions stop after each step try the "Playback Options" panel menu item.
9. If you want to change the settings of a recorded step, double click it in the action list in the ActionsXXL window. Then change the dialog settings and click OK. If you want to change the position of a step you can simply drag and drop it to another position.
10. If you want to display a message at a certain point in your action, choose the "Insert Stop" panel menu item.
1. After your recorded or modified one or more actions and are satisfied with the result, it is a good idea to save it. You can save only one set of actions into an .atn file, so it is good if all actions of this set are ready to be saved. Otherwise create a new set and drag and drop only the action(s) that you want to save into it.
2. Select the action set that you want to save. You can select the set item itself, but it is already fine if there is a selection anywhere inside the set.
3. Click on the icon at the top right of the ActionsXXL panel window and choose "Save Actions" from the panel menu.
4. In the appearing file dialog choose a folder and enter a file name.
5. Your action set is now saved as an .atn file and can be loaded again in ActionsXXL at any time.
1. If you want to apply the same image processing steps to multiple open images or multiple layers in Photoshop Elements, you can record these steps as described above and use the Batch dialog to apply them.
2. If you want to apply an action to multiple layers, select these layers in the Layers panel. Hold down the Ctrl or Shift key to select multiple layers. If you want to apply an action to multiple open documents, make sure that only these documents are open. Close all other documents that you do not want to process.
3. Run the Batch command by clicking on the batch icon at the top of the ActionsXXL panel window, by choosing File > Automation Tools > Batch or by selecting the "Batch" panel menu item.
4. To make sure that no previous batch settings are activated that you may not want to use, hold down the Alt key and click on the Cancel button, which now turned into a Reset button.
5. On the Source tab sheet of the Batch dialog activate the "Open Images" or the "Selected Layers ..." radio button.
6. Switch to the Destination tab sheet and activate the "None" option. This makes sure that the open documents are not saved and closed.
7. If you want to resize the documents or convert them to sRGB or 8 Bits/channel, then activate the appropriate options on the Format tab sheet.
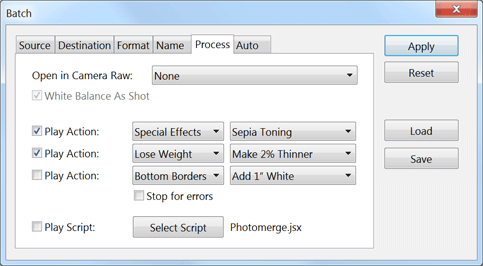
8. On the Process tab sheet activate one of the Run Actions check boxes, select the set of your action from the first combo box at the right and the actions itself in the second combo box. This will apply your action.
9. If you want to apply an automatic enhancement to your documents, activate the appropriate check box on the Auto tab sheet.
10. To use these batch settings again later click the Save button and enter a name for them. To open them again later, use the Load button.
11. Now click the Run button to start the processing. If there is a problem, you can press the Esc key to stop the batch processing at any time.
1. If you want to batch process image files in Photoshop Elements, best close all open documents. Make sure that the action(s) that you want to apply to the image files are displayed in the ActionsXXL window.
2. Run the Batch command by clicking on the batch icon at the top of the ActionsXXL panel window, by choosing File > Automation Tools > Batch or by selecting the "Batch" panel menu item.
3. To make sure that any previous batch settings are activated that you may not want to use, hold down the Alt key and click on the Cancel button, which now turns into a Reset button. If you want to use batch settings that you saved to a file, use the Load button.
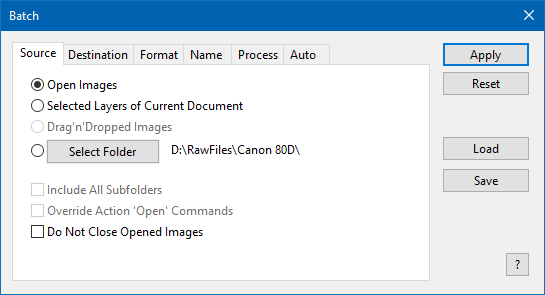
4. On the Source tab sheet click the Select Folder button and choose the folder that contains your image files. If you want to process images files from sub folders of the selected folder, activate the "Include All Subfolders" check box. Alternatively you can select the image files in Windows Explorer and drag and drop them onto the Batch dialog.
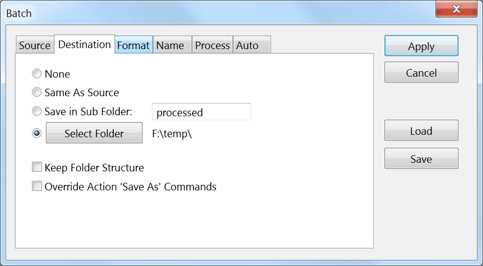
5. Switch to the Destination tab sheet and activate one of the three bottom radio buttons. The None option will only open the image files, but not save and close them. It is probably best if you save the processed files in a sub folder with the "Save in sub folder" option or if you select a new folder with the Select Folder button. The "Save in same location" option overwrites the original files if you do not select another format or name on the next two tab sheets, so you should usually only use it if you already work with duplicates of the original files.
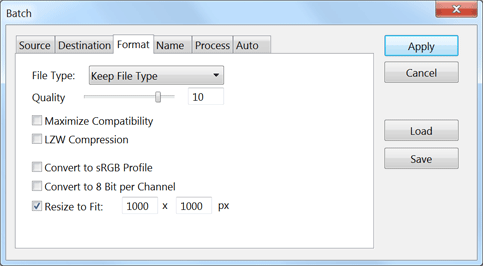
6. Switch to the Format tab sheet. If you want to keep the current file format of files, use the "Keep File Type" option. Otherwise choose one of the other file formats from the File Type combo box. Choose the prefered file format options below the combo box. If you want to resize the images, e.g. to create thumbnails for low resolution versions, activate the Resize to Fit check box and enter the maximum new width and height.
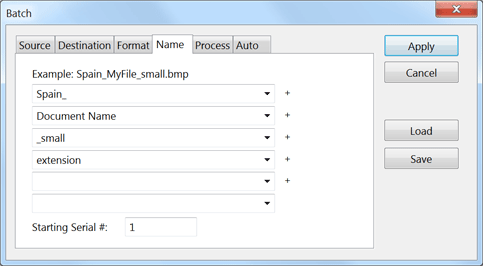
7. Switch to the Name tab sheet. If you want to keep the name of the files, make sure that "Document Name" is visible in the first combo box and "extension" in the second. Otherwise choose another option or enter a text in the combo boxes. At the top you see an example of how the first processed file with a file name of "MyFile.bmp" would be renamed.
8. On the Process tab sheet you can apply up to three actions and a script to the images. Additionally you can edit none, the first or all images with Camera Raw.
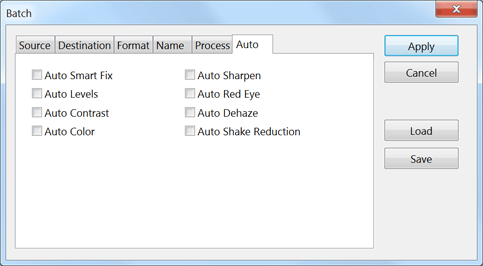
9. If you want to apply an automatic enhancement to your documents, activate the appropriate check boxes on the Auto tab sheet.
10. To use these settings later again, click the Save button and enter a name for the settings.
11. Now click the Run button to start the processing. If there is a problem, you can press the Esc key to stop the batch processing at any time.
Automated Method:
1. Close all images and choose Denoise from the Image > Tasks sub menu or from the Tasks panel, which can be launched from the Window menu.
2. On the appearing Open As Layers file dialog select at least two images (taken with the same camera settings of the same scene) by using the Ctrl or Shift key. Then click the Open button.
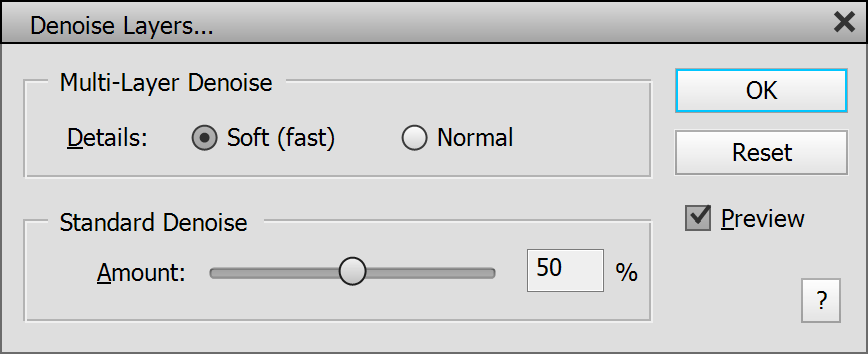
3. When the Denoise Layers dialog appears, adjust its options if necessary. Then click OK.


The left image is
a 100% detail of a photo taken at ISO 6400. For the right image the
Denoise Layers feature was used on five photos taken at ISO 6400.
Manual Method:
1. Choose Open As Layer from the File menu and select at least two images (taken with the same camera settings of the same scene) by using the Ctrl or Shift key. Then click the Open button.
2. If it does not appear automatically, choose Auto Align Layers from the Image menu and click OK.
3. If there are transparent border areas, choose Remove Transparency from the Image menu, activate the "Stacked Images" radio button and click OK to crop them away. To fill these transparent areas with content (in Photoshop Elements 13, Photoshop CS5 and higher) activate the Content-Aware Fill check box before clicking OK. Alternatively use the Crop tool to manually remove them.
4. Choose Denoise Layers from the Image menu, adjust the Denoise options and click OK.
Automated Method:
1. Close all images and choose Depth of Field Increase from the Image > Tasks sub menu or from the Tasks panel, which can be launched from the Window menu.
2. On the appearing Open As Layer dialog select at least two images by using the Ctrl or Shift key. Then click the Open button.
3. Now you will see all images as layers with layer masks that reveal the sharpest parts of each layer.
Manual Method:
1. Choose Open As Layer from the File menu and select at least two images by using the Ctrl or Shift key.
2. If it does not appear automatically, choose Auto Align Layers from the Image menu and click OK.
3. Choose Auto Blend Layers from the Image menu.
4. Select Stack Images from the Blend Method options. If desired, activate the check box for seamless tones and colors. Finally press OK.
5. If there are transparent border areas, choose Remove Transparency from the Image menu, activate the "Stacked Images" radio button and click OK to crop them away. To fill these transparent areas with content (in Photoshop Elements 13, Photoshop CS5 and higher) activate the Content-Aware Fill check box before clicking OK. Alternatively use the Crop tool to manually remove them.
Automated Method:
1. Close all images and choose HDR from the Image > Tasks sub menu or from theTasks panel, which can be launched from the Window menu.
2. On the appearing Open As Layer dialog select at least one raw file but maximally three files (taken with the different exposure settings of the same scene) by using the Ctrl or Shift key. Then click the Open button.
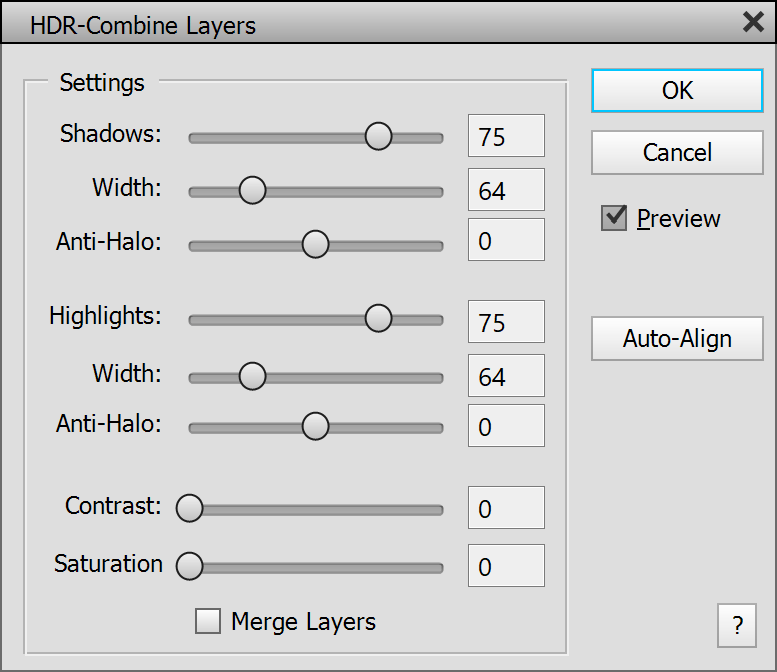
3. When the HDR-Combine Layers dialog appears adjust its settings. Then click OK.
Manual Method:
1. Choose Open As Layer from the File menu and select at least one raw file but maximally three files by using the Ctrl or Shift key. Then click the Open button.
2. If it does not appear automatically, choose Auto Align Layers from the Image menu and click OK.
3. If there are transparent border areas, choose Remove Transparency from the Image menu, activate the "Stacked Images" radio button and click OK to crop them away. To fill these transparent areas with content (in Photoshop Elements 13, Photoshop CS5 and higher) activate the Content-Aware Fill check box before clicking OK. Alternatively use the Crop tool to manually remove them.
4. Choose HDR-Combine Layers from the Image menu, adjust the settings for the best result and click OK.
Automated Method:
1. Close all images and choose Light Trail from the Image > Tasks sub menu or from the Tasks panel, which can be launched from the Window menu.
2. On the appearing Open As Layer dialog select at least two photos (taken of the different scenes) by using the Ctrl or Shift key. Then click the Open button.
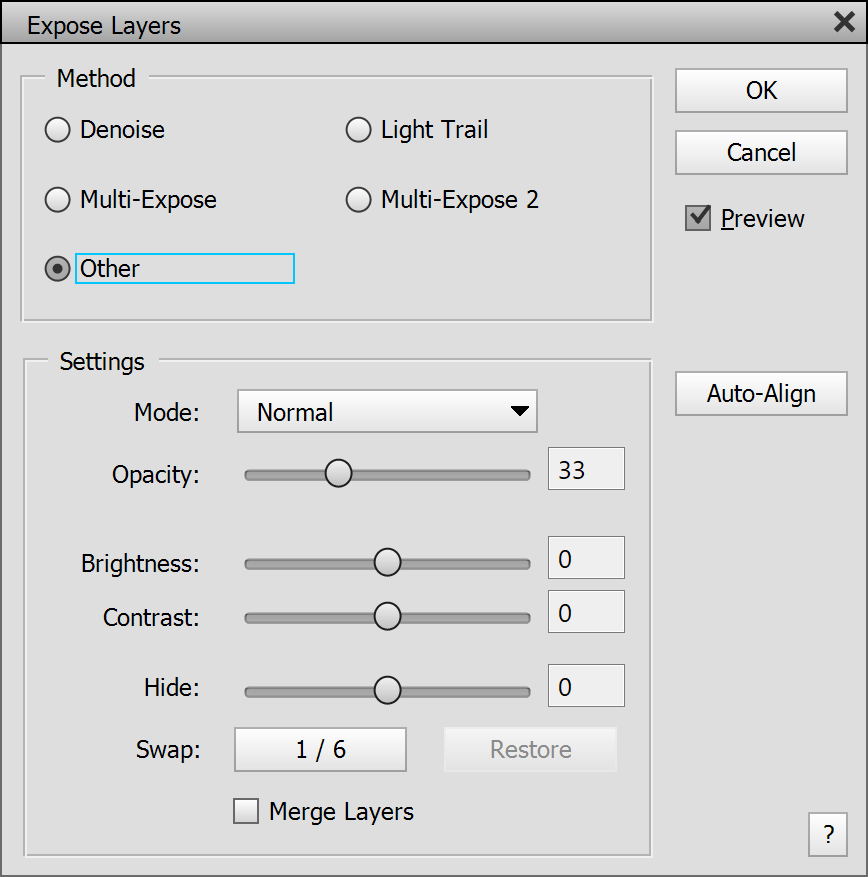
3. When the Auto-Expose Layers dialog appears adjust its Brightness and Contrast sliders and try the Hide slider for excluding some photos. Then click OK.
Manual Method:
1. Choose Open As Layer from the File menu and select at least two photos of light trails by using the Ctrl or Shift key. Then click the Open button.


The
left image is one of three light trail photos taken with a tripod. The
right result was produced by automatically aligning
and cropping all three photos and applying LayerShop's Auto-Exposure feature
with the Light Trail option activated.
2. If it does not appear automatically, choose Auto
Align Layers from the Image menu and click OK.
3. If there are transparent border areas, choose Remove Transparency from the Image menu, activate the "Stacked Images" radio button and click OK to crop them away. To fill these transparent areas with content (in Photoshop Elements 13, Photoshop CS5 and higher) activate the Content-Aware Fill check box before clicking OK. Alternatively use the Crop tool to manually remove them.
4. Choose Auto-Expose Layers from the Image menu, select the Light Trail method, adjust the Brightness and Contrast sliders, try the Layers slider for excluding some photos and click OK.
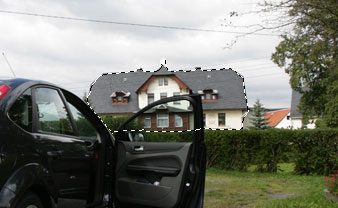
Automated Method:
1. Close all images and choose Manual Composition from the Image > Tasks sub menu or from the Tasks panel, which can be launched from the Window menu.
2. On the appearing Open As Layer dialog select at least two images by using the Ctrl or Shift key. Then click the Open button.
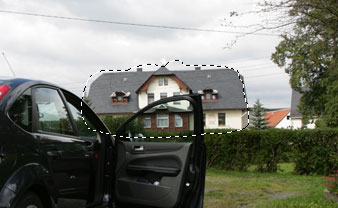
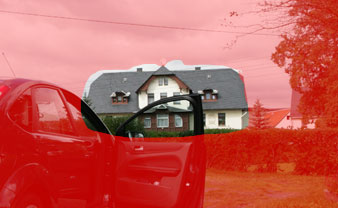
3. Now you will see all images as layers each with a layer mask except the bottom layer. Use the brush tool for making certain image areas of a layer visible or invisible. This way you can combine the best parts of each photo.
Manual Method:
1. Choose Open As Layer from the File menu and select at least two images by using the Ctrl or Shift key.
2. If it does not appear automatically, choose Auto Align Layers from the Image menu and click OK.
![]()
3. If there are transparent border areas, choose Remove Transparency from the Image menu, activate the "Stacked Images" radio button and click OK. Alternatively use the Crop tool to manually remove them.
4. Create a layer mask for each layer except the bottom one and use the brush tool for making certain image areas of a layer visible or invisible. This way you can combine the best parts of each photo.
Automated Method:
1. Close all images and choose Multiple Exposure from the Image > Tasks sub menu or from the Tasks panel, which can be launched from the Window menu.
2. On the appearing Open As Layer dialog select at least two photos (taken of the different scenes) by using the Ctrl or Shift key. Then click the Open button.
3. When the Auto-Expose Layers dialog appears click the Swap button multiple times for effect variations and try the "Multi-Expose 2" option. Adjust the Brightness and Contrast sliders if necessary. Then click OK.
Manual Method:
1. Choose Open As Layer from the File menu and select at least two photos (taken of the different scenes) by using the Ctrl or Shift key. Then click the Open button.
2. Choose Auto-Expose Layers from the Image menu, select the Multi-Expose method. Click the Swap button multiple times for effect variations and try the "Multi-Expose 2" option. Adjust the Brightness and Contrast sliders if necessary. Then click OK.
Automated Method:
1. Close all images and choose Panorama from the Image > Tasks sub menu or from the Tasks panel, which can be launched from the Window menu.
2. On the appearing Open As Layer dialog select at least two images by using the Ctrl or Shift key. Then click the Open button.
3. On the Remove Transparency dialog you can decide about the transparent areas of the panorama. To to keep them click Cancel. To crop them away deactivate the Content-Aware Fill check box and click OK. To fill them with content (in Photoshop Elements 13, Photoshop CS5 and higher) activate the Content-Aware Fill check box and click OK.
4. Now you will see all images as layers stitched as panorama.
Manual Method:
1. Choose Open As Layer from the File menu and select at least two images by using the Ctrl or Shift key.
2. If it does not appear automatically, choose Auto Align Layers from the Image menu. For normal panoramas best choose the Cylindrical option of the Projection group, because the Auto option is sometimes a bit unreliable. The other options position and distort the panorama images differently. Click OK.
3. Choose Auto Blend Layers from the Image menu.
4. Select the Panorama radio button from the Blend Method options and activate the check box for seamless tones and colors. Finally press OK.
5. If there are transparent border areas, choose Remove Transparency from the Image menu and activate the Panorama option. To crop the transparent areas away deactivate the Content-Aware Fill check box and click OK. To fill them with content (in Photoshop Elements 13, Photoshop CS5 and higher) activate the Content-Aware Fill check box and click OK.
Automated Method:
1. Close all images and choose Remove Moving Objects from the Image > Tasks sub menu or from the Tasks panel, which can be launched from the Window menu.
2. On the appearing Open As Layer dialog select at least three images by using the Ctrl or Shift key. Make sure to choose an uneven number of photos for better results. Then click the Open button.
3. If you still see parts or faded versions of the objects, please continue with the "Further Object Removal" instructions below.
Manual Method:
1. Choose Open As Layer from the File menu and select at least three images by using the Ctrl or Shift key.
2. If it does not appear automatically, choose Auto Align Layers from the Image menu and click OK
3. If there are transparent border areas, choose Remove Transparency from the Image menu, activate the "Stacked Images" radio button and click OK to crop them away. To fill these transparent areas with content (in Photoshop Elements 13, Photoshop CS5 and higher) activate the Content-Aware Fill check box before clicking OK. Alternatively use the Crop tool to manually remove them.
4. Choose Remove Moving Objects from the Image menu.
Further Object Removal:
1. If you still see parts or faded versions of the objects that you wanted to remove, please create a selection around them.
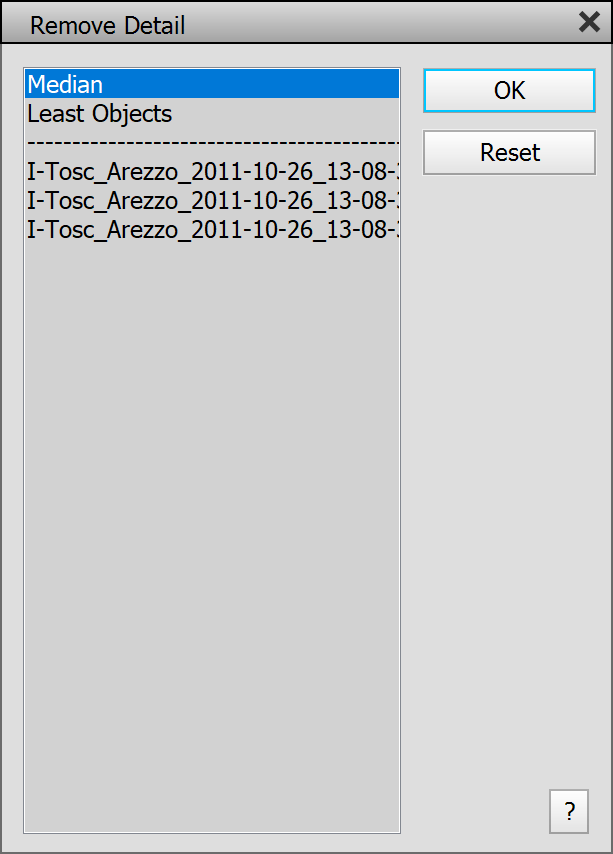
2. Choose Remove Detail from the Image menu and select the items in the list until the object(s) vanish. Then click OK.
Automated Method:
1. Close all images and choose Increase Resolution from the Image > Tasks sub menu or from the Tasks panel, which can be launched from the Window menu.
2. On the appearing Open As Layer dialog select at least two images by using the Ctrl or Shift key. Then click the Open button.
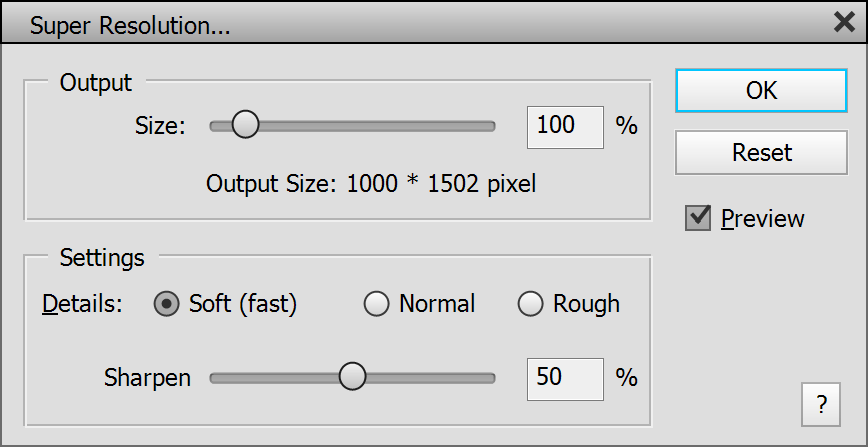
3. On the Super Resolution dialog choose an output size in percent and adjust the detail and sharpen settings as needed.
Manual Method:
1. Choose Open As Layer from the File menu and select at least two images by using the Ctrl or Shift key.
2. If it does not appear automatically, choose Auto Align Layers from the Image menu and click OK.
3. If there are transparent border areas, choose Remove Transparency from the Image menu, activate the "Stacked Images" radio button and click OK to crop them away. To fill these transparent areas with content (in Photoshop Elements 13, Photoshop CS5 and higher) activate the Content-Aware Fill check box before clicking OK. Alternatively use the Crop tool to manually remove them.
4. Choose Super Resolution from the Image menu and choose an output size in percent and adjust the detail and sharpen settings as needed.
Automated Method:
1. Close all images and choose Fix Underexposure from the Image > Tasks sub menu or from the Tasks panel, which can be launched from the Window menu.
2. On the appearing Open As Layer dialog select at least two images by using the Ctrl or Shift key. Then click the Open button.
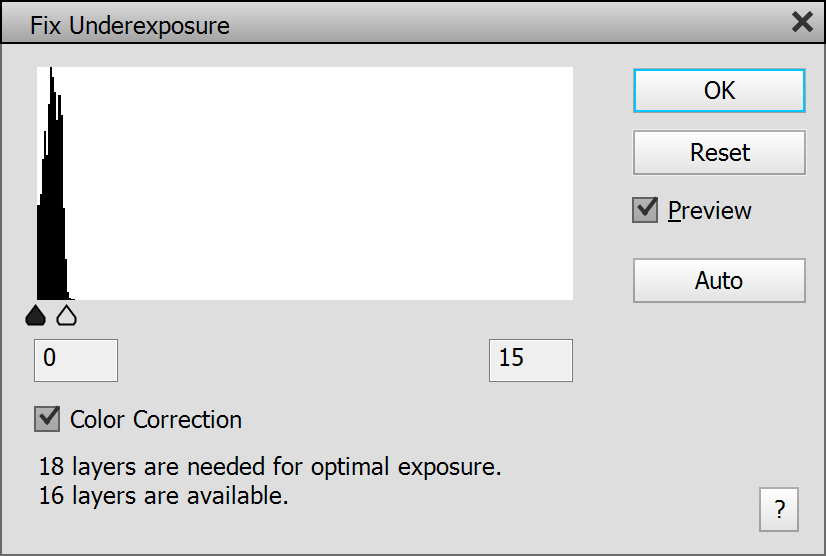
3. On the Fix Underexposure dialog you can use the slider below the histogram to adjust the exposure intensity in case you do not like the automatic setting. Activate the Color Correction check box to fix a color cast. Then click OK.
Manual Method:
1. Choose Open As Layer from the File menu and select at least two images by using the Ctrl or Shift key.
2. If it does not appear automatically, choose Auto Align Layers from the Image menu and click OK.
3. If there are transparent border areas, choose Remove Transparency from the Image menu, activate the "Stacked Images" radio button and click OK to crop them away. To fill these transparent areas with content (in Photoshop Elements 13, Photoshop CS5 and higher) activate the Content-Aware Fill check box before clicking OK. Alternatively use the Crop tool to manually remove them.
4. Choose Fix Underexposure from the Image menu. You can use the slider below the histogram to adjust the exposure intensity in case you do not like the automatic setting. Activate the Color Correction check box to fix a color cast. Then click OK.