Supported by Photoshop Elements 11 and higher
Requirements: An image needs to be opened.
Extended in ElementsXXL 5.0
Normally the Auto Smart Fix filter can only be applied to images with 8-bit per channel. ElementsXXL allows you to apply it to images with 16-bit per channel. However, only the color effect of Auto Smart Fix filter is transferred to 16-bit images, while the local contrast effect is dropped. While the dialog is displayed you will see a color bar at the top of the image. It vanishes after you click the OK button.
Supported
by Photoshop CS2, CC, 2020 and higher
Supported by Photoshop Elements 11 and higher
Requirements: An image needs to be opened.
Added in ElementsXXL 6.0
The Auto Saturation increases the saturation for pale photos and decreases it for photos with too vivid colors. It does this automatically with the help of the saturation histogram and some internal logic.
Supported
by Photoshop CS2, CC, 2020 and higher
Supported by Photoshop
Elements 11 and higher
Requirements: An image needs to be opened.
Added in ElementsXXL 9
The Auto Color 1, Auto Color 2 and Auto Color 3 menu commands perform an automatic color correction. Auto 1 tries to detect color casts in all image areas, Auto 2 looks in midtone areas and Auto 3 check highlights for color casts. Depending on your photo one of the three will be more effective in removing a color cast. If you use a selection, then only the selected area will be analysed for a color cast and not the whole image.
Supported by Photoshop
Elements 11 and higher
Requirements: An image needs to be opened.
Added in ElementsXXL 3.0, extended in ElementsXXL 4.0

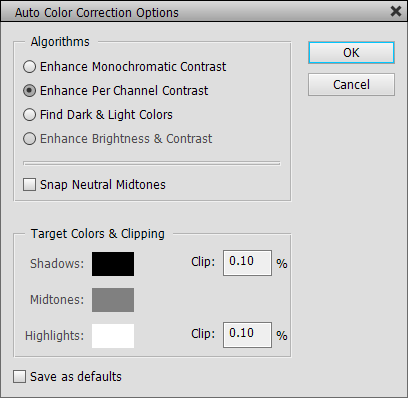
The Auto Options command displays a dialog that offers more options for the Auto Contrast, Auto Level and Auto Color Correction items of the Enhance menu. The Algorithms group lets you switch between them and also offers a Snap Neutral Midtones check box, which produces a slight color correction. The Enhance Brightness & Contrast option is not available in Photoshop Elements yet, but may become available in a future version.
In the Target Colors & Clipping group you can pick colors for adjusting the shadows, midtones and highlights by clicking on the appropriate color box. You can also enter percent values for clipping the shadows and highlights. The effect is immediately visible in the document window. If activated, the Save as defaults check box makes sure that the current settings are used as the default values when opening this dialog again.
Supported by Photoshop Elements 11 and higher
Requirements: An image needs to be opened.
Added in ElementsXXL 5.0
The Auto Lens Correction sub menu offers various menu items for automatically correction the lens distortion of photos. Please make sure that these photos were not already lens corrected, otherwise they will be corrected too much. For manually correcting lens distortion you can also use the Correct Camera Distortion filter on the Filter menu. For manually correcting chromatic aberration use ElementXXL's Chromatic Aberration Removal filter on the Filter menu.
Options...
The Options menu item displays a dialog for manually selecting a lens profile and lens correction options. If ElementsXXL is able to find a matching profile, the found lens profile is already preselected from the Make, Lens and Profile combo boxes of the Lens Profiles group. Otherwise you have to choose the correct lens (or compact camera or smart phone model) from the Lens combo box.
If there is more than one item in the Profile combo box, you can also try the other items to see if they produce a better result. Some lenses offer profile variations for JPEG and raw files or the same lens is available for different camera makes thus different profiles.
If ElementsXXL was not able to find a matching lens profile, you can use the information displayed in the Metadata group to select a items from the combo boxes of the Lens Profiles group. Do not mind if a different camera name is displayed under Make (Metadata) and Profile (Lens Profiles), because different crop factors of different cameras are taken into considerations during lens correction.
You can save your own lens default if you want to use another lens profile for certain metadata or if ElementsXXL is not able to find a matching lens, This mean whenever ElementsXXL tries to find a lens profile it first searches the saved lens defaults for the current metadata. So the saved lens defaults take precedence over the lens profile detection algorithm. To save a lens default choose your lens profile from the combo boxes of the Lens Profiles group and then click the Save button in the Lens Defaults group. To delete the lens default again simply click the Delete button.

If you see a deactivated Auto button in the Lens Defaults group after displaying this dialog, it means that the selected lens profile was found by the auto lens profile detection algorithm. If the Default button is deactivated instead, the selected lens profile was found among the lens defaults. You can also click the Auto button to select the lens profile of the automatic algorithm or click the Default button to assign the lens default. If no lens profile can be detected or no lens default was saved for the current metadata, you will get an error message when clicking one of the two buttons.
The Geometric Distortion, Chromatic Aberration and Vignette check boxes of the Correct group determine which parts of the lens correction process will be applied or omitted. An activated Auto Scale Image check box makes sure that as much image content is preserved as possible by scaling the image after the lens correction. In most cases you will not see any blank edge areas after the lens correction, but for some extreme lenses, e.g. fisheye lenses, you can decide what should be displayed in the blank area with the help of the Edge combo box. You can choose between Edge Extension, Transparency, Black Color and White Color.
When selecting an option the changed settings will be automatically applied and the lens correction will be performed. This usually takes a few seconds. If you do not want to wait and adjust multiple settings, you can also deactivate the Preview check box. If you keep it deactivated, you will only see the final result after clicking OK. If you deactivate and activate the Preview check box at once, you can compare the before and faster result without having the effect slowly recalculated.
Full Lens Correction,
Geometric Distortion
Only, Chromatic Aberration Only, Vignette Only
The Full Lens Correction menu item removes the geometric distortion, chromatic aberration and vignetting. If you only want to apply one of them, please use the Geometric Distortion Only, Chromatic Aberration Only and Vignette Only menu items. During the processing you can see the used lens profile in the progress window.
If ElementsXXL cannot find a matching lens profile, you will see a message and the dialog of the Options... menu item will be displayed. There you can manually choose a matching profile. Best click the Save button in the Lens Defaults group to make sure that the selected lens profile is used the next time for images with the same camera and lens name in the meta data. Otherwise you will have to manually reselect the lens profile next time.
Update Lens Database, Supported Lenses
The Update Lens Database menu item displays the web page of the latest version of Adobe DNG Converter. Please download and install it to get the latest database of lens profiles from Adobe. Please restart Photoshop Elements after that to make sure that ElementsXXL picks up the new lenses.
The Supported Lenses menu item takes you to a web page where the names of all supported lenses are displayed. The Camera Raw version number mentioned there corresponds to the version number of Adobe DNG Converter.
Adobe Lens Profile Downloader / Creator
The Adobe Lens Profile Downloader menu item takes you to the download page of the Adobe Lens Profile Downloader software. If the installation does not complete, you may need to install the latest version of Adobe AIR from here. After you installed Lens Profile Downloader, you can run it from the same menu item. You can use it to download lens profile that were uploaded by users. Here you can find profiles for more exotic lenses and install them directly to the Adobe lens database on your computer. Please restart Photoshop Elements to make sure that ElementsXXL picks up the new lenses.
The Adobe Lens Profile Creator menu item takes you to the download page of the Adobe Lens Profile Creator software. Copy the contents of the downloaded .zip file to c:\Program Files (x86)\Adobe Lens Profile Creator 1.0.4\ to ensure that you can run Lens Profile Creator from the same menu item. You can use it to create lens profiles that do not exist so far. For more information read its manual.
To make sure that ElementsXXL
notices your newly created lens profile (or profiles that you downloaded from
somewhere), please copy the.lcp file into this folder (where the downloaded
lenses from the Adobe Lens Profile Downloader also reside):
c:\Users\<your username>\AppData\Roaming\Adobe\CameraRaw\LensProfiles\1.0\Downloaded\
Please restart Photoshop Elements to make sure that ElementsXXL picks up
the new lenses.
Auto Red Eye Fix
Supported by Photoshop
Elements 11 and higher
Requirements: An image needs to be opened.
Extended in ElementsXXL 9.0
ElementsXXL allows applying the Auto Red Eye Fix to images with 16-bit per channel.
Adjust Color > Remove Color Cast
Supported by Photoshop Elements 11 and higher
Requirements: An image needs to be opened.
Extended in ElementsXXL 5.0
Normally the Remove Color Cast filter can only be applied to images with 8-bit per channel. ElementsXXL allows you to apply it to images with 16-bit per channel. While the dialog is displayed you will see a color bar at the top of the image. It vanishes after you click the OK button.
Supported
by Photoshop CS2, CC, 2020 and higher
Supported
by Photoshop Elements 11 and higher
Requirements: An image needs to be opened.
Added in ElementsXXL 9
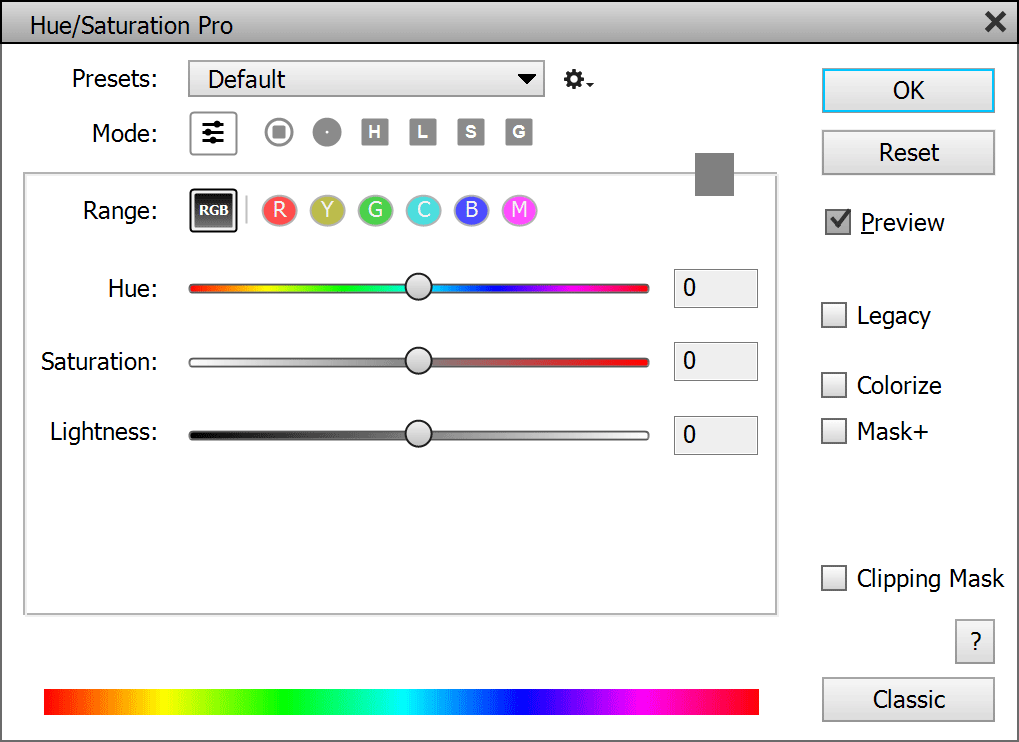
Hue/Saturation Pro is an advanced version of the Hue/Saturation filter included in Photoshop (Elements). The original filter was created decades ago with computer graphics in mind and was not updated since then. Hue/Saturation Pro is meant to be used with photos, so it avoids the problems of the original, e.g. saturation artifacts and contrast reduction.
The Legacy check box activates the effect of the original Hue/Saturation filters of Photoshop Elements. This means you can switch between both effects and use the one that suits your task better. The Colorize check box lets you convert the image to black and white and colorize it at the same time. This effect can only be applied to the full image.
Besides the usual slider mode Hue/Saturation Pro also offers various modes, which let you can choose a color in order to create a combined hue/saturation/lightness effect in a certain color range. This might seem a bit strange at first, but should feel intuitive after a while. You can basically change 2 hypothetical sliders at the same time this way. For more explanations about these modes see Color Balance below.
The Range icons let you select a color range to edit. The RGB icon influences the whole image. The colored icons affect image areas with the same color. Each icon offers its own sliders and color controls, you can adjust them all on the same time.
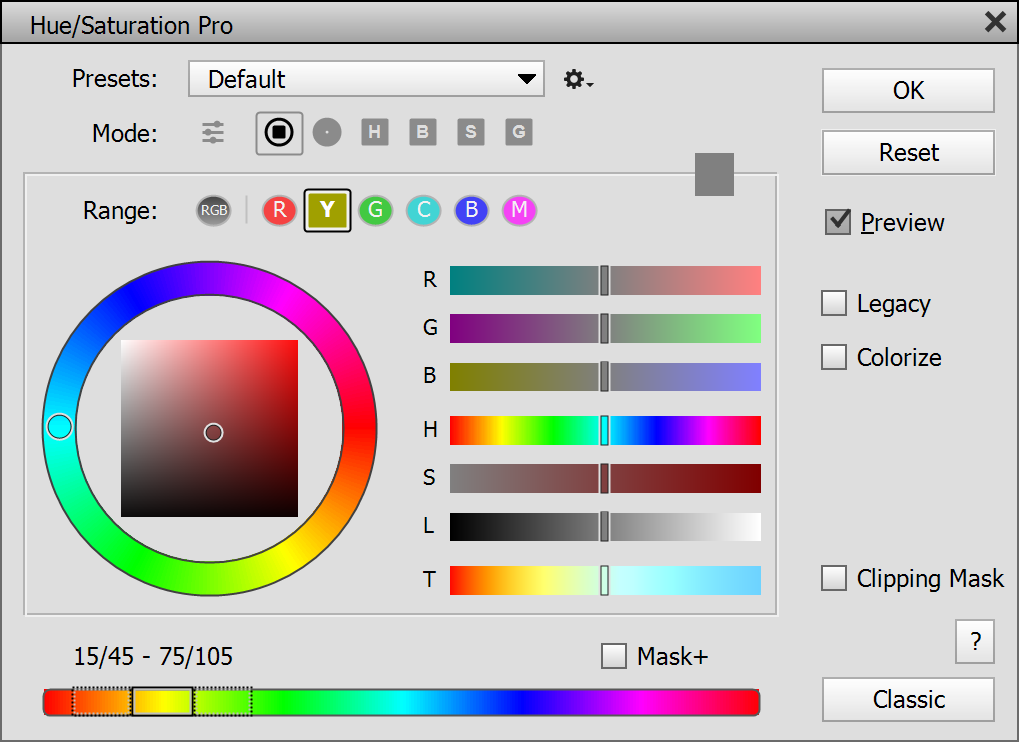
If you activate one of the Range icons (except RGB), you can use the hue bar at the bottom. You can see three areas there. The middle one defines the colors that are affected. The 2 outer areas are used for gradually blending between the main color area and surrounding areas. This avoids harsh edges and creates a pleasing soft transition. Click and drag the middle area to move all three areas to the left or right. This changes the color range that is affected in the image. Click and drag one of the outer area to move it while expanding or contracting the middle area. Click on the vertical lines of the black frame to individually make each of the three areas smaller or larger. Above the hue bar you can see the color angle values that define the chosen color area.
The Mask+ check box lets you apply a more strict mask. It only shows the color that is selected in the Range icon bar. So changing the hue bar controls has less effect.
Click on the Classic button to switch to the original Hue/Saturation dialog of Photoshop if needed.
Supported
by Photoshop CS2, CC, 2020 and higher
Supported
by Photoshop Elements 11 and higher
Requirements: An image needs to be opened.
Added in ElementsXXL 9
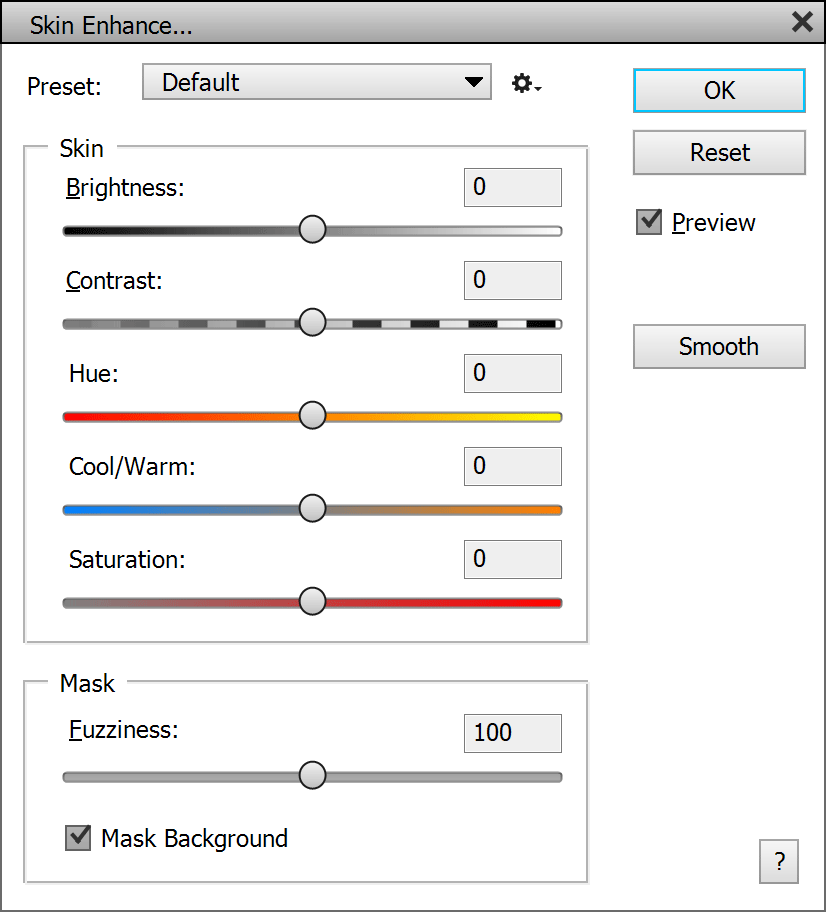
The Enhance Skin feature makes it easy to change the brightness, contrast, hue, color and saturation of skin areas in photos without having to create a mask and using multiple filters. Skin in portrait shots often receives insufficient light when not using pro equipment. The Brightnessand Contrast sliders allows you to compensate for that. The Hue slider only shifts the color from red to yellow, so it is limited to skin tones.The Cool/Warm slider can be used to compensate for too cold or warm skin color. Saturation lets you make skin tones look more natural.
The Mask group lets you adjust the skin mask that is automatically created by the filter. The Fuzziness slider lets you add more or less image areas to the skin mask that is used to smooth the skin. In Photoshop Elements 2020 and higher you can also use the Mask Background check box to keep background areas that have a similar color as skin from being affected.
Click the Smooth bottom to instantly switch to the Skin Smoother filter. You will be asked first if you want to apply the current effect.
Supported
by Photoshop CS2, CC, 2020 and higher
Supported by Photoshop Elements 11 and higher
Requirements: An image needs to be opened.
Added in ElementsXXL 7.0
The Range Adjust filter and adjustment layer lets you target specific image area with a certain tonal, saturation and color range and change their brightness, contrast and color. Its masking options are similar to the Color Range feature, but offer more flexibility. Additionally the Range Adjust feature produces softer edges than the Color Range dialog, which avoids unnatural looking photo adjustments. Range Adjust also lets you create a mask and apply the adjustment in one pass. So you can immediately see if the mask works out or not and readjust the it quickly without having to going back and forth between different dialogs.
The sliders in the Adjust group change the pixel values. The Brightness slider increases or decreases the brightness and the Contrast slider does the same for the contrast of the targeted image area. The Amplify slider applies an effect similar to the Levels dialog. You can use it for stronger brightness and contrast adjustments. The Saturation slider makes colors faded or more vivid. The Cool/Warm and Green/Magenta sliders together colorize the image area with every imaginable color.
The Mask group lets you define the image area that is affected by sliders of the Adjust group. There are three histogram controls allow creating a mask by defining the ranges of hue, saturation and luminosity that should be targeted. These controls displays a histogram and lets you visually select a range.

With the top histogram control you can select a certain color or color range. The histogram shows you which hues are present in the image and which are not. You can move the two slider knobs of the second and third control to the left to focus on low saturation areas or shadows. Keep them in the middle for the mid saturated areas or midtones and move them to the right for high saturated areas or highlights. You can also adjust the whole image by setting all black knobs to zero and the white ones to 255.
You can also use three eyedropper tools to click on the image, which readjusts the values of the three histogram controls. The normal eyedropper tool sets default ranges, which can be increased or decreased by clicking with the + and - eye dropper tools. Below the eyedropper icons you see a grayscale preview of the used mask. Further below are two color boxes. The left color box shows the color that is defined by the black slider knobs beneath the three histograms, the right color box contains the color that is defined by the white slider knobs. Click on each color box to change the color and the appropriate slider values from a color dialog. The Invert check box inverts the mask and select non-selected areas.
The Fuzziness slider changes the contrast of the mask. Lower values produce a higher contrast mask thus targeting certain areas more precisely. Higher values make the applied effect flow into neighboring areas too. The Radius slider softens the borders of the mask of the defined mask. This smoothly blends the adjusted area with the rest of the image. The Adjust slider moves the mask border forth and back thus allowing to make the transition look even more natural.
Supported by Photoshop Elements 11 and higher
Requirements: An image needs to be opened.
Extended in ElementsXXL 5.0
Normally the Adjust Color for Skin Tone filter can only be applied to images with 8-bit per channel. ElementsXXL allows you to apply it to images with 16-bit per channel. While the dialog is displayed you will see a color bar at the top of the image. It vanishes after you click the OK button.
Supported
by Photoshop CS2, CC, 2020 and higher
Supported by Photoshop Elements 11 and higher
Requirements: An image needs to be opened.
Added in ElementsXXL 1.0, extended in 3, 8 and 9
The Channel Mixer recomposes each color channel of an RGB image by blending the three RGB channels according to certain percentage values, which produces color effects. If the Monochrome check box is activated, you are able to create a black & white effect that is defined by a mix of the three color channels.
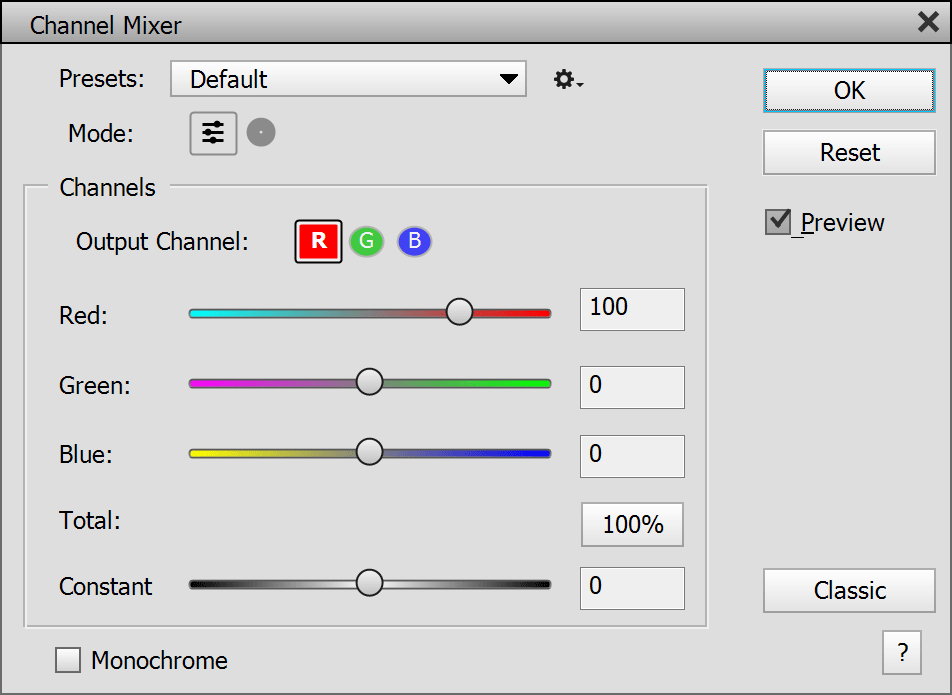
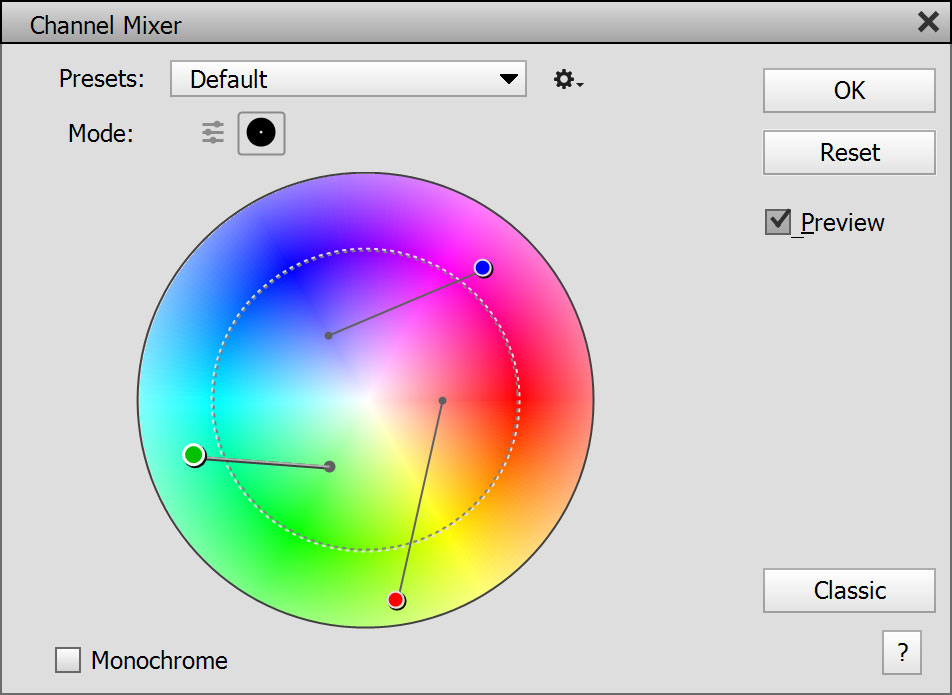
The Default mode of Channel Mixer contains 3 x 4 sliders for adjusting the effect. It is able to produce more effect combinations than the Color Circle mode, but is also harder to use and requires much more effort to produce a certain effect.
The Output Channel option in Default mode lets you selects the color channel that is altered by the four sliders. Each output channel owns different slider values, so there are actually 2 x 4 = 12 slider values in total. The Red, Green and Blue sliders define the color mix that is used for the selected output channel. The Constant slider adjusts the brightness of the current output channel.
As long as the Total value of the Red, Green and Blue sliders is 100%, the brightness of the image is not affected. You can click on the % button to make all three sliders add up to 100%. This makes sure that the brightness is not changed, but it may also remove an intended color cast effect.
The Color Circle mode offers three handles (representing the three output channels) which can be placed anywhere on a color circle. By default they sit on their neutral position which is indicated by a base spot. The base spot is connected with the handle by a line, which makes it easier to memorize the angle of the adjustment. The handle that is currently selected is displayed a bit larger than the other two and show a drop shadow. If you click somewhere, the currently selected handle immediately jumps there. Alternatively you can click and drag a handle. To select another handle just click (and drag) it or use the Page up/down keys.
Each angle of the color circle offers a different hue and the distance from the center increases the saturation of the color. If you place a handle outside the dashed circle, it produces a more extreme effect which may involve color casts. The color at the position of each handle is used to calculate the red, green and blue percentages of each output channel. The total value is always 100%, so you cannot change the brightness of the image in the Color Circle mode as you can do in the Default mode. This limits the total amount of effect combinations, but also helps to produce effects faster and easier.
If the Monochrome check box is active, only one handle remains which selects a color filter for the black & white conversion.
To reset all values hold down the Alt key and click on the Cancel button, which is now named Reset.
Supported by Photoshop Elements 11 and higher
Requirements: An image needs to be opened.
Added in ElementsXXL 1.0, extended in 3.0
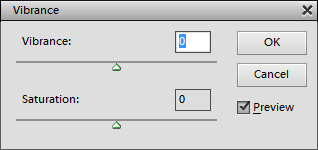
The Vibrance filter changes the saturation of the image. Whereas the Saturation slider produces a more or less standard saturation adjustment, the Vibrance slider additionally protects skin tones from getting too saturated.
Supported
by Photoshop CS2, CC, 2020 and higher
Supported by Photoshop Elements 11 and higher
Requirements: An image needs to be opened.
Added in ElementsXXL 1.0, extended in 3, 7,8 and
9
The Color Balance filter allows you to adjust the color of shadow, midtone and highlight areas separately. In addition to the default mode with only three color slider, which the Color Balance dialog of Photoshop also offers, ElementsXXL provides 5 new modes with many more color controls that provide more intuitive and creative ways to colorize an image.
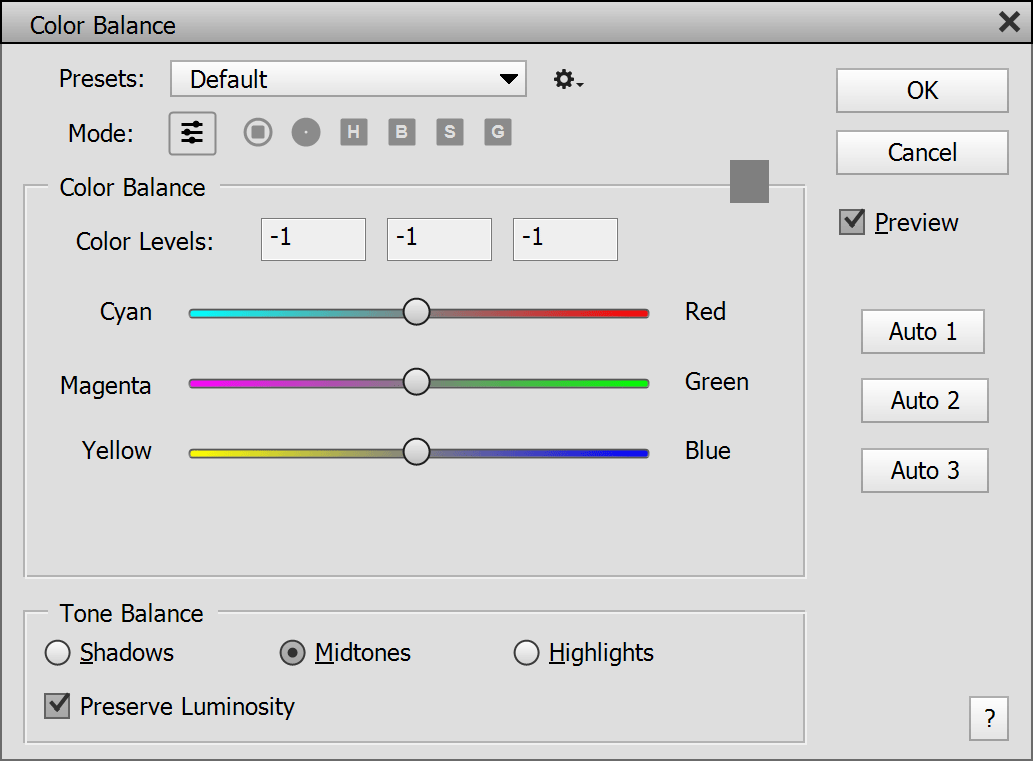
At the bottom in the Tone Balance group you can switch between the Shadows, Midtones or Highlights radio buttons. Each of these 3 options store different values for the three color sliders. So you can apply different colors to the shadows, midtones and highlights at the same time. The Preserve Luminosity check box keeps the brightness of the image unchanged while it is colorized. The Auto 1 to 3 buttons sample the image and adjust the slider in order to remove a color cast. Each button detects color casts differently.
The Color Balance group at the top offers controls for selecting a color that is applied. In the Default mode you can select the color with the help of Cyan/Red, Magenta/Green and Yellow/Blue sliders. At the top right corner of the group box you see a color box, which displays the color that was selected with the three sliders. You can click on this color box to change the color in an appearing color dialog. The sliders then automatically adjust to reflect the new color.
The other five modes of Color Balance display a color wheel, circle or box on the left side and 7 sliders on the right side. No matter which control you you click the other control automatically adjust to reflect new value. This means that the color box on the left and all sliders on the right change their colors.
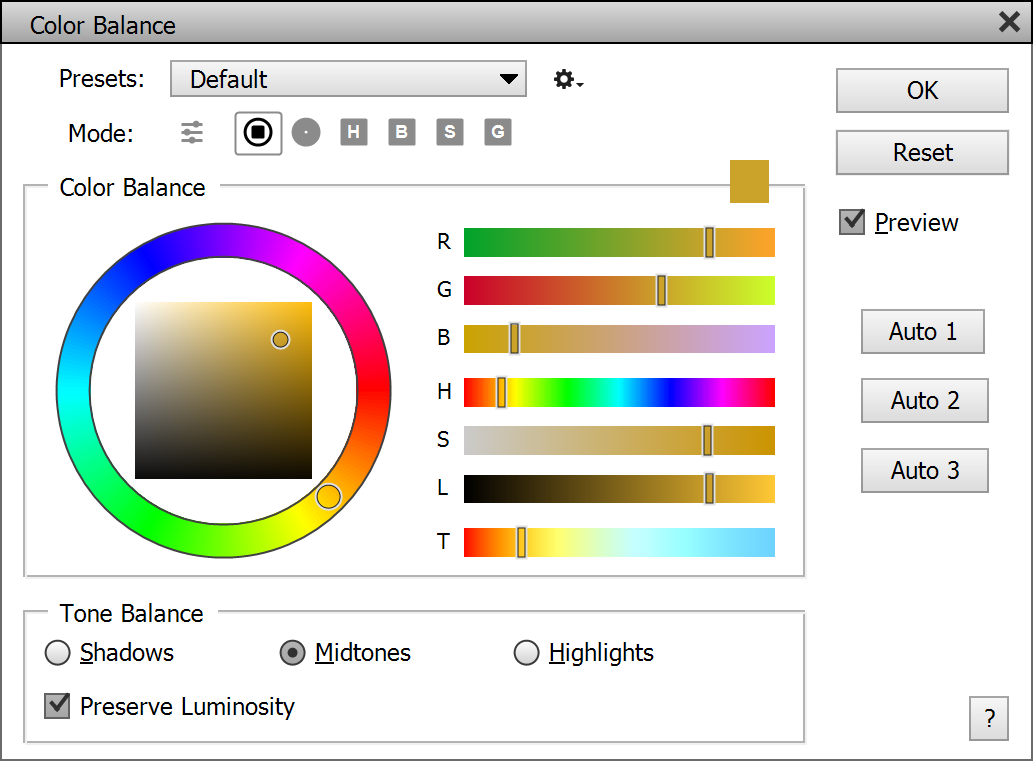
The Color Wheel mode displays a color wheel on the left, which encircles a color box. The color wheel contains all hue tones in a circular fashion. Click on it to select another hue tone. As a result the color box in the middle shows all possible saturation and brightness variations of the selected hue tone. Click somewhere on this color box to set the saturation and brightness of the color.
In all modes (except the Default one) there are the same 7 sliders on the right side. The top three sliders (R, G, B) have the same effect as the three sliders in the Default mode. Additionally you always see which other colors can be chosen directly on the color box of the slider. So you do not need to drag the slider know, you can simply click on a color. Additionally you can define a color with H(ue), S(aturation) and L(ightness) sliders. Finally, there is a T(emperature) slider, which offers the limited spectrum of the color temperature scale from red to blue while omitting magenta tones. You can use it together with the H and S sliders to produce more color variations.

The Color
Circle mode shows a color circle, which contains all possible hue and
saturation values. To adjust the brightness of the selected color use the vertical
gray
slider
or
the
L slider on the left.
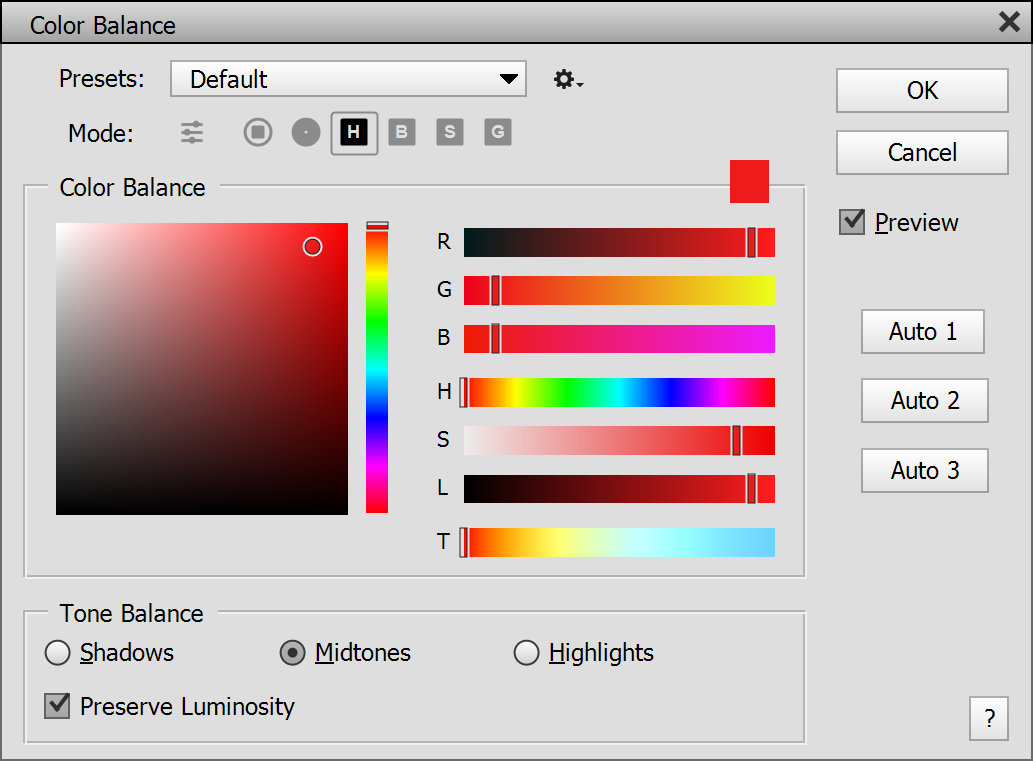
The Hue
Cube
mode offers a color box containing all possible saturation and
brightness values of a hue tone. To select another hue tone use the vertical
hue
slider
or
the
H slider on the left.
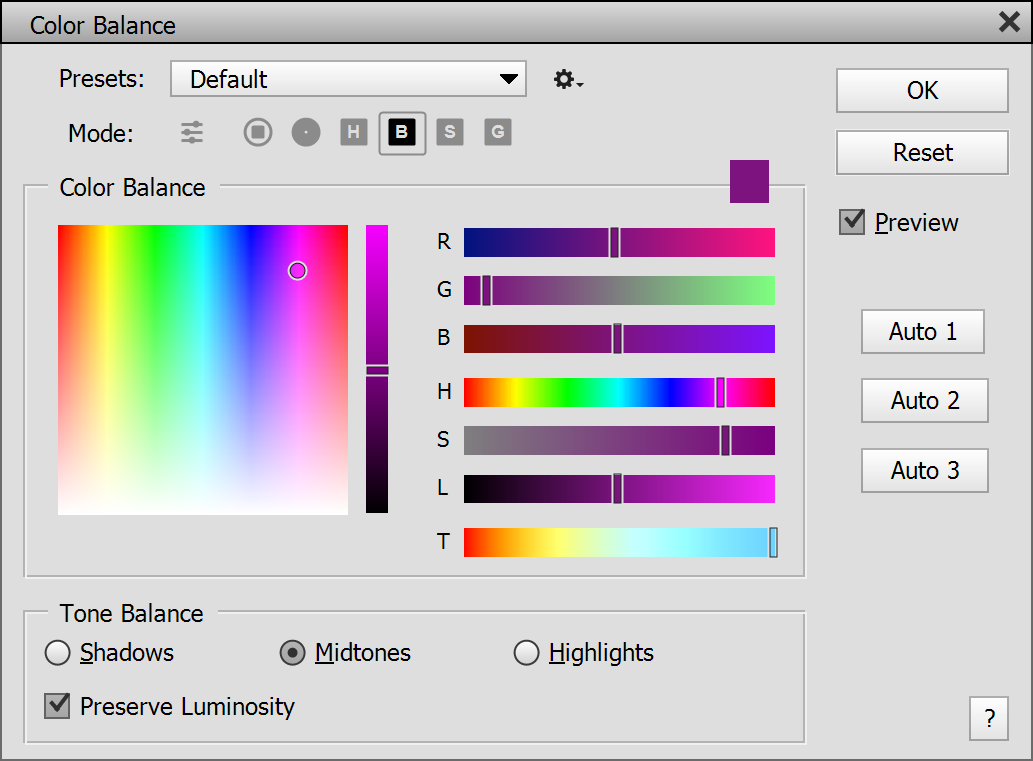
The Brightness
Cube mode presents a box with hue tones running horizontally and
saturation vertically. To adjust the brightness use the vertical
brightness slider
or
the
L slider on the left.
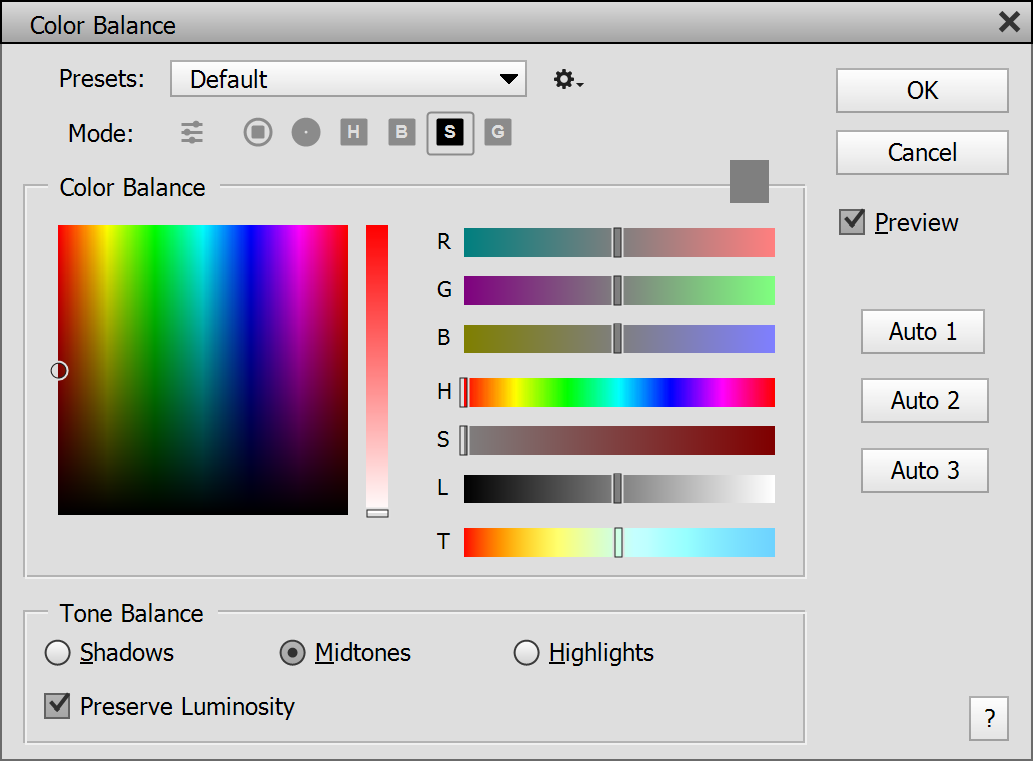
The Saturation Cube mode displays a box with hue tones running horizontally that fade to black vertically. To adjust the saturation use the vertical saturation slider or the S slider on the left.
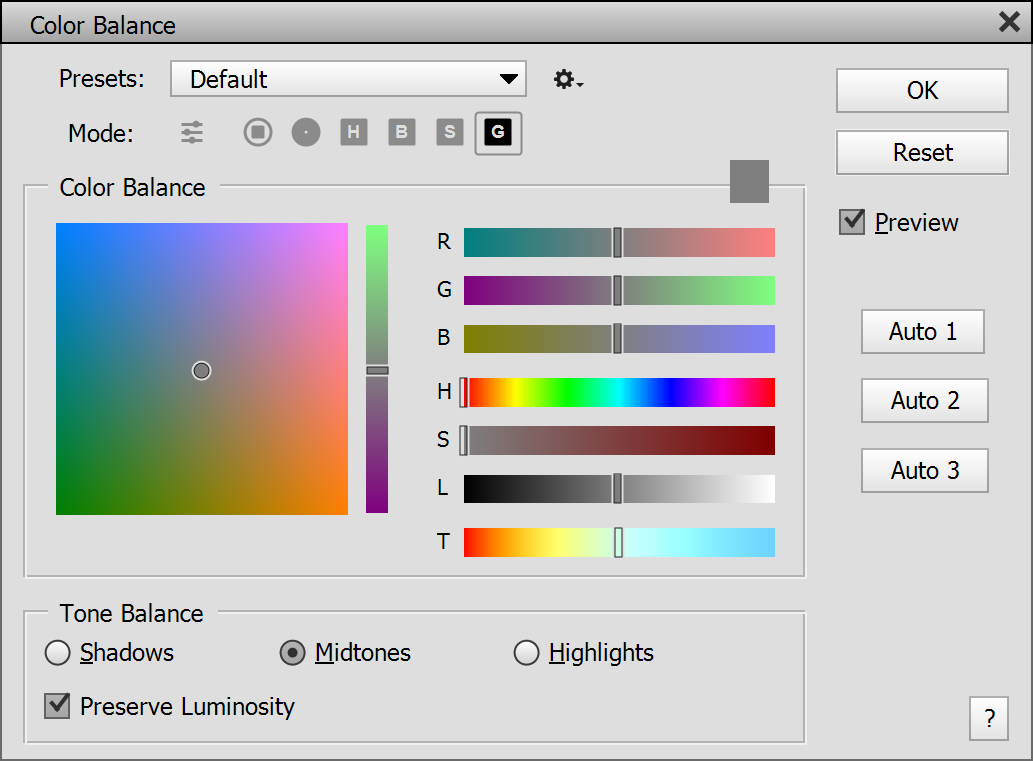
The Green Color mode displays a box with a red vertical gradient and blue horizontal gradient which are mixed together. To adjust the green color use the vertical slider or the G slider on the left. This mode lets you use choose rather soft colors.
Best choose the mode that intuitively makes the most sense to you. All of these modes let you select all possible colors, but some of the modes may inspire more color creativity.
Supported by Photoshop Elements 11 and higher
Requirements: An image needs to be opened.
Added in ElementsXXL 1.0, extended in 3.0
The Selective Color filter lets you independently adjust certain color and gray areas of the image. It is similar to the Adjust Hue/Saturation filter, but uses the CMYK color model instead of the HSL one, as you can see from the names of the sliders. Additionally it also allows adjusting white, neutral and black areas. On the other hand the adjustments of the Selective Color filter are less precise, because there is no feature for editing the color ranges.
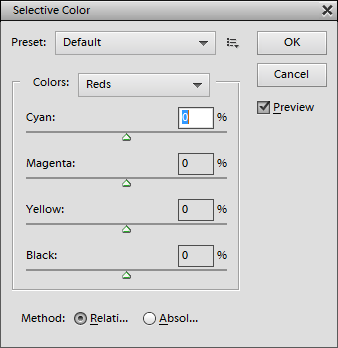
Select the target color from the Colors combo box and use the sliders to change it. Each combo box option uses different slider values, so there are a total of 9 * 4 = 36 slider values. The two Method radio buttons at the bottom switch between different color adjustment methods. To reset all values hold down the Alt key and click on the Cancel button, which is now named Reset.
Supported by Photoshop Elements 11 and higher
Requirements: An RGB image needs to be opened.
Added in ElementsXXL 4.0, improved in 5.0, extended in 8.0
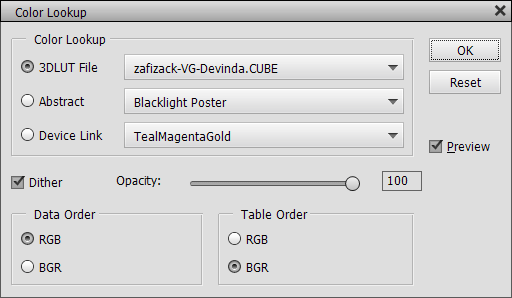
The Color Lookup filter lets you apply a lookup table (also called profile) to the image thus producing a color adjustment or color effect. There are two types of dialogs: The classic one (see above) is displayed in Photoshop Elements 13 and higher. ElementsXXL's own dialog (see below) is mainly used in Photoshop Elements 11 and 12.
There are three combo boxes with different type of profiles (3D LUT, Abstract and Device Link). As you can only apply one profile at a time a radio button at the left-hand side decides which combo box option is applied. The combo boxes already offer profile items, but you can also open a profile from file by choosing the first "Load ..:" item of each combo box, which opens a file dialog.
The Dither check box determines if the color profile applies dithering, which means that neighboring pixels will be adjusted in order to produce a visually more precise result. This is only recommended if the image does not contain any noise, which may be amplified that way.
The Opacity slider lets you reduce the intensity of the color lookup effect. In the case of the Color Lookup adjustment layer this directly reduces the opacity of the adjustment layer. The Opacity slider is not always available depending on the used Photoshop Elements version and whether you use the filter or adjustment layer dialog. Alternatively please use the Edit > Fade command after applying the Color Lookup filter or adjust the layer opacity after applying the Color Lookup adjustment layer.
If you open a .cube file, you will also see Data Order and Table Order controls at the bottom. They let you swap the color order, which usually produces more exotic effects.
Please note: You
can create your own lookup files with the File > Export > Color
Lookup Table command and then use them with Color Lookup filter and adjustment
layer.
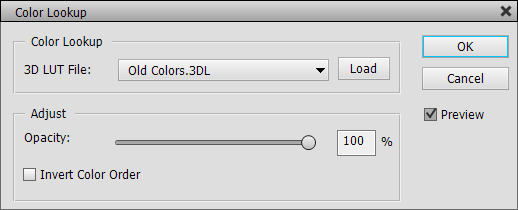
ElementsXXL's Color Lookup dialog is a bit more simple and does not support 1DLS, 3DLS and ICC/ICM profiles. However, it runs in Photoshop Elements 11 and 12 and can also be used in newer Photoshop Elements versions by deactivating the "Use native filters for 16-bit images" check box in the ElementsXXL Preferences. There is a dedicated Load button for opening profile files, so you do not need to choose it from the combo box. The Invert Color Order check box (in contrast to the of Data Order and Table Order controls) also works with 3DL, CSP and LOOK files and not only CUBE files.
Supported
by Photoshop CS2, CC, 2020 and higher
Supported by Photoshop
Elements 11 and higher
Requirements: One or more 8-bit images need to be opened.
Added in ElementsXXL 2.0, improved in ElementsXXL 6.0 and 7.0
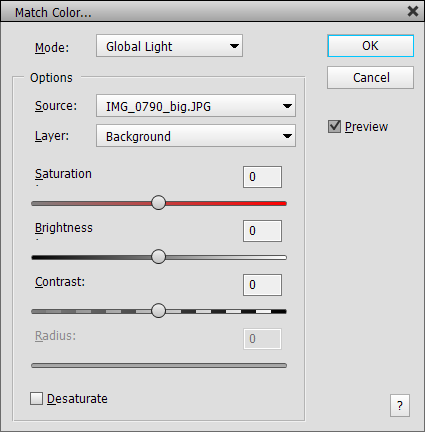
The Match Color filter lets you grab colors from another layer or image and apply them to the currently selected layer in order to equalize the color mood of both layers or images. This way you can make sure that the two images or layers have the same overall look. The image and layer from which the colors are grabbed are defined by the Source and Layer combo boxes. There you can select the current document or any other document that is opened in Photoshop Elements as well as a layer of the selected document or a merged version of all layers of the document. You can also create a selection in the source document. Then the Match Color filter will only use the selected area instead of the whole image area.
There are two effects selectable from the Mode combo box. The Global Light effect takes the average color of the other image or layer to uniformly colorize the current image. The Local Range effect grabs colors from various areas of the other image thus colorizing the current image differently in various places. The Desaturate check box makes sure that the currently selected layer is only adjusted in brightness and not color. The Saturation slider controls the saturation of the color effect. The Brightness and Contrast sliders let you adjust the effect to the brightness and contrast of the source image or layer. The Radius slider determines the size of the areas from which colors are grabbed by the Local Range effect.
Supported by Photoshop
Elements 11 and higher
Requirements: An image needs to be opened.
Added in ElementsXXL 2.0, enhanced in ElementsXXL 9
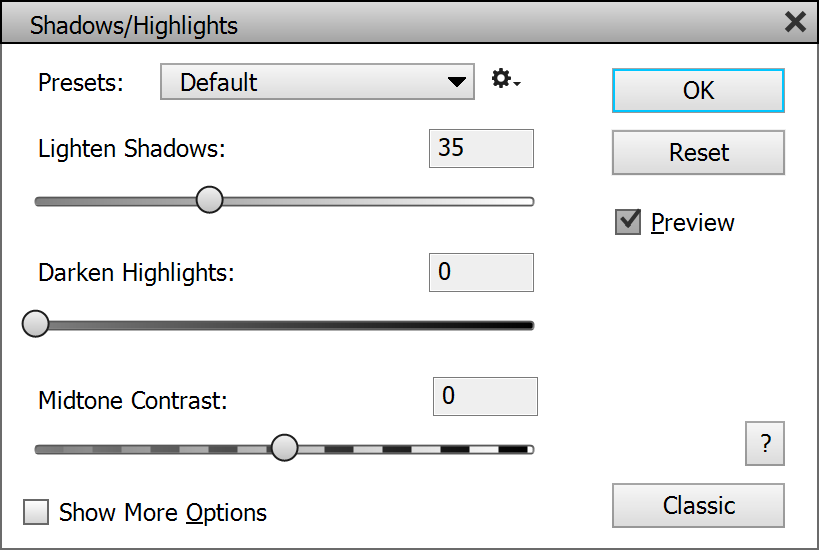
The Shadows/Highlights filter enables you to adjust the brightness of the darkest and brightest areas of an image independently. ElementsXXL lets you run this filter with the new Ctrl + H key shortcut and replaces the standard Shadows/Highlights dialog with its own dialog. The new dialog looks similar to the old one until you activate the Show More Options check box at the bottom. Then you get all the features that Photoshop's Shadows/Highlights filter offers.
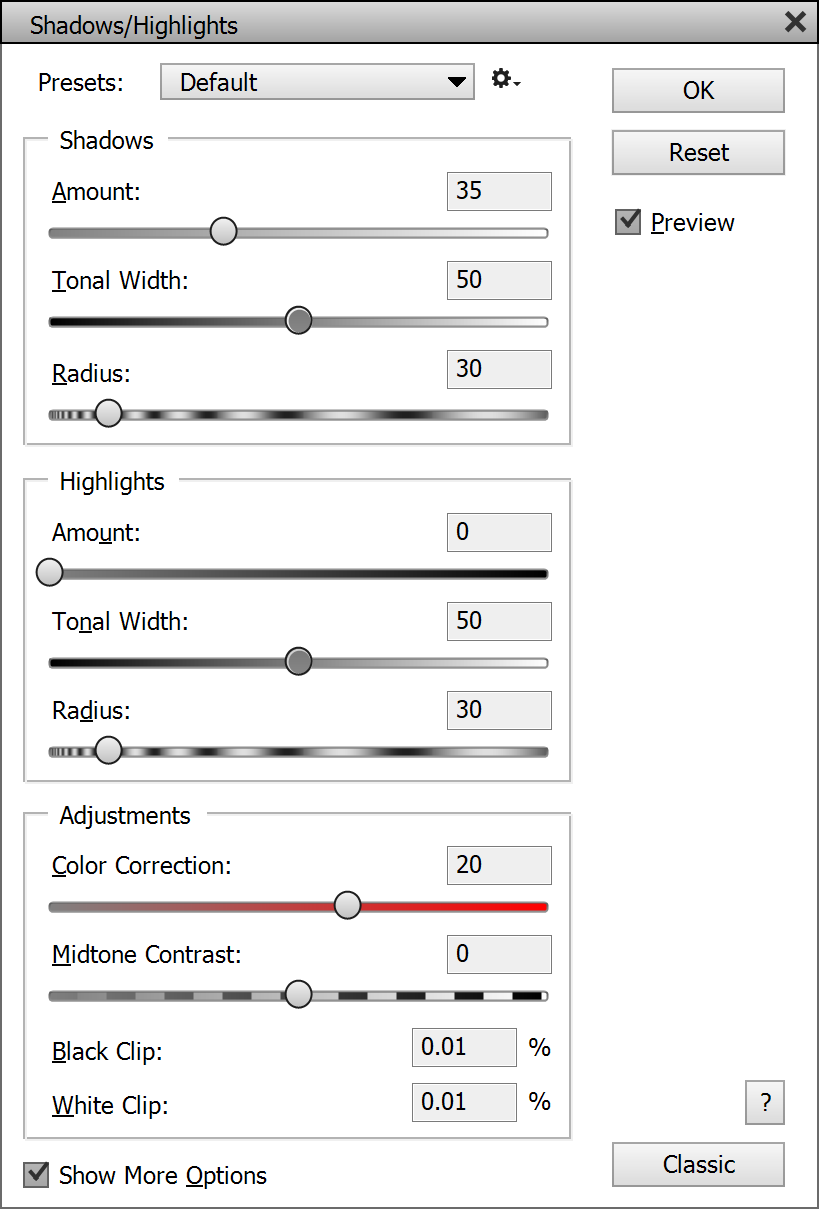
With Show More Options activated, you receive three sliders instead of one for correcting the shadows as well as highlights. And you get three more adjustment options.
The Lighten Shadows and Darken Highlights sliders of the unexpanded dialog are now called Amount. The Tonal Width sliders define the range of tonal values that will be affected. At the lowest value only the darkest or brightest areas of the image will be changed. Higher slider values also include the midtones.
The Radius sliders determine the softness of the transition between the adjusted areas and the rest of the image. A low Radius value makes the adjustment look flat and creates harsh transitions. On the other hand a too high Radius may weaken the adjustment, because the transition areas can replace the adjusted areas.
The Color Correction slider basically adjusts the saturation of the image. Strong corrections may increase or decrease the saturation, so this slider lets you handle such problems. The Black Clip and White Clip text boxes are for entering a percentage value that influences how many tonal values are cut off at both ends of the tonal scale. These two options are similar to the black and white slider knobs of the Levels filter. A higher Black Clip value, e.g. 5.0%, usually produces stronger shadows. But increasing the White Clip value can quickly remove details from the brightest image areas, so it should be handled with more care.
If you hold down the Alt key, the Cancel button is renamed to Reset and you can click on it to recreate the default settings for all controls. To switch to the standard Shadows/Highlights dialog of Photoshop Elements click on the Classic button in the bottom right corner.
Under Edit >Preferences > ElementsXXL > General you can find two options for this filter. To bypass ElementsXXL's enhanced dialog and display only the classical dialog, you can activate the check box Show classic Shadows/Highlights dialog. By default a preview image is created for speeding-up the effect rendering while the dialog is shown. If you do not like it, you can deactivate the Use Preview Image for Filters check box.
Supported
by Photoshop CS2, CC, 2020 and higher
Supported by Photoshop
Elements 11 and higher
Requirements: An image needs to be opened.
Added in ElementsXXL 1.0, extended in 3.0 to 9.0
The Curves filter lets you change and improve the brightness, contrast and color of digital images by remapping the brightness and color values of the image. It can also be applied to layer masks and smart filter masks for improving them.
You can choose a preset from the Presets combo box at the top. 14 presets are already available by default and cannot be deleted. You can save your own presets by clicking on the menu icon on the right hand side of the combo box and choosing Save Preset from the menu. Please save the preset file in the preselected folder, otherwise it will not appear on the Presets combo box. The Load Preset menu item displays a file dialog for opening a preset file, which is handy if you have some presets located in another folder, e.g. after downloading from the web. The Delete Current Preset menu item deletes the preset file that is currently displayed in the Presets combo box.
If the current image is grayscaled or only one channel or a mask is selected, you only have one curve to work with. If all channels of an RGB image are active, you can adjust up to 17 curves. You can can switch between them with the Channels icon bar. Once you clicked on it, you can also use the cursor keys to switch channels. Double clicking a channel icon resets the curve of the channel. Only the used channels have a colored icon whereas the inactive ones are mid gray. If you want, you can also get back the old Channels combo box with the Use Old Channels combo boxes check box on the ElementsXXL Preferences.
The RGB curve lets you change the brightness of the image. The Red (R), Green (G) and Blue (B) channels adjust the red, green and blue channels of an RGB image. The Cyan (C), Magenta (M), Yellow (Y) and Black (K) curves create respective color effects, but as the CMYK color model is the opposite of RGB, you have to drag the curve down add cyan, magenta, yellow or black effects (unless you activate the Pigment/Ink check box). The Hue (H) curve produces color shift effects by mapping one base color to another. The Saturation (S) curve lets you adjust the saturation selectively, e.g. you amplify the saturation of less saturated pixels or desaturate more saturated pixels. You can also use it to create color key effects, e.g. a blue sky in an otherwise black & white image. Whereas the RGB curves changes the brightness of the image while also altering the color slightly, the Lightness (L) curve does that without changing the saturation and hue of the colors.
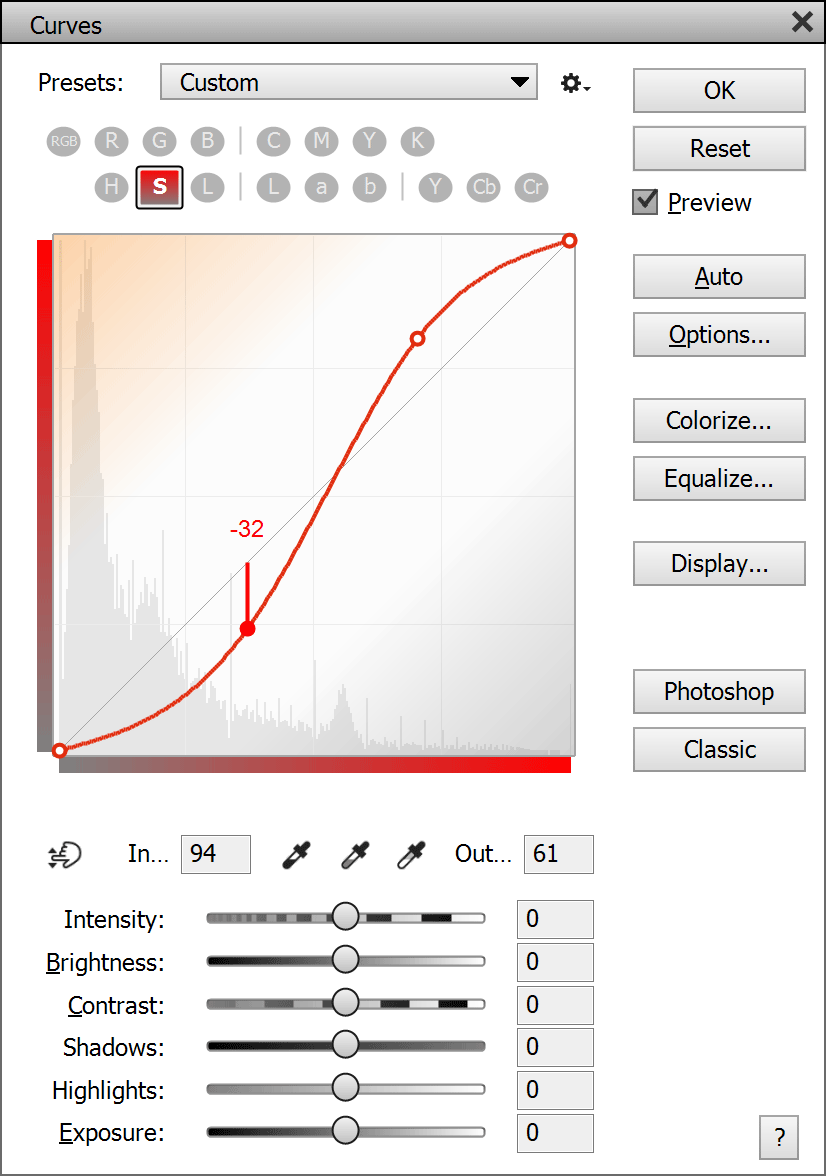

The Saturation and Cyan curves with Channel Overlay, Gradient and Distance Line options
The remaining six curves represent the Lab and YCbCr color
models, which are quite similar, but the Lab model requires more calculations,
so it renders slower. Both offer a Luminance curve, which works
similar to the Lightness curve, as well as two color channels with Red/Green
and Blue/Yellow curves. Although the names of these four color curves
are the same, the color effects that they produce are a bit different. To produce
color shift effects with these curves you have to use an S or inverted-S shape
for the curve.
By default the "curve" is displayed as a diagonal line in the diagram, which means that the input and output values are the same and no adjustment is applied. The curve can be adjusted with the help of points. To create a new point click somewhere in the diagram and drag. The curve is then drawn through the new point. You can adjust your point or add new points until you get the desired result. You can also adjust curve points by entering numbers in the Input and Output boxes. Hold down the Alt key and drag any control point to move all control points at the same time.
To delete a curve point, you have three options: 1) hold down the Ctrl key and click it, 2) select it and hit the Del or Backspace key or 3) drag the point towards another point in order to merge both. To start from scratch hold down the Alt key and click on the Cancel button, which will now be renamed to "Reset".
Below the curves box you can six sliders that can be used to for changing curve of the current channel. You can increase or decrease the brightness, contrast, shadows, highlights and exposure of the curve. The Intensity slider increases or decreases the effect of an available curve. If no curve point exists and you also did not use one of the other five sliders, it will have to effect. The Brightness slider adds a new middle curve point (in case there is none available) and moves it vertically to adjust the brightness of the image. The Contrast slider adds up to two new curve point in order to create a S-shaped curve for adjusting the contrast. The Shadows and Highlights sliders may each add a curve point in the left or right region of the curve diagram thus adjusting the brightness in the shadow and highlight areas. Finally, the Exposure slider moves the first or last curve point in order to adjust the brightness more linearly and cut off tones. Once you edit the curve manually or switch to another channel, the sliders are reset to zero to allow new adjustments.
The Auto button
automatically creates curves that corrects the brightness, contrast and
color of the image according to the settings displayed by the Options button
(see the Auto Options dialog above!). Both buttons delete existing curves,
so
best use this feature right after the Curves dialog is displayed.
Click on the Colorize button to select a color in a color dialog. After clicking OK, you will see the color as curves in the R, G and B channels.
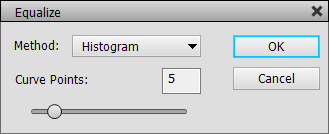
The Equalize button displays a dialog for performing various types of histogram equalizations. The Filter > Adjustments > Equalize filter, which does something similar, applies the effect to the image without the ability to adjust it. The Equalize feature on the Curves dialog creates a curve that produces the effect. This way you can adjust the curve to edit the effect according to your taste. The Equalize feature is applied to the currently selected channel. It works best with luminosity channels like RGB, L or Y.
The Histogram method creates a equalization curve by using the full histogram. The number of created curve points is determined by the Curve Points slider. The more curve points are added the more precise is the effect, but less curve points often produce a more pleasing effect. The Brightness method adds one additional curve point that increases or decreases the brightness. The Contrast and Tonal Range effect add three curve points that equalize the contrast or tonal range of the image. The Simple method is similar to the Histogram method, but only adds three curve points.
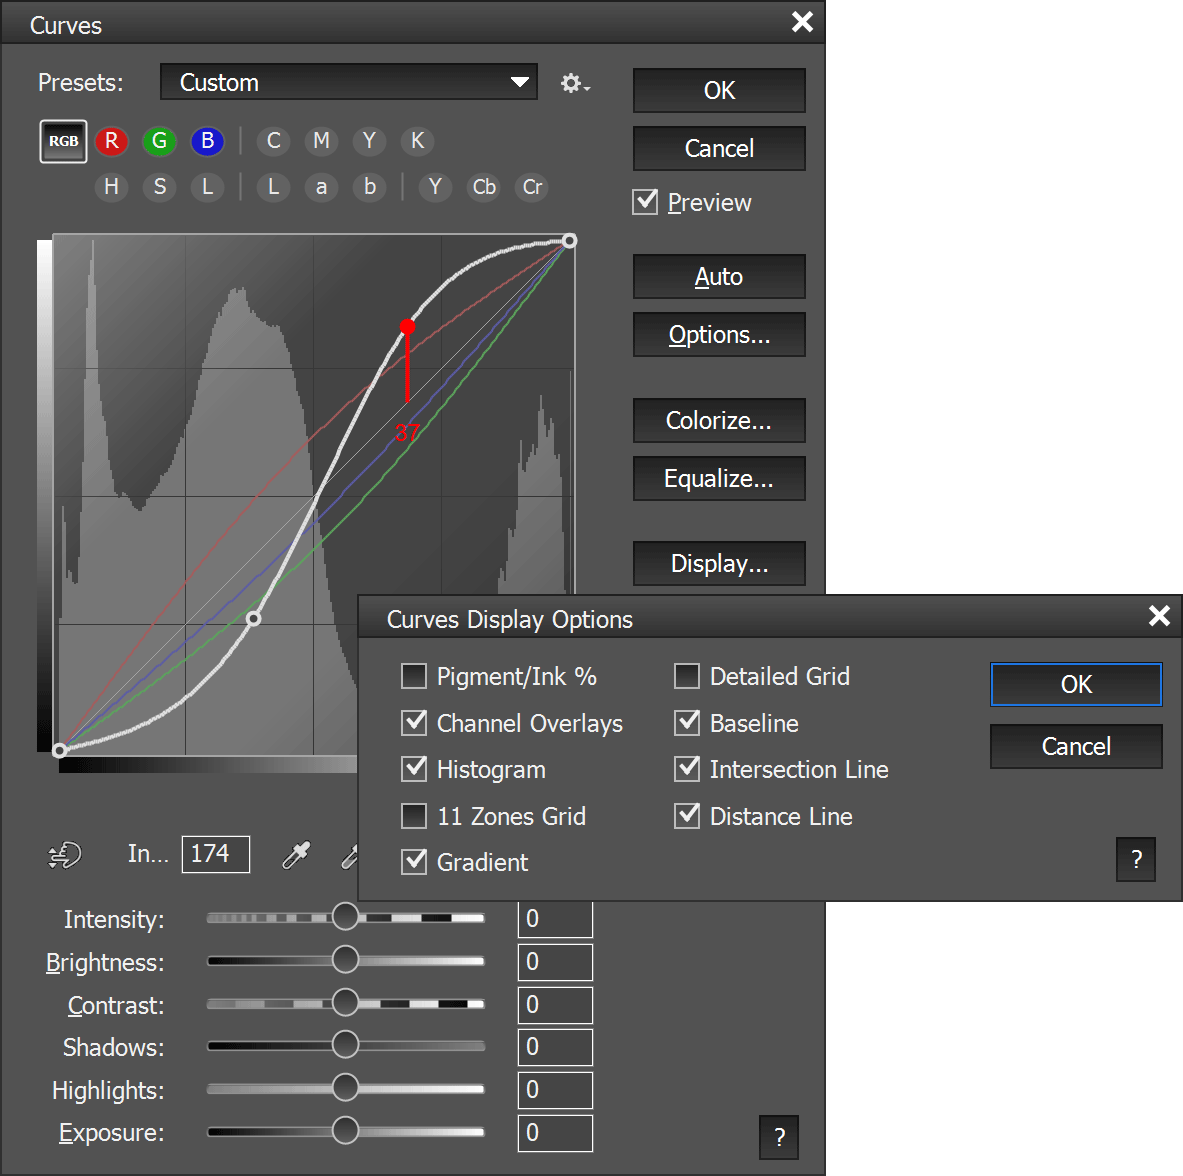
The black RGB curve shows a typical contrast adjustment with the help of an S curve consisting of two added points. The Curve Display Options are shown with the Display button.
There are eye dropper
tools for picking a black and white point (the darkest and brightest
pixels) from the preview. Additionally the gray eye dropper performs a
color correction when you click on a slightly colorized gray area in the
preview. Double click on one of these eye dropper icons to display a color
dialog for selecting the target shadows, midtones or highlight color. Shift
click on them to display a color dialog for manually adjusting the picked
color. The hand tool lets you create and adjust a curve
point by clicking and dragging on the preview.
When using Curves on the Adjustments panel and your selected a Curve tool, the regular tools of Photoshop Elements are blocked. You have to either deactivate the curve tool again or select another tool from the tool bar of Photoshop Elements to be bale to use regular tool again.
The Clipping Mask check box is only available in the dialog of the Curves adjustment layer. It allows adding a clipping mask to the Curves adjustment layer and removing it again. The clipping mask makes sure that the curves are only applied to the layer beneath it and not to all other layers below.
When clicking Display button, the Curve Display Options dialog shows up. The Pigment/Ink option simply inverts the values of both axes of the diagram, which makes the colors run from white to black and rotates the curve by 180 degrees. The Detailed Grid check box doubles the straight number of lines in the diagram. If you have the RGB displayed, an activated Channel Overlays check box also shows the red, green and blue curves. The Baseline check box removes or adds the diagonal line in the diagram. The Histogram check box only shows histogram behind the curves. The Intersection Line check box displays thick crossing lines when you move a curve point.
The 11-Zones Grid check box displays nine horizontal lines and numbers from 1 to 9 at the left-hand side. This system was developed by black & white photographer Ansel Adams and defines 11 brightness levels from 0 (pure back) to 5 (mid gray) to 10 (extreme white). The Distance Line check box draws a vertical line between the current control point and the diagonal base line. It also displays a value which expresses the tonal increase or decrease with values ranging from -255 to 255 or -9.9 to 9.9 if the 11-Zones Grid is active. The Gradient check box displays gradients with different colors for each channel in the top left and bottom right corners of the diagram.
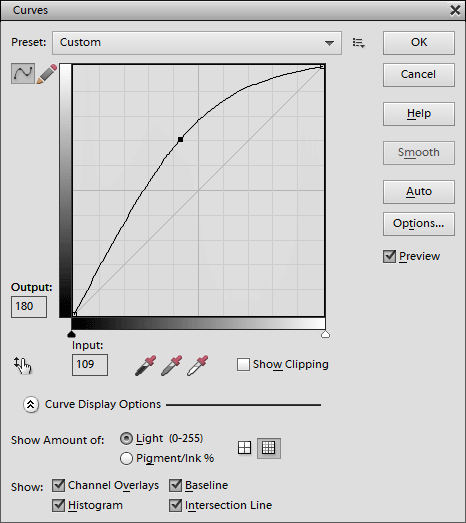
When clicking the Classic button you will get the standard Curves dialog of Photoshop Elements. It does not have the essential Channels option, so it only lets you adjust the RGB curve (or the Red, Green or Blue curve if the appropriate channel was previously selected), but offers three other non-essential features that are not available in ElementsXXL's Curves dialog yet: The Show Clipping check box, which visualizes image areas where the tonal values are cut off, a Pen tool for drawing an individual curve, which can be smoothed with the Smooth button, and two slider knobs below the diagram, which reposition the first and last control point. The curve in the above screenshot shows a typical curve for raising the brightness. However, the Auto and Options buttons do not work in Photoshop Elements 13 and higher.
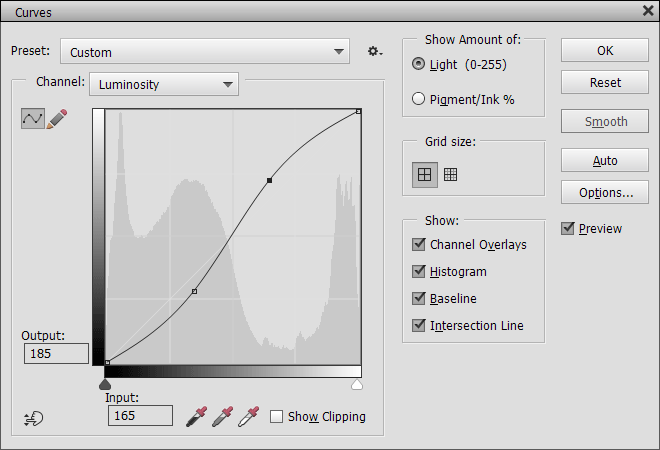
The Photoshop button (only available from the Curves filter dialog in Photoshop Elements 15 and higher) runs a Curves dialog that looks very similar to the one in Photoshop CC. It offers the same features as the the classic dialog. There is a Channels combo box, but it does now work. Same for the Auto and Options buttons.
Supported by Photoshop Elements 11 and higher
Requirements: An image needs to be opened.
Added in ElementsXXL 1.0, extended in 3.0
The Exposure filter changes the brightness of the image with three different methods. It is easier to use, but offers less control than the Curve filter.
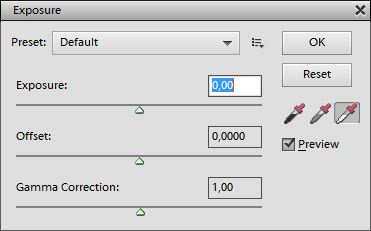
The Exposure slider adjusts the brightness of the image similar to the photographic exposure. The Offset slider moves the brightness values into a certain direction without taking shadow or highlight rescue measures. The Gamma Correction slider applies a brightness correction that is known from computer monitors and is similar to the middle slider of the Levels adjustment.
Again you have three eyedroppers for picking a black, gray and white point. They directly adjust the value of the Exposure or Offset slider.
Supported
by Photoshop CS2, CC, 2020 and higher
Supported by Photoshop Elements 11 and higher
Requirements: An image needs to be opened.
Added in ElementsXXL 6.0, extended in 9.0
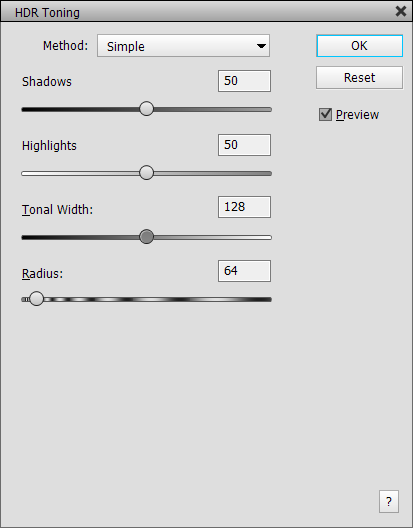
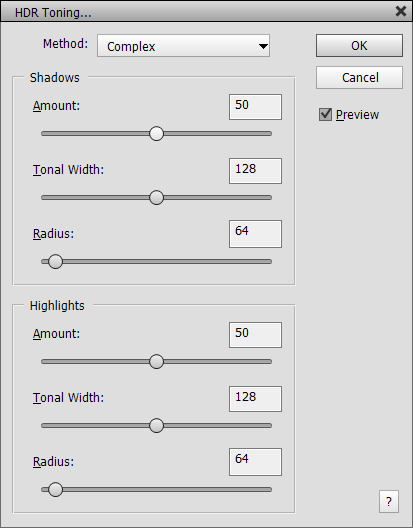
The HDR Toning filter lets you compress the shadow and highlight tones in order to achieve a HDR-like look. This filters is similar to the Shadows/Highlights filter, but usually produces a more natural looking effect. The Simple mode offers less sliders and renders faster than the Complex mode, which offers more sliders for separate shadows and highlights adjustments. Both modes use individual slider values, so switching to the other mode, does not transfer the slider values of the previous mode to the current.
The Shadows and Highlights sliders in Simple mode as well as the two Amount sliders in Complex mode moderate the intensity of the effect in the shadow and highlight areas. The Tonal Width slider in Simple mode defines the border between the shadows and highlights. Lower values apply the effect intensity of the Highlights slider in darker image areas whereas higher values apply the Shadows slider's effect intensity in brighter image areas. In Complex mode you can define the tonal limit of the shadows and highlights independently from each other with the two Tones sliders, which means that midtones may receive a weaker or stronger effect depending on the two slider values.
The Radius sliders finally define the softness of the transition area between shadows and highlights. Larger values produce a soft transition and lower values create a more distinct edge between shadows and highlights. Again, in Complex mode you can define the transition independently for shadows and highlights.
Supported
by Photoshop CS2, CC, 2020 and higher
Supported by Photoshop Elements 11 and higher
Requirements: An image needs to be opened.
Added in ElementsXXL 6.0,
extended in 8.0
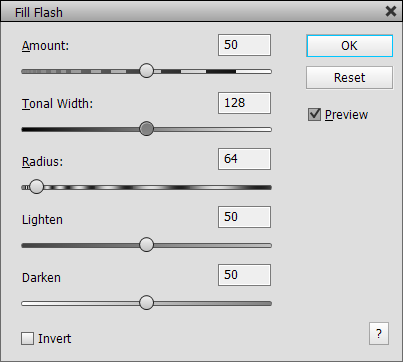
The Fill Flash filter is meant to simulate the effect of using a flash on your camera, which brightens up darker image areas and keeps brighter areas from getting too bright, which effectively darkens them.
The Amount slider controls the strength of the overall effect from 0 to 100%. The Tonal Width slider lets you define dark and bright areas is in terms of tonal value. Larger values apply the brightening effect to midtones or even highlights whereas lower values keep the brightening effect in the darker image areas. Respectively larger values limit the darkening effect to the highlight areas and lower values also apply it to the shadows.
The Radius slider softens the transition between the brightened and darkened areas. The Brighten slider controls the intensity of the brightening effect of the virtual flash whereas the Darken slider defines the strength of the darkening effect. You can set any of the two sliders to zero to only apply a brighten or darken effect.
The Invert check box basically reverts the effect and darkens dark areas as well as brightens bright areas. This can be used to create a backlight effect.
Supported by Photoshop Elements 11 and higher
Requirements: An image needs to be opened.
Extended in ElementsXXL 5.0
Normally the Adjust Smart Fix filter can only be applied to images with 8-bit per channel. ElementsXXL allows you to apply it to images with 16-bit per channel. However, only the color effect of Adjust Smart Fix filter is transferred to 16-bit images, while the local contrast effect is dropped. While the dialog is displayed you will see a color bar at the top of the image. It vanishes after you click the OK button.
Supported by Photoshop Elements 11 and higher
Requirements: An image needs to be opened.
Extended in ElementsXXL 5.0
Normally the Convert to Black and White filter can only be applied to images with 8-bit per channel. ElementsXXL allows you to apply it to images with 16-bit per channel. While the dialog is displayed you will see a color bar at the top of the image. It vanishes after you click the OK button.
Supported by Photoshop
CS2, CC, 2020 and higher
Supported by Photoshop Elements 11 and higher
Requirements: An image needs to be opened.
Added in ElementsXXL 1.0, extended in 3.0 and 5.0
Similar to the Monochrome option of the Channel Mixer filter, the Black & White filter turns a color image into a grayscaled one. With six instead of three sliders for adjusting the black & white effect, you have more control, but it also gets more complicated. Additionally you can colorize the black & white image with the help of a color box and two color sliders.
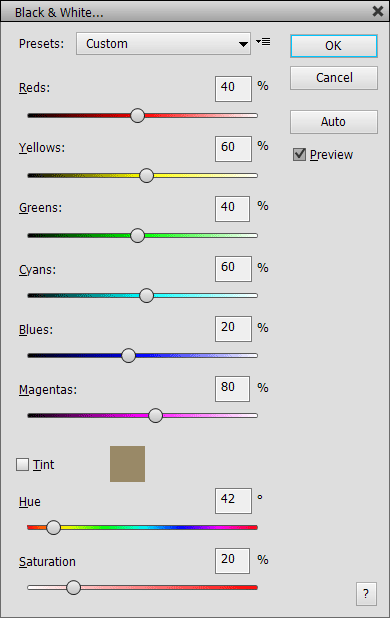
You can choose a preset from the Presets combo box at the top. 12 presets are already available by default. You can save your own presets by clicking on the menu icon on the right hand side of the combo box and choosing Save Preset from the menu. Please save the preset file in the preselected folder, otherwise it will not appear on the Presets combo box. The Load Preset menu item displays a file dialog for opening a preset file, which is handy if you have some presets located in another folder. The Delete Current Preset menu item deletes the preset file that is currently displayed in the Presets combo box after asking for confirmation. Please note: If you delete one of the already existing preset files, you have to reinstall ElementsXXL in order to restore it.
The six top sliders define the black & white effect of the filter by mixing six different color channels, which are based on the RGB and CMY color models. A low slider value darkens the color area and a high value brightens the color in the black and white version of the image. The Auto button sets values for these sliders, which produce an optimal black & white look in many cases. To colorize the black and white effect activate the Tint check box. Now you can click on the color box to choose another color from a color dialog or use the Hue and Saturation sliders to adjust the color.
Supported
by Photoshop CS2, CC, 2020 and higher
Supported by Photoshop Elements 11 and higher
Requirements: An image needs to be opened.
Added in ElementsXXL 6.0, extended in 9.0
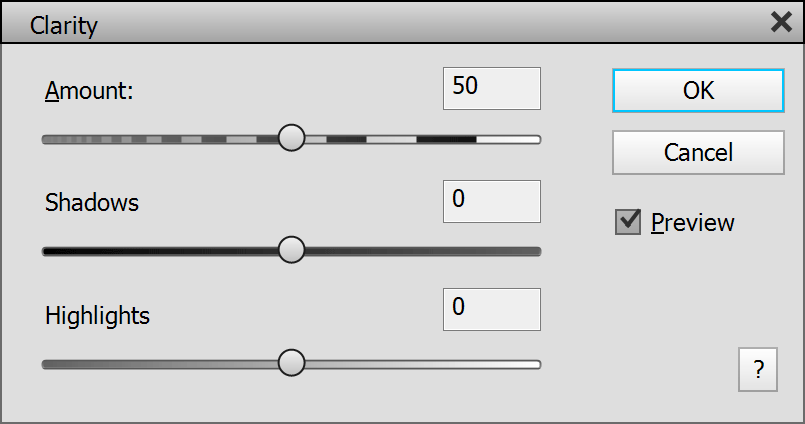
The Clarity filter reproduces the effect that is know from Adobe Camera Raw. It increases the contrast in smaller image details, but more subtle than the Micro Contrast effect. The Amount slider determines the intensity of the effect. The Shadows and Highlights sliders lets you decrease or increase the Clarity effect in the dark and bright image areas.
Supported by Photoshop Elements 11 and higher
Requirements: An RGB image needs to be opened.
Extended in ElementsXXL 4.0
Normally it is only possible to apply the Adjust Sharpness and Unsharp Mask filters to all color channels. With ElementsXXL you can apply both filters to a layer mask, an individual channel or even two active channels of an RGB image. This allows you to sharpen individual color channels differently, produce colored sharpness halos for special effects or sharpen layer masks.
Supported
by Photoshop CS2, CC, 2020 and higher
Supported by Photoshop
Elements 11 and higher
Requirements: An image needs to
be opened.
Added in ElementsXXL 6.0,
extended in 8.0
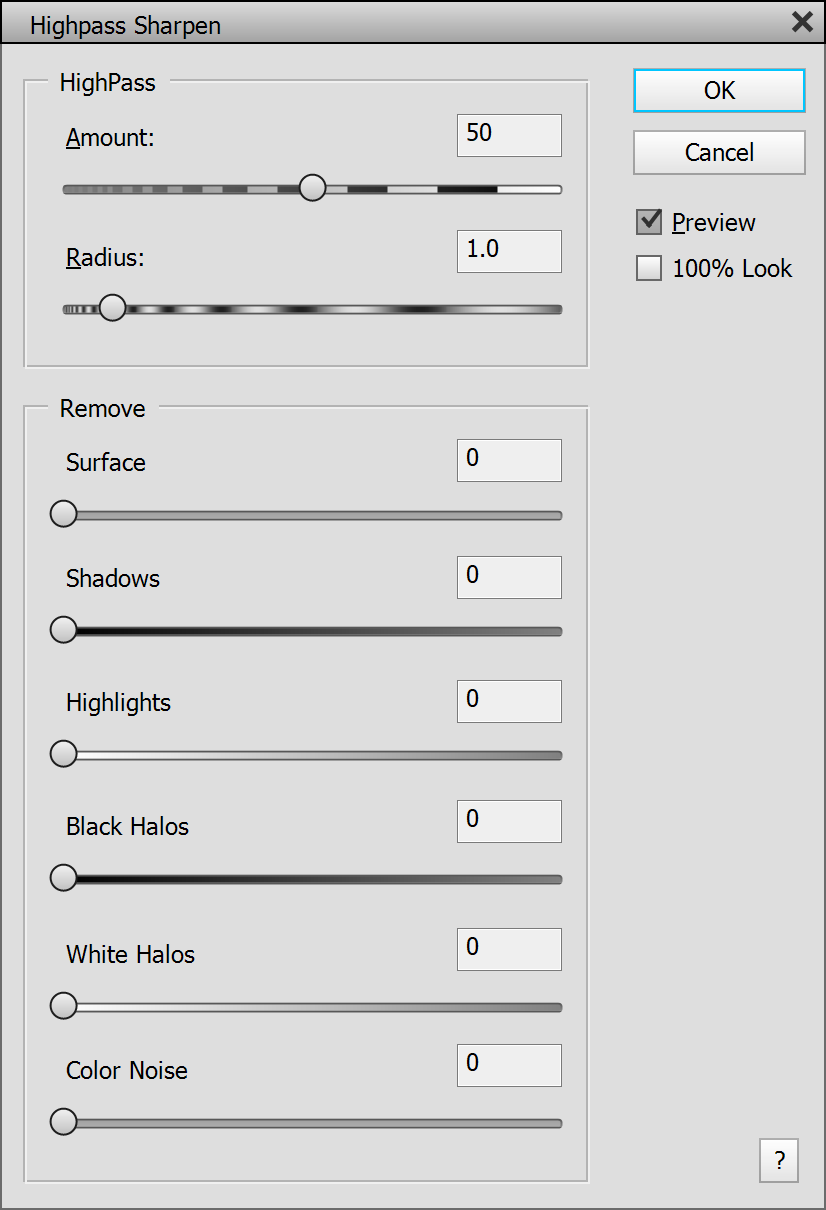
The Highpass Sharpen filter lets you sharpen an image while avoiding sharpening artifacts and offering great control over the sharpening process.
The 100% Look check box allows you to view the sharpening effect at 100% zoom. If a preview image is used, the preview feature is deactivated and rendering may take longer.
The Amount slider controls the strength of the sharpening effect. The Radius slider defines the size of the details that will be sharpened. Small values bring out small image details whereas larger values emphasize larger image details.
The Surface slider lets you reduce the sharpening in flat image areas while keeping the sharpening on the edges of the image details constant. The Shadows and Highlights sliders reduce the sharpening intensity in dark and bright image areas.
The sharpening effect consists of black and white halos, which are drawn around image details. Sometimes white halos may become too visible against a dark background. Same may happen for black halos against a bright background. To avoid that, you can use the Black Halos or White Halos sliders to fix this problem and reduce their effect. Please note that the sharpen effect will disappear if you set both sliders to their maximum values. The Color Noise slider reduces color noise that may occur during the sharpening process. This slider does not remove color noise that was already present in the image before sharpening.
If you apply Highpass Sharpen to a 16-bit per channel image, the sliders of the Remove group are disabled, because they are not supported.
Supported
by Photoshop CS2, CC, 2020 and higher
Supported by Photoshop
Elements 11 and higher
Requirements: A Grayscale or RGB image needs to be opened.
Extended in ElementsXXL 5.0

The Micro Contrast filter brings out textures in smaller or larger image details. It offers two methods: Soft produces a more smooth effect whereas Grainy creates a more rough surface effect. Please not that the Grainy effect is only available for images with 8-bit per channel and the Soft effect renders much slower for images with 16-bit per channel.
The Amount slider runs from 0 to 200% and controls the effect intensity. The Radius slider defines the size of the details that will be enhanced. A very small slider values produces an effect that looks more like sharpening whereas a very large slider value moves more into the direction of a conventional contrast effect. Middle Radius slider values emphasize the contrast in smaller or larger image details.
The Threshold slider is generally similar to the Amount slider but also increases the number and size of image details that will be amplified. For the Soft method it additionally amplifies the intensity of the contours in the image. For the Grainy method larger slider values also make the effect a bit softer.
Supported
by Photoshop CS2, CC, 2020 and higher
Supported
by Photoshop Elements 11 and higher
Requirements: An image needs to be opened.
Added in ElementsXXL 8.0, extended in 9.0
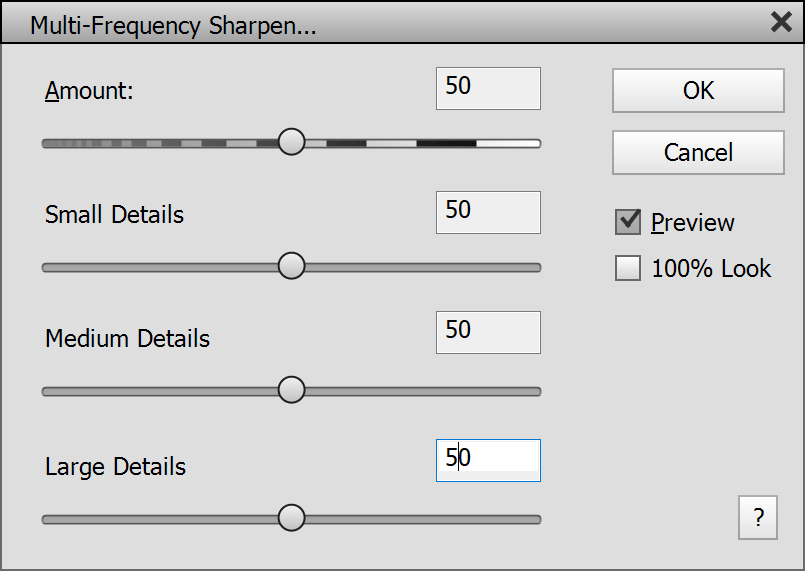
The Multi-Frequency Sharpen filter lets you sharpen small, medium and large details at the same time. This is similar to sharpening an image multiple times (each time with different radiuses) but without causing sharpening artifacts and by doing it in a more convenient way.
The Amount slider controls the overall intensity of the sharpening. The other three sliders determine the sharpening amount of the small, medium and large details. So you are able to sharpen details of a certain size more than others. Keep all three sliders at 50 to apply a similar sharpening. The 100% Look check box displays the image at 100% zoom for a more precise view of the effect. You can use the hand tool or the scroll bar to move the image within the window.
Supported
by Photoshop CS2, CC, 2020 and higher
Supported by Photoshop
Elements 11 and higher
Requirements: An image needs to be opened.
Added in ElementsXXL 9
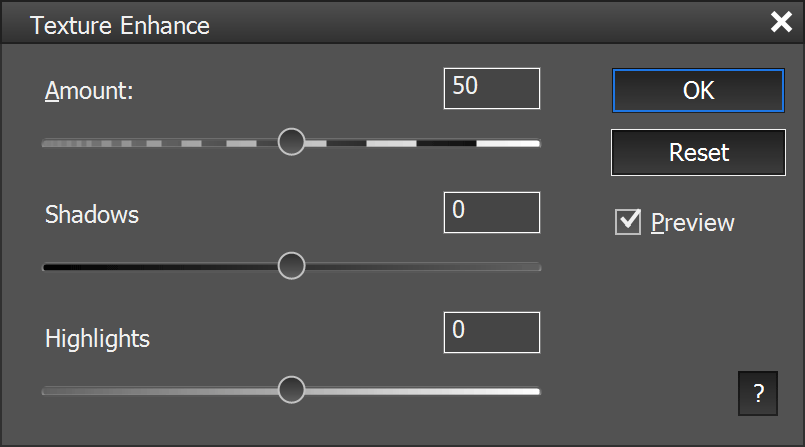
The Texture Enhance filter reproduces the Texture effect that is know from Adobe Camera Raw. It increases the contrast in image details similar to the Micro Contrast effect, but produces a different look. The Amount slider determines the intensity of the effect. The Shadows and Highlights sliders lets you decrease or increase the effect in the dark and bright image areas.
Supported by Photoshop
Elements 11 and higher
Requirements: An image needs to be opened.
Added in ElementsXXL 1.0, adjusted in 5.0
These three simple sharpening filters apply the effect without showing a dialog. Sharpen More applies a stronger sharpening than the Sharpen filter. Sharpen Edges only sharpens the edges in the images. To reduce the effect of these filters either apply them to a layer and adjust their opacity or use the Edit > Fade command.
Supported
by Photoshop CS2, CC, 2020 and higher
Supported by Photoshop
Elements 11 and higher
Requirements: An image needs to be opened.
Added in ElementsXXL 8.0, extended in 9.0
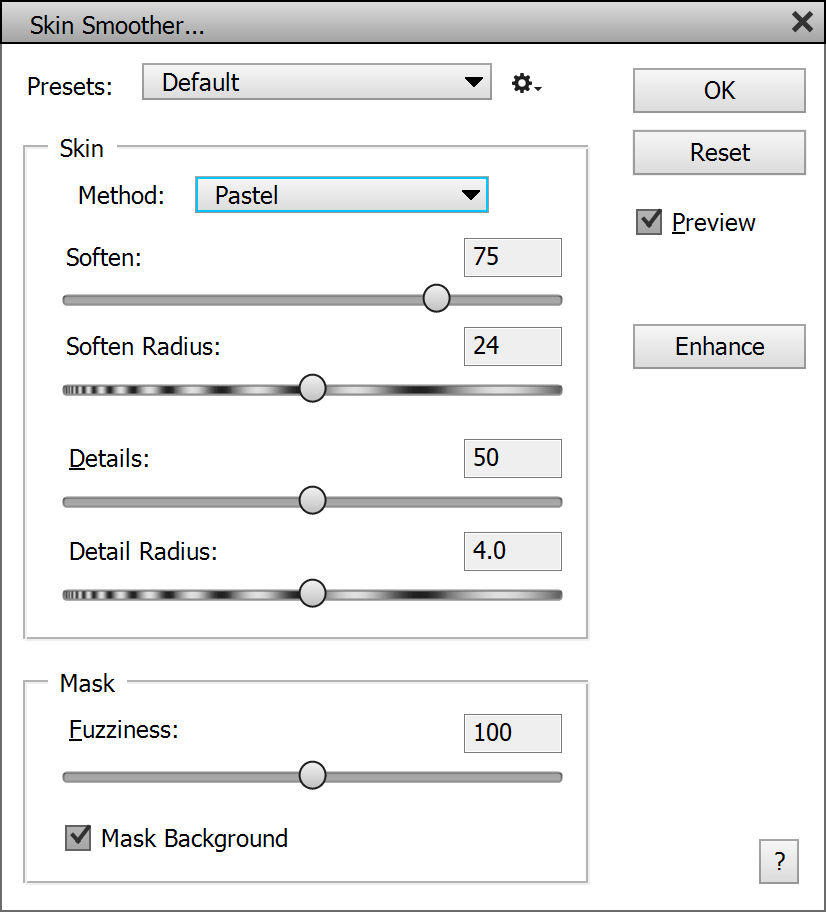
The Skin Smoother tool lets you soften the skin of people in portrait photos with three different methods. At the top you can open and save presets of the filter settings.
The Method combo box offers Pastel, Soft and Glow methods. The Pastel method looks similar to cover cream of makeup toolkit. It more or less removes skin details and produces a matte look. The Soft method produces a more soft effect and lets the skin shine. The Glow method is the least aggressive, keeps most skin details, but may also look less natural than the others. Do not apply too high settings or you may produce an unnatural look.
The Soften slider controls the intensity of the skin smoothing. The Soften Radius defines the size of the blemishes that are removed from the skin. Higher values of the Details slider add back details to the skin. The Details Radius slider determines the size of these skin details.
The Mask group lets you adjust the skin mask that is automatically created by the filter. The Fuzziness slider lets you add more or less image areas to the skin mask that is used to smooth the skin. In Photoshop Elements 2020 and higher you can also use the Mask Background check box to keep background areas that have a similar color as skin from being smoothed.
The Enhance button lets you instantly switch to the Skin Enhance filter for further editing. You are asked first if you want to apply the current effect.
Supported
by Photoshop CS2, CC, 2020 and higher
Supported by Photoshop
Elements 13 and higher
Requirements: An image needs to be opened.
Added in ElementsXXL 5.0
The Basic Denoise filter (previously called "Reduce Noise") reduces the noise of a photo. It can be applied after sharpening to remove the noise that was introduced by the sharpening process. It applies the noise reduction at full strength. To decrease it please use the Edit > Fade command with an Opacity of less than 100%. This Reduce Noise filter uses a different algorithm than the Reduce Noise filter on the Filter menu.
Supported
by Photoshop CS2, CC, 2020 and higher
Supported
by Photoshop Elements 11 and higher
Requirements: An image needs to be opened.
Added in ElementsXXL 8.0, extended in 9.0
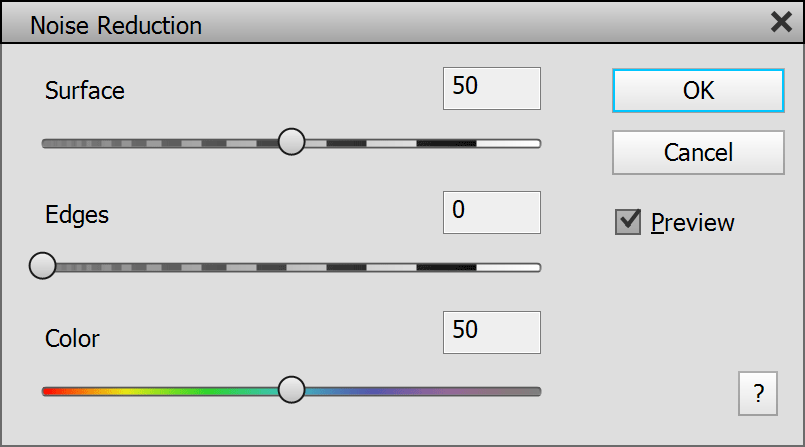
The Noise Reduction filter lets you apply the noise reduction effect of Adobe Camera Raw in Photoshop Elements without having to run it. The Surface slider only removes noise from areas with little image details. If there is no extreme noise in the image, this is usually sufficient. With more extreme noise you can also increase the value of the Edges slider. This is more aggressive and will also soften the image edges and remove details. The Color slider adjusts the strength of the color noise reduction.
Supported
by Photoshop CS2, CC, 2020 and higher
Supported by Photoshop
Elements 11 and higher
Requirements: An image needs to be opened.
Added in ElementsXXL 9
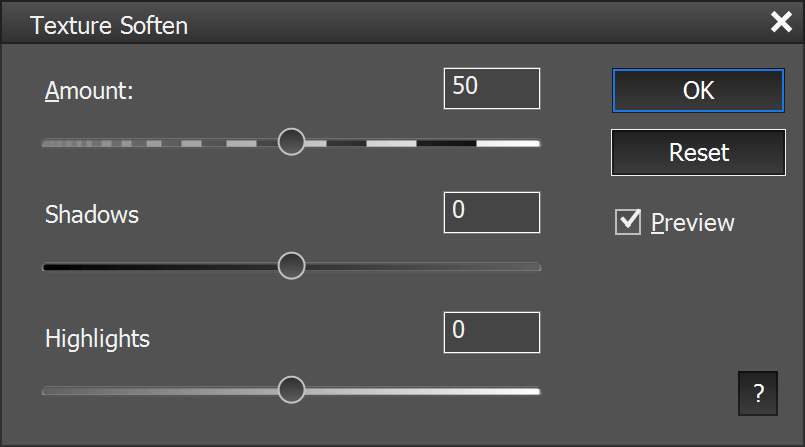
The Texture Soften filter reproduces the Texture effect that is know from Adobe Camera Raw. It smoothes surface areas in images and removes noise and textures. The Amount slider determines the intensity of the effect. The Shadows and Highlights sliders lets you decrease or increase the effect in the dark and bright image areas.
Supported
by Photoshop CS2, CC, 2020 and higher
Supported by Photoshop
Elements 11 and higher
Requirements: An image needs to be opened.
Added in ElementsXXL 9
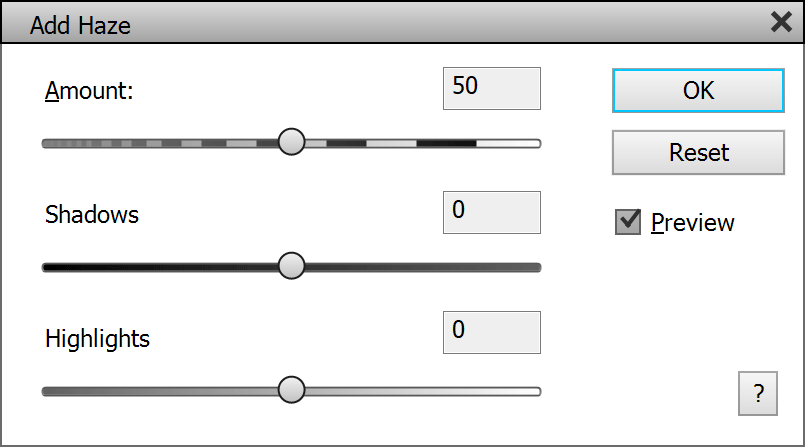
The Add Haze filter reproduces the haze effect that is know from Adobe Camera Raw. It lowers contrast and adds a misty look. The Amount slider determines the intensity of the effect. The Shadows and Highlights sliders lets you decrease or increase the effect in the dark and bright image areas.