ElementsXXL adds four new menu items and one sub menu to the Select menu of Photoshop Elements that make it easier to work with selections.
Supported by Photoshop
Elements 15 and higher, already built into Photoshop Elements 11-14
Requirements:
At least two layers should be available
Added in ElementsXXL 4.0
The Select Similar Layers command is quick way to select all layers of the same type in a document, e.g. image layers, smart objects, fill layers, adjustment layers, shape layers or text layers.
Supported
by Photoshop CS2, CC, 2020 and higher
Supported by Photoshop
Elements 11 and higher
Requirements:
At least one layer has to be present
Added in ElementsXXL 3.0
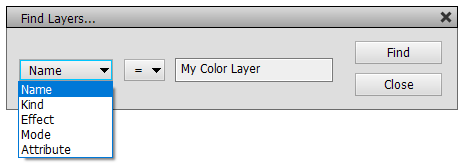
The Find Layers dialog lets you select layers in the Layers panel according to their name, kind, used style effect, blend mode or other attribute. The first combo box on the left lets you select the search type and the third combo box or text box lets you choose or enter a search item. The combo box in the middle defines if the search will look for layers that match (=) the search item or does not match it (!=).
For example, if you want to select all layers that do not have the word "copy" in their name, you choose "Name" and "!=" from the combo boxes and enter "copy" in the text box. Then click the Find button. For selecting all layer with Overlay blend mode, you choose "Mode", "=" and "Overlay". To select all invisible layers choose "Attribute", "!=" and "Visible".
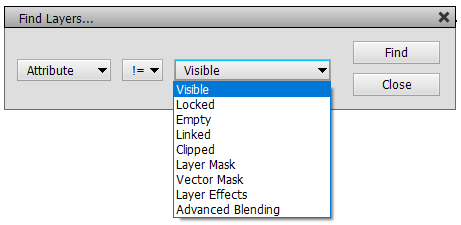
The Find Layers window is actually a panel, so you can keep it open while you do other things in Photoshop Elements. If you do not need it anymore, you can click the Close button or its x button in the title bar.
Supported by Photoshop
Elements 11 and higher (but all features are only available in version
13 and higher)
Requirements:
An image has to be opened.
Added in ElementsXXL 2.0, extended in 3.0
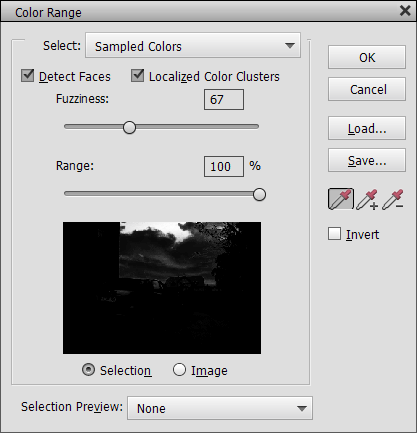
The Color Range dialog lets you create a selection based on a sampled color or certain color and brightness ranges.
The Color Range dialog
in Photoshop Elements 13 and higher
The method for creating a selection can be chosen from the Select Combo box. The Sample Colors method uses the foreground color, which is displayed at the bottom of the tool panel, to produce the selection. Click on the image to choose another color. To add more colors to the selection hold down the Shift key while clicking on the image. To subtract colors hold down the Alt key. Alternatively you can also activate the + and - eye dropper icons to do the same. To reduce or enlarge the selection area use the Fuzziness slider. In Photoshop 13 and 14 you can additionally activate the Localized Color Clusters check box, which makes the Detect Face check box and Range slider usable. Both give you even more control over the selected areas.
The Reds to Magentas options select image areas with certain color ranges whereas the Highlights to Shadows options select image areas with a certain brightness level. The Skin Tones option selects areas that have a similar color as the human skin, which is useful for portrait retouching.
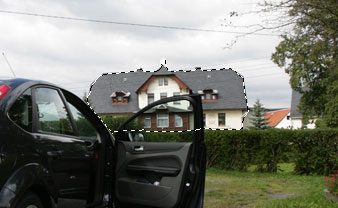
Selection marquees do not visualize semi-transparent areas sufficiently. That is why the Color Range dialog offers a Selection Preview combo box, which allows displaying the produced selection differently. The Grayscale option displays it as a grayscale image, which makes clear which areas are mid gray and thus semi-transparent. Black Mate and White Mate cover the unselected areas with black or white color whereas the Quick Mask option covers them with red color. In Photoshop 13 and 14 you additionally see the selection as a grayscale image in a small preview. You can also save and load the current settings to a file.
To invert the selection use the Invert check box. When you have finished click OK or abort with the Cancel button.
The Color Range dialog
in Photoshop Elements 11-12
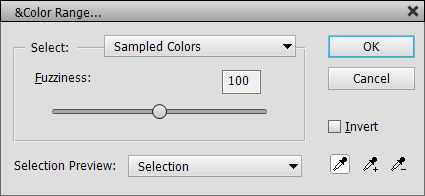
If you activate the "Use ElementsXXL's Color Range" option in the ElementsXXL Preferences, you will see ElementsXXL's own Color Range dialog, which has less features, but does not suffer from an occasionally crash problem like the Color Range dialog of Photoshop Elements.
Supported
by Photoshop CS2, CC, 2020 and higher
Supported by Photoshop
Elements 11 and higher
Requirements:
An image has to be opened.
Added in ElementsXXL 4.0
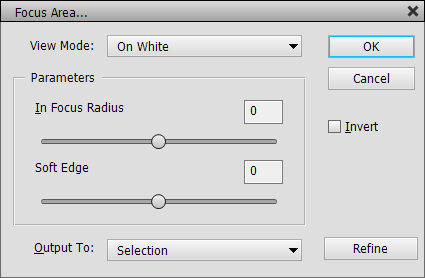
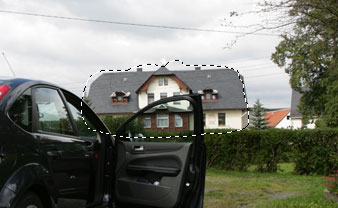
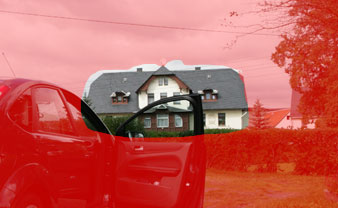
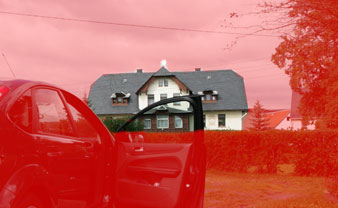
The Focus Area dialog lets you create a selection based on the sharpness of the image. You will achieve the best results if you apply it to a photo that has areas that are visibly out of focus. ElementsXXL's Focus Area produces a softer mask than the similar feature in Photoshop, which is an advantage in many cases, e.g. when you want to adjust the brightness, contrast or colors with the help of this mask. It is less useful for creating masks that are meant for cutting out image objects.
When you run it it displays a progress bar and takes up to a few seconds to calculate a focus mask. When the dialog shows up you will see unsharp image areas covered with white color in the image window. You can change this by using the View Mode combo box. The Marching Ants option displays the focus mask as a regular selection, which is the least precise method. The Overlay option covers the sharp areas with the color red whereas the On Black and On White options cover the unsharp areas with black or white color. The Black & White option shows the focus mask as a grayscaled image whereas the On Layers option makes the unsharp areas transparent. The Reveal Layer option simply disabled the focus mask preview. For 16-bit images only the Marching Ants option is available.
Higher values of the In Focus Radius slider define more image areas as sharp and add them to the mask whereas lower values select less image areas. Lower values of the Soft Edge slider produce a mask with harder and more defined edges whereas higher values produces softer transition between the sharp and unsharp areas. The Invert check box simply inverts the mask, which means that the unsharp area will now be visible and selected in the final selection or mask.
The Output To combo box defines how the focus mask will be made usable. The Selection option creates a selection from the focus mask. The Layer Mask option adds the focus mask as a layer mask to the current layer. The New Layer option creates a new layer and makes the unsharp areas transparent. The New Layer with Layer Mask option duplicates the current layer and adds the focus mask as a layer mask to it. The New Document option creates a new document with the current layer and makes the unsharp areas of the new layer transparent. The New Document with Layer Mask option creates a new document with the current layer and and adds the focus mask as a layer mask to it. For 16-bit images only the Selection option is available.
The Refine button applies the focus mask to the image (just like the OK button) and executes the Refine Edge command. In the new dialog you can adjust the selection or layer mask further.
Supported
by Photoshop CS2, CC, 2020 and higher
Supported
by Photoshop Elements 11 and higher
Requirements: A selection has to exist
Added
in ElementsXXL 9, extended in ElementsXXL 11
The Subject menu item tries to identify a subject in a photo by using an AI algorithm. It is provided by Photoshop Elements, but ElementsXXL caches the created mask for each layer that it is applied to and saves it as a channel. So when you execute it again, you do not have to wait up to a minute and get the result instantly. You can deactivate this caching feature in the ElementsXXL Preferences under "Edit > Preferences > ElementsXXL > Tools > No Subject Mask Caching". ElementsXXL automatically removes subject masks of layers that do not exist anymore once you execute a feature that uses a subject mask.
The Background menu item selects the background of the image, so it is a basically an inverted version of Subject. It also uses subject mask caching.
The Foreground menu item selects the area that is not the sky. Foreground+ selects the area is not the sky and not the subject.
The Skin and Skin+ menu items create a selection from the skin areas in the current image. Both command works better in Photoshop Elements 2020 and higher, because they do not add skin-like colored background areas to the selection. The Skin+ command additionally removes edges from the skin areas, which produces less soft results when smoothing the skin areas. They were previously located on the Selection From sub menu, but are more easy to access on the main menu.
Supported
by Photoshop CS2, CC, 2020 and higher
Supported by Photoshop
Elements 11 and higher
Requirements:
A selection has to exist
Added
in ElementsXXL 8.0
The top 4 ElementsXXL menu items on the Modify submenu of the Select menu remove shadows, midtone, highlight and skin areas from the current selection. If you need more control over the removal of these areas, you can also edit the selection in Quick Mask Mode (see below).
Supported
by Photoshop CS2, CC, 2020 and higher
Supported
by Photoshop Elements 11 and higher
Requirements:
A selection has to exist
Added
in ElementsXXL 8.0
The menu items in the third section of the Modify menu convert the current selection into a certain shape or add a soft edge to it. The outer rectangle of the current selection is used to fit the new shape, e.g. a rectangle, ellipse, circle, triangle or rounded rectangle. Best create a rectangular selection where you want these shape selections to appear.
The Soft Edge command softens the outlines of the current selection while at the same time fitting the soft outlines to the image content.
Supported
by Photoshop CS2, CC, 2020 and higher
Supported
by Photoshop Elements 11 and higher
Requirements:
A selection has to exist
Added
in ElementsXXL 8.0
The menu items at the bottom of the Modify menu turn a regular selection into a selection that is only 1 pixel wide or high. The Single Column Left item creates the 1 pixel wide vertical selection at the left hand-side of the old selection. The Right command does the same but on the opposite side of the selection. The Single Row Top command places a 1 pixel high selection at the top of the existing selection. The Bottom does it at the bottom of the current selection. Before using this command we recommend that you create a rectangular selection and make sure that it is placed where you want the 1 pixel selection to appear.
Supported by Photoshop
Elements 11 and higher
Requirements: An image has to be opened
Added
in ElementsXXL 1.0, improved in 2.0
This menu item activates and deactivates the Quick Mask Mode. In Quick Mask Mode a selection is transformed into a mask, which is visualized by a red color overlay. This mask can be edited like an image with all available tools and filters. Even selections can be used to modify the mask.
 |
 |
|
| 1. After drawing a selection with the Lasso tool. | 2. After switching to Quick Mask Mode. | |
 |
 |
|
| 3. With the brush tool the outlines of the object were masked precisely. | 4. After exiting Quick Mask Mode. The mask was converted back to a selection. |
When you have finished with editing the mask, you can convert it back to a selection
by clicking the "Edit in Quick Mask Mode" menu item again.
When using the Quick Mask Mode feature on a 16-bit/channel image, a new document called "Quick Mask Mode" is opened. This allows you to use all tools and filters on the mask. When ending Quick Mask Mode, the edited mask is transferred to the original document.
Supported by Photoshop
Elements 11 and higher
Requirements: "Edit in Quick Mask Mode" has to be activated beforehand
Added
in ElementsXXL 1.0, improved in 2.0
After the Edit in Quick Mask Mode menu item was activated, you can adjust the appearance of the quick mask.
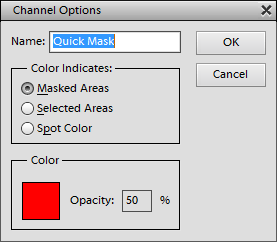
The Masked Areas radio button displays the areas outside of the selection colored. The Selected Areas option colorizes the areas of the selection. The Spot Color option makes the color go away completely, so better not use it.
Click on the color box to change the color of the mask overlay. The Opacity edit box lets you adjust the opacity of the colored overlay.
Supported
by Photoshop CS2, CC, 2020 and higher
Supported by Photoshop
Elements 11 and higher
Requirements: An image needs to be opened
Added
in ElementsXXL 1.0, extended in 3.0, 4.0 and 8.0
This command creates a selection based on the layer luminosity (the Layer menu item), the layer mask, the vector mask, transparency of the layer (the Layer Opacity menu item), the filter mask of a smart object, the luminosity of the image, one of the color channels or the saturation of the image. The red, green or blue image channel or the luminosity are useful for creating a mask. A saturation selection offers new possibilities for selectively adjusting the saturation of an image. After you created a selection with one of these options, you can also turn it into a layer mask by clicking the layer mask icon on the Layers panel.
Additionally this sub menu also creates three types of selections based on shadows, midtones and highlights. The + and even more the ++ in the menu item names indicate that the selected shadows, midtones and highlights areas will be more precise and smaller. These selection are nice for separately adjusting the dark and bright areas of photos. Please note that the Color Range feature (see above) also lets you create shadows, midtones and highlights selections and gives you more adjustment options in Photoshop Elements 13 (and higher).