Resizing
the Dialog
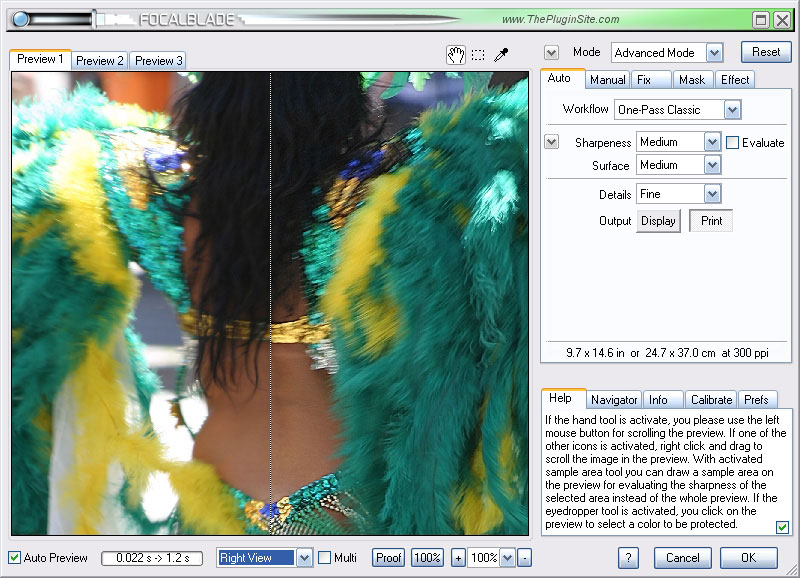
When you move the mouse cursor to the borders of the FocalBlade window or to the grip in the bottom right corner, it will turn into an arrow. Hold down the left mouse button and drag to change the size of the window. The preview and all controls will be repositioned according to the new size of the window. If you make the window smaller (in the Windows version), the OK, Cancel and ? buttons will be moved below the preview to keep them from disappearing. A smaller preview will speed up the preview rendering. You can also enlarge it to cover the whole screen. To make the FocalBlade window as large as the screen, please click on the maximize icon, which is the first icon at the right end of the title bar. To minimize the window to its previous size, please click the icon again. The second icon cancels FocalBlade.
Preview
Tab Control
Above the preview you see three tab buttons called Preview 1, Preview 2 and Preview 3. They lets you quickly switch between three different effect settings and compare them. Only the effect of the selected Preview tab button will be rendered when you press OK. Right clicking on the tab buttons displays a context menu for copying the settings of the currently selected tab to one of the other tabs.
Preview
and Tool Bar
![]() On
the left hand side of the dialog box there is a preview box that shows you how
the final effect will look like. If the image isn't fully displayed in the preview
and you want to display another part of the image, you can move the image by
activating the hand tool and dragging the image with it. If one of the
other tools is activated, you can also scroll the image by holding down the
right mouse button and dragging. The same also works with the left mouse button
together with the Alt key. While being moved, the original image is shown and
after you release the right mouse button the preview is recalculated.
On
the left hand side of the dialog box there is a preview box that shows you how
the final effect will look like. If the image isn't fully displayed in the preview
and you want to display another part of the image, you can move the image by
activating the hand tool and dragging the image with it. If one of the
other tools is activated, you can also scroll the image by holding down the
right mouse button and dragging. The same also works with the left mouse button
together with the Alt key. While being moved, the original image is shown and
after you release the right mouse button the preview is recalculated.
![]() The
marquee tool lets you draw a so-called sample area on the preview. Please
don't confuse this sample area with an image selection as it is known from image
applications. The sample area marquee may look like a selection marquee, but
it is used to measure the sharpness of the area it surrounds and not for selecting
a certain part of the image. For more information, please read the Auto:
One Pass page or the Auto:
Two/Three Passes page.
The
marquee tool lets you draw a so-called sample area on the preview. Please
don't confuse this sample area with an image selection as it is known from image
applications. The sample area marquee may look like a selection marquee, but
it is used to measure the sharpness of the area it surrounds and not for selecting
a certain part of the image. For more information, please read the Auto:
One Pass page or the Auto:
Two/Three Passes page.
With the eye dropper tool you can click anywhere in the preview to pick a certain color for the color boxes on the Mask tab sheet. See the Mask page for more details.
Mode Combo Box and the Arrow-Down
Button
![]()
FocalBlade offers various modes for various tasks. Easy Mode is meant for first time users or for people who are satisfied with a few simple options. In Advanced Mode, on the other hand, you can achieve all effects of the other modes. For more information, please read the Modes page.
Reset
Clicking the Reset button sets all controls to their default values. This is useful if you want to start over with adjusting the effect. Clicking the arrow down button displays a context menu with various reset options. See the Reset, Undo & Presets page.
The Main Tab Control
![]()
The large tab control with tab sheets like Auto, Manual, Fix, Mask and Effect contains the controls for adjusting the effect of FocalBlade. See the following pages for more explanations: Auto: One Pass, Auto: Two/Three Passes, Manual, Fix, Mask, Effects.
One of the most important type of controls are sliders. They can be used to select a certain value within a specific value range. You can drag the slider button with the mouse (or arrow keys or mouse wheel), enter a numerical value in the text box at the right of the slider bar, click somewhere on the slider bar for large value steps or use the two arrow buttons for small value steps.
The Bottom Tab Control
![]()
The Help tab sheet displays useful information about a control if you move the cursor over it. The Navigator tab sheet lets you quickly display an image area in the preview. The Info tab sheet shows the currently used sharpening settings and color values of the image pixels. The Calibrate tab sheet offers controls for adjusting the automatic sharpening. Finally, the Prefs tab sheet contains options for changing the general behavior of FocalBlade. Please read further on the following pages: The Bottom Tab Sheets.
Auto Preview
and Progress Bar
![]()
A deactivated Auto Preview check box does not render the effect and therefore does not display any effect in the preview. This way you can see before/after versions of the image and adjust a number of controls without provoking a repeated rendering of the effect. When the effect is rendered, you will see a bar running from left to right in the progress bar control. After the rendering is completed and the preview updated, you will see the time that was needed for rendering as well as an approximation of the time that is needed to render the full image.
Split View
![]()
FocalBlade offers some split views for comparing the original with the sharpened image and for selecting from various sharpening settings. If one of the Split Views is activated, you can select one of the split areas by holding down the Shift key and clicking on it. For more information, please read the Split View page.
Zoom and Softproof
 |
Below the preview there are + and - buttons with a percentage label in between. These zoom buttons let you adjust the size of the image in the preview box. 100% means that the original size of the image is displayed. There are also two buttons on the left (Proof and 100%) for quickly activating two important options of the zoom combo box. When starting FocalBlade the zoom rate will be automatically set to 100%, because with this setting you can best examine the sharpening effect. The Fit zoom option fits the image completely into the preview. The Softproof option simulates the sharpness of a print. This only works if you have a print method selected on the Auto tab sheet. You can also use Softproof during the capture or creative pass of a multi-pass sharpening workflow, but it will be less reliable than for the output pass. By clicking the Proof button, you can quickly activate the Softproof feature. If you hold the Shift key when pressing the + zoom button, the zoom factor will be set to 100%. Doing it again will select 3200%. Shift clicking on the - button, will switch to 100% and then to "Fit". The same is true when holding down the CTRL key except that 6% zoom will be selected instead of "Fit". With the Alt and - keys you can decrease the zoom ratio and with the Alt and + keys you can increase the zoom by one step. Some very old applications (e.g. Corel Photopaint 7 or Corel Xara 2) don't support preview zooming. In this case the zoom controls do not work. To jump from one preview zoom rate to another you can use the zoom combo box which is located between the two zoom buttons. |
OK, Cancel
and ?
![]()
Clicking on the OK button exits FocalBlade and applies the correction to the image. The current settings are saved and restored when you use FocalBlade again.
The Cancel button simply exits FocalBlade without changing the image. Alternatively you can also use the second icon in the title bar. Depending on the application you are using, the current settings will be lost immediately (or kept as long as your image application is running). If you hold down the CTRL key while clicking on Cancel, you will be prompted for Cloak Mode. For more information, please read the Batch Processing page.
The ? button displays the HTML version of the manual.

If you only open one image in the Lightroom version of FocalBlade, you see no difference to the Plugin version. If you select two or more image in Lightroom, the Lightroom version of FocalBlade displays an Images tab control left of the preview. This Image tab is also displayed in the Standalone version if you open more than one image. It lets you switch between the images.
As result of displaying the Images tab control the preview gets smaller. To increase the preview size again please enlarge the FocalBlade window. See below for instructions.
![]()
The Standalone version on the other hand offers a few more features than the Lightroom and Plugin versions of FocalBlade. That is because it does not rely on another program for opening and saving image files. As a result the OK button of the Lightroom and Plugin versions is replaced by Open and Save As buttons for opening and saving image files. The Cancel button is called "Exit", which saves the effect settings unlike the Cancel button. Additionally the Standalone versions offers an arrow-down button in the top left area of the window below the title bar. Clicking on it displays an menu with various options.

Apart from these small extras and changes, all versions of FocalBlade behave and work the same. For more information visit the Standalone/Lightroom Features page.