
The large tab control in the top right corner of the FocalBlade window contains the controls for adjusting the FocalBlade effects. Depending on which mode you use, it will contain between one and five tab sheets. You can now read explanations for the controls of these tab sheets. The controls are described here as they appear in Advanced Mode. Other modes do not offer all of these controls Please refer to the Modes page concerning which controls are offered by which modes.
FocalBlade's automatic sharpening feature provides settings that work with most images. Whereas Easy Mode and Classic Mode only offer one-pass sharpening options, Advanced Mode also supports two and three pass sharpening. There are two different one-pass sharpening workflow options in Advanced Mode: One is called "One-Pass Classic" and offers only a few controls, which are meant for people who like it easy and simple. The "One-Pass Pro" workflow (only available in Advanced Mode) adjusts the sharpening according to important variables of the input and output process. It is meant for more demanding users.


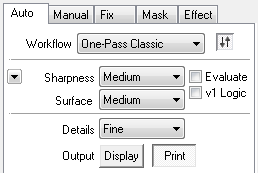
Easy Mode, Classic Mode and the One-Pass Classic workflow of Advanced Mode basically offer six options for controlling the auto sharpening of FocalBlade. There are three combo boxes with sharpening parameters (Sharpness, Surface and Details) and two buttons (Display and Print) for selecting the purpose of sharpening. An Evaluate check box is available for making FocalBlade analyze the sharpness of the preview image and assign the sharpening accordingly. Finally there is an arrow-down button menu for selecting typical settings for the three combo boxes.
Sharpness
The Sharpness combo box offers five settings from "Very Low" to "Very High". The "Medium" setting is sufficient for most images that haven't been sharpened already. If you apply FocalBlade to an image that was sharpened already, but not sufficiently, you should try the "Light" setting. The "Very High" settings is usually only recommended in connection with an activated Print button for the purpose of printing photos that are viewed at a larger distance. Highly blurred photos may also benefit from it.
The Sharpness setting determines the value of the Sharpen slider (of the Edges group) on the Manual tab sheet.
Surface
The Surface combo box increases or decreases the sharpening of the surface areas. For photos with a lot of sky, skin and walls you had better choose a "Very Light" or "Light" setting which doesn't sharpen the surfaces at all or only slightly. Regular photos need a "Medium" setting and photos with a lot of texture details (and no noise and artifacts) look better with a "Strong" or "Very Strong" setting.
Another factor that you should take into account when adjusting the Surface setting is image quality. The better the image quality, the higher the setting you can choose. You should use a "Very Light" or "Light" setting for portrait photos or image with soft surface areas. For photos with severe noise and artifacts better use the "Soft" and "Very Soft" options. These options also help reducing skin problems.
If the Dual Radius method is selected on the Manual tab sheet, the Surface setting sets the value of the Sharpen slider of the Surface group in relation to the value of the Sharpen slider of the Edges group on the same tab sheet. If the Single Radius or Adaptive Radius method is activated, the Surface setting sets the values of the Surface slider on the Manual tab sheet.
Details
Details lets you define the size of image details that will be sharpened. For most photos that show people or objects at a larger distance you should use the "Very Fine" or "Fine" setting. Photos, in which people occupy a large part of the image, you usually need a "Fine" or "Medium" setting. For close-up photos and portraits a "Rough" setting will sometimes be sufficient. For noisy images a "Rough" or "Very Rough" setting sometimes yields a better result.
You should also take into account the scaling factor that was used when sizing the image to its final output size. For example if you scaled up the image to a size that is two, three or more times larger than the original image, you usually get a more effective sharpening by using a "Rough" or "Very Rough" setting for the Details combo box. If you scaled down the image, you should consider choosing a "Very Fine" or "Fine" setting.
To select the best setting use a preview zoom of 100% or higher and look at the most important image details. Try various settings and see which one emphasizes the details best.
The Details setting determines the values of the Radius sliders on the Manual tab sheet.
The Display and Print
Buttons
Images that are intended to be printed require a much stronger sharpening than images viewed on displays. During the printing process the image is softened again, so the image needs to be sharper from the beginning. That's why FocalBlade sharpens an image much more and with a larger radius value if you have the Print button activated. The final printed result will look somewhat softer than what you see on your screen. So do not worry if the sharpened image looks coarse or rough-edges on your display. With the Display button activated FocalBlade will apply a much weaker lower-radius sharpening effect suitable for monitors and other screens.
The Auto options of FocalBlade sharpen for a regular viewing distance. For other viewing distances please increase or decrease the sharpening accordingly. If you have the Print button activated, you can set the zoom combo box below the preview to "Softproof" to see an approximation of the sharpness of the final print.
The Arrow-down Button
Menu

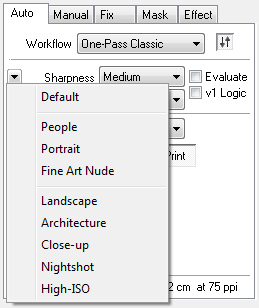
By clicking the arrow-down button on the Auto tab sheet you get a menu with several options. Each of these options sets the Surface and Details settings to a special value that is suitable for the selected type of photos. The Default option sets the default values, which suit a large number of images.
The Evaluate Check Box
and the Sample Area
If the Evaluate check box is deactivated, FocalBlade uses the same sharpening for every image (provided you use the same Auto settings). If you activate the Evaluate check box, FocalBlade additionally takes the image section that is displayed in the preview into account. It tries to analyzes the sharpness of the image adjust the sharpening accordingly. So with activated preview evaluation it is best to have the most important image area shown in the preview. Scrolling the preview will also change the sharpening values.
![]()
You can also make the auto features analyze a much smaller image area by drawing a sample area in the preview. To draw a sample area activate the Marquee icon, which is the second icon above the preview. Then hold down the left mouse button and drag the mouse over the preview to draw the sample area. It should be drawn around the most important part of the image, e.g. a face, a whole person or another important object. By doing so FocalBlade will apply the optimum sharpness for that area.
To remove the sample area either hit the Reset button or right click on the Reset button and choose "Remove Sample Area" from the context menu. Don't just click on the preview to remove the marquee, because that creates a one pixel large sample area which can produce unpredictable results.
If the sample area technique
still doesn't produce a satisfying result, you can also create a selection of
that object in your image application and use FocalBlade to sharpen it with
a different setting than the rest of the image.
The v1 Logic Check Box
If this check box is activated, then the auto sharpening algorithm of version 1 of FocalBlade will be used. As a result different sharpening values will be calculated and applied to the control of the Manual tab sheet. Especially the radius values increase with the size of the image, which may produce too coarse sharpening. Even if you do not have the Evaluate check box activated, it works as if it would be activate.
This feature is only available in Easy Mode, Classic Mode and if the One-Pass Pro workflow option is chosen in Advanced mode.

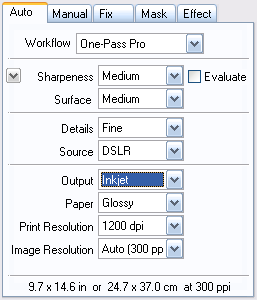
In addition to the Sharpness, Surface, Details and Evaluate controls (as described above) the One-Pass Pro option of Advanced Mode offer a few more options. They are meant to replace the Print and Display buttons with more detailed controls for defining the input and output devices. They influence the intensity and radius values of the sharpening effect.
Source
The Source combo box is for selecting the device that was used to digitize the image that you are currently working on. You can choose between four types of digital cameras and four types of film. This settings influences the intensity as well as radius of the sharpening effect.
Output
The Output option offers a display option and various print methods. If you select "Display", you can still enter the display type by using appearing Type combo box. Three print methods are supported: Contone, halftone and inkjet. Generally speaking, if you send your photos to a photo printing service or print them with a dye-sublimation printer, you should choose the "Contone" option. If you want to print your images or documents at an offset print shop or with a laser printer, you should choose the "Halftone" option. Then there is a general inkjet and four inkjet brands to choose from. Each output options makes up to three new combo boxes visible for letting FocalBlade know more details about the print or display process.
If you have one of the print methods selected, you set the zoom combo box below the preview to "Softproof" to see an approximation of the sharpness of the final print.
Type or Paper
If you selected "Display" from the Output combo box, you will get a new Type combo box with five options: Projector, TV, CRT, Plasma and LCD. With "Projector" any type of projector is meant, but this options has especially video projectors in mind. "TV" refers to old fashioned television sets with a cathode ray tube. "CRT" stands for computer monitor using the old CRT technology. "Plasma" means TVs with a plasma display panel. "LCD" can be computer monitors as well as TVs that use the LCD technology.
If you selected halftone or inkjet output, you will be prompted to select the paper type for printing. Also if you use a very special paper type that is not selectable, please chose the option that compares best to your paper. For contone printing you cannot select a paper type.
Print Resolution
If you selected one of the print output options, you are prompted to enter the print resolution as well as image resolution. If your print resolution lies between the given values please choose the value that comes closest.
Many inkjet drivers do not show a dpi value anymore. Instead they offer descriptions like "Fast", "Standard" or "High". These terms are also displayed in the Print Resolution combo box if you choose the Canon, Epson, HP or Lexmark Inkjet output options.
Image Resolution
The image resolution determines
at which size the image will be printed. Depending on the selected image resolution
you see a different print size mentioned in the text line below the Image Resolution
combo box. The Auto option of the Image Resolution combo box uses the image
resolution that was either assigned when the image was captured or entered when
the size of the image was changed. If the Auto option does not show the desired
image resolution (so that a wrong print size is shown), you do not need to leave
FocalBlade and set another ppi value in your image application. Instead you
can choose one of the other available values from the Image Resolution combo
box. If your image resolution lies between the given values please choose the
value that comes closest.

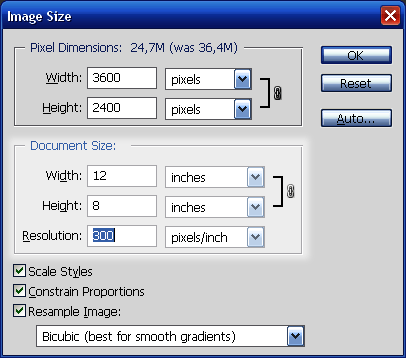
In Photoshop's Image
Size dialog we entered an image resolution of 300 pixels/inch (ppi) and a print
size of 12 x 8 inch. These settings will resize the image to 3600 x 2400 pixel
after pressing OK.
For inkjet printing you should resize your image to 300 ppi at your desired
print size. If you use an Epson printer you can also use 360 ppi. Larger ppi
values only produce better print quality in special cases. Smaller ppi value
can be used for printing documents or lower quality images.
For continuos tone printing it is best to use the same dpi and ppi value, which means that the image resolution value should be identical to the print resolution value.
For halftone output you can either choose the Auto option of the Image Resolution combo box or choose between two other options. The "lpi * 2" option assumes an image resolution that is twice as large as the print resolution and the "lpi * 1.5" option selects a one and a half as large image resolution. For example if you plan to print at 133 lpi, you should resize your image in your image application by entering the desired print size and an resolution of 266 ppi. If the print quality is not so crucial, you can also use a factor of 1.5 and 200 ppi.
If this talk of resolution means nothing to you or confuses you, we recommend that you better use Easy Mode, Classic Mode or choose the "One Pass: Classic" workflow option in Advanced mode.
Print Size
The text line at the bottom of the Auto tab sheet display the print size that is reached for the selected image resolution. It is displayed in inches as well as centimeter. If you did not already have a certain image resolution in mind when sizing the image to the final output size, you can try different values for the Image Resolution combo box and see which one is the closest to your desired print size.