
The Fix tab sheet contains controls for suppressing halos, weakening the effect and for removing color noise.
Halos are the white and black outlines around the edges in the image. They can also appear as grain in surface areas. Halos produce what is perceived as sharpness by the human eye and brain. Without halos there is no sharpening effect, but too extreme halos, especially white ones, usually do not look visually attractive. With the four sliders of the Halo group you can produce a very strong sharpening effect while reducing exaggerated halos.
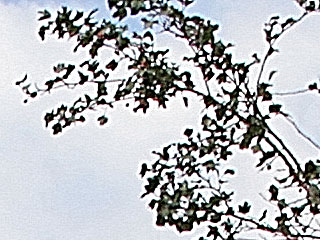
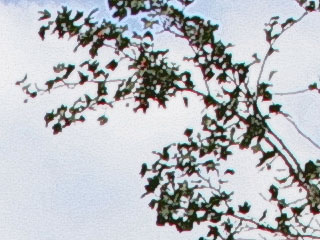
Left Image: No halo reduction
was used. Right Image: The default halo reduction settings were used.
The White Halo and Black Halo sliders let you reduce the intensity of the halos that are produced by the sharpening process. You can influence the white and black part of the halos independently with each slider. Usually white halos are more visible than black ones. Using very high values for both sliders can also reduce the sharpness of the image. In a few cases choosing very different values for both sliders may add an unnatural look.
In some cases it is not possible to remove all halos with the White Halo and Black Halo sliders without weakening the sharpening effect. That is when the White Peak and Black Peak sliders come into play. They use another method for halo removal that is a bit more aggressive but complement the first method. If the White Halo and Black Halo sliders have a value of zero, the White Peak and Black Peak sliders have no effect. This avoid that artifacts occur. So you should only use White Peak and Black Peak if White Halo and Black Halo are not sufficient.
The arrow-down button displays a menu with five options. "Default" sets four Halos sliders to the default values defined on the Calibrate tab sheet. "No Halo Reduction" sets all four sliders to zero. The remaining options assign slider values for light, average and strong halo reduction.
For more tips about halo reduction, please read the Tips page.
The Highlights and Shadows sliders lets you reduce the sharpening or blurring in the highlights and shadows. The Highlights slider makes sure that the bright areas of the image aren't sharpened or sharpened less. With the Shadows slider you avoid e.g. noise being sharpening in the shadows and made even more visible. When applying a blur effect, you have more control over the blurring with the help of these two sliders. Setting both sliders to their maximum values doesn't completely remove the sharpening or blur effect. The midtones are still affected.
The Fade slider weakens the overall effect of FocalBlade. At zero the effect is left untouched and at 100 there is not effect applied. At a value of 50 the effect is only half as strong as before.
The color noise options let you reduce color noise in the image. It does not work with grayscale and CMYK images.
The Remove slider determines the intensity of the color noise removal. A value of 100 is good in most cases.
The Noise Size slider defines the maximum size of the noise to be removed. Higher values remove more noise but can also have adverse effects on the image. A value around 3.0 is usually sufficient. Please use a higher value if some noise is still left.
The Resaturate slider increases the saturation of the image to compensate for the desaturation that may occur by the color removal. Sometimes a very strong sharpening can also produce a slight desaturation. So you can also use this slider for compensating that.