
Supported by Photoshop
CS2/CC and higher, Photoshop
Elements 11 and higher
Requirements: An RGB image needs to be opened.
The Auto Saturation increases the saturation for pale photos and decreases it for photos with too vivid colors. It does this automatically with the help of the saturation histogram and some internal logic.
In Photoshop Elements this menu item is displayed on the Enhance menu.
Supported by Photoshop
CS2/CC and higher, Photoshop
Elements 11 and higher
Requirements: An RGB image needs to be opened.
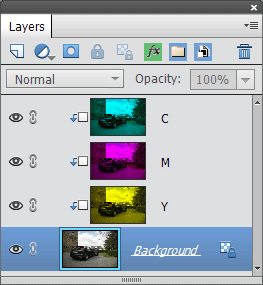
The Split Layer sub menu offers menu items for splitting the current layer into various "channels". These "channels" will be added as new layers on top of the current layer and are linked to it with clipping masks. So adjusting these new layers will only affect the original layer. With the help of these new layers you can change the look of the original layer. After selecting a layer you can apply a filter or use a tool on it.
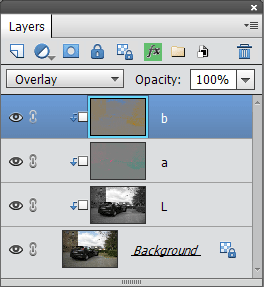
You can split a layer into RGB, CMY, CMYK, Lab, HSL, YCbCr, Luminosity & Color and two types of Frequency separation layers. The RGB, CMY and CMYK options are nice for colorizing effects. The Lab, YCbCr and Luminosity & Color options are useful for sharpening and noise reduction. The HSL layers are meant to selectively adjust the hue, saturation and lightness. Finally, the the Frequency separation layers are great for portrait retouching.
After you are finished with your adjustments, you can remove the split layers by selecting them as well as the original layer and choosing Layer > Merge Down.
Supported by Photoshop
CS2/CC and higher, Photoshop
Elements 11 and higher
Requirements: An RGB image
has to be opened
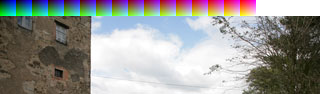
This menu item expands the image canvas and adds a lookup pattern at the top left corner of the image. No image pixels are overwritten this way. This lookup pattern is only necessary if you want to use a 16-bit image (e.g. for more precise color values) or want to capture the effect of a filter. A lookup pattern is not needed if you use a 8-bit image and only add adjustment layers for producing an effect.
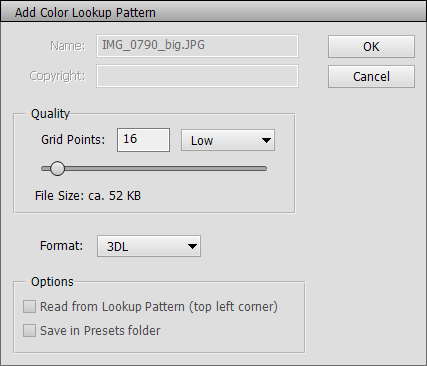
You have to choose a grid point value and a lookup format with the appropriate controls. The higher the grid point value, the more colors will be sampled, which results in a better quality but the larger the lookup file will be. We recommend values between 16 (4096 colors, 50-100K file size) and 32 (32768 colors, 400-800K file size). The 3DL format produces file sizes that are half as large as CUBE or CSP.
After you added the lookup pattern by clicking the OK button, you can apply filters to the image thus producing a desirable effect. This effect can be saved as a lookup file with the File > Save > Color Lookup Table command and applied to any image with the Color Lookup filter or adjustment layer.
Please note: The grid point value and format have to be the same on the Add Color Lookup Pattern dialog and the Color Lookup Table dialog, otherwise the produced lookup file will contain nonsense values that do not reproduce the effect.
Supported by Photoshop
CS2/CC and higher, Photoshop
Elements 11 and higher
Requirements: An 8-bit
image has to be opened
The Replace Background dialog provides instructions and tools that are needed for cutting out an object (e.g. a person) from one photo and adding a new background (e.g. from another photo). It also does a lot of things automatically in the background as you proceed from one step to another. This saves you a lot of time and manual work. For a step by step example about fine hair masking see here.
The dialog offers up to 8 steps which should be executed in this order by clicking one or more of the buttons below each step. Going back to a previous steps or jumping ahead to one of the next steps should cause no problems though. If you want to cut out an object with a clearly defined shape, you should activate the Hard Edges tab sheet. If you like to cut out a person with protruding fine hair, you should switch to the Fine Hair tab sheet. Depending on your choice some steps or tools are disabled. But you can switch between both tab sheets anytime.
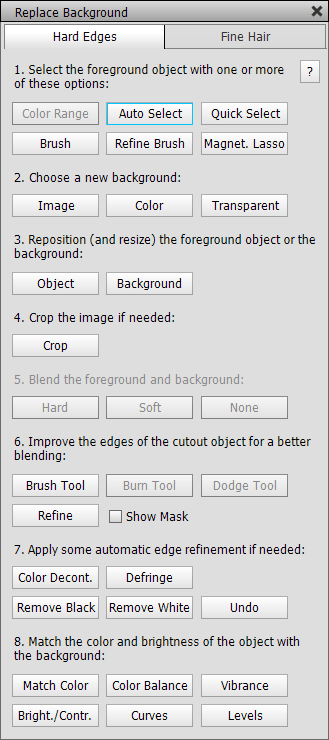
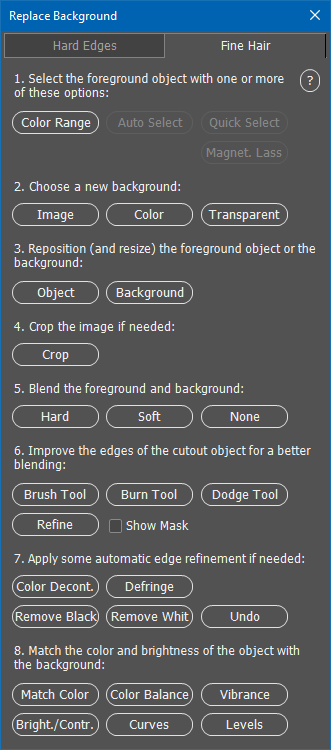
Step 1 offers tools for cutting out the object. For fine hair you can only use the Color Range dialog whereas for hard edges you can choose between 3 or 5 tools. The result should be a precise selection around the object.
In step 2 you can choose an image from a file dialog or a plain color, which will replace the old background outside the selection. If you choose the Transparent option you will see a checkerboard pattern, which indicates a transparent background. You can then add another background later manually. This step turns the selection of step 1 into a layer mask.
Step 3 lets you click on the Object or Background button for selecting one of these two layers. Additionally the Move tool is automatically activated, which can be used for repositiong and scaling. Step 4 lets you activate the Crop tool and crop away unnecessary or blank areas, which may have been produced by repositioning and scaling.
For fine hair you can use step 5 to blend the fine hair with the background. This works almost magically and makes it look as if the fine hair was really a part of the background. This steps places the background layer above the object layer and moves the layer mask to the background layer.
For hard edges you can use the brush tool to enhance the edge masking in step 6. For fine hair you should only use the burn or dodge tools with their Range option set to Shadows or Highlights. This makes sure that the fine hair structure is preserved while you enhance its edges. The Refine dialog offers some more features for fine-tuning the edges if needed.
Step 7 offers some automatic edge enhancement option in case you are not satisfied with the result of the previous step. All of these steps remove or blend 1-2 pixel large seams around the object. In case these features overdid it and you do not like the result, you can click the Undo button. Please also notice that these steps remove the layer mask (which was created after step 1) and make the object layer transparent. In case you want to keep a layer mask, you should skip this step.
In step 8 you can finally adjust the color, brightness and contrast of the object to the background. The Match Color dialog lets you do that semi-automatically whereas the other options offer a great deal of manual control.
After you went through these steps you can close the dialog and can make some more manual adjustments on your own if you want. Please reopen the Replace Background dialog again for every new background composition to make sure that it correctly readjusts itself to a new image.