The menu items on this page are displayed on the AdjustShop sub menu of the Image menu in Photoshop and on the Enhance menu in Photoshop Elements.
Supported by Photoshop
CS2/CC and higher, Photoshop
Elements 11 and higher
Requirements: An RGB image needs to be opened.
The Auto Saturation increases the saturation for pale photos and decreases it for photos with too vivid colors. It does this automatically with the help of the saturation histogram and some internal logic.
In Photoshop this menu item is displayed on the Image menu.
Supported by on
Photoshop CS2/CC and higher, Photoshop
Elements 13 and higher
Requirements: An RGB image needs to be opened.
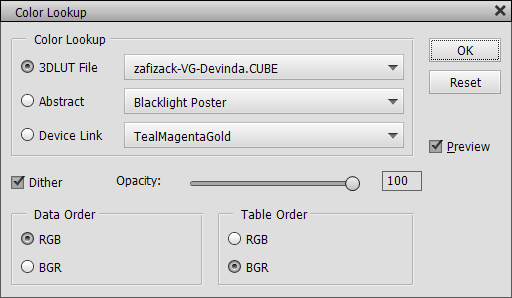
The Color Lookup filter lets you apply a lookup table (also called profile) to the image thus producing a color adjustment or color effect. There are two types of dialogs: The classic one (see above) is displayed in Photoshop CS6/CC as well as Photoshop Elements 13 and higher. AdjustShop's own dialog (see below) is used in Photoshop CS2-CS5 and Photoshop Elements 11/12 and only works as a filter but not adjustment layer there.
The classic dialog offers three combo boxes with different type of profiles (3D LUT, Abstract and Device Link). As you can only apply one profile at a time a radio button at the left-hand side decides which combo box option is applied. The combo boxes already offer profile items, but you can also open a profile from file by choosing the first "Load ..:" item of each combo box, which opens a file dialog.
The Dither check box determines if the color profile applies dithering, which means that neighboring pixels will be adjusted in order to produce a visually more precise result. This is only recommended if the image does not contain any noise, which may be amplified that way.
The Opacity slider lets you reduce the intensity of the color lookup effect. In the case of the Color Lookup adjustment layer this directly reduces the opacity of the adjustment layer. The Opacity slider is not always available depending on the used Photoshop Elements version and whether you use the filter or adjustment layer dialog. Alternatively please use the Edit > Fade command after applying the Color Lookup filter or adjust the layer opacity after applying the Color Lookup adjustment layer.
If you open a .cube file, you will also see Data Order and Table Order controls at the bottom. They let you swap the color order, which usually produces more exotic effects.
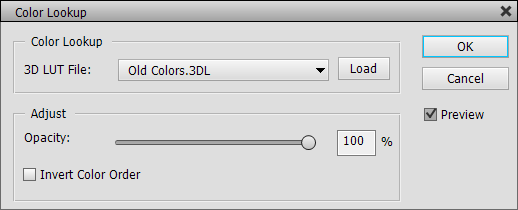
AdjustShop's Color Lookup dialog is a bit more simple and does not support 1DLS, 3DLS and ICC/ICM profiles, but runs as a filter in older Photoshop (Elements) versions.
There is a dedicated Load button for opening profile files, so you do not need to choose it from the combo box. The Invert Color Order check box (in contrast to the of Data Order and Table Order controls) also works with 3DL, CSP and LOOK files and not only CUBE files.
Please note: You can create your own lookup files with the File > Export > Color Lookup Table command and then use them with Color Lookup filter and adjustment layer.
Supported
by Photoshop CS2/CC and higher, Photoshop
Elements 11 and higher
Requirements: An RGB image needs to be opened.


The Color Correction feature lets you remove a color cast from an image. You can also colorize the image by activating the Colorize check box, which will apply the opposite color effect. The applied color correction or colorization can be seen on the Applied Color Tones bar below the Colorize check box. Click the color bar to display a color dialog for editing the currently used color.
The color for removing the color cast or colorizing the image can be picked from the image by activating the eyedropper tool (on the right-hand side of the dialog) and clicking on the image. You can also use the Auto 1, Auto 2 and Auto 3 buttons to let an algorithm pick a color from the image data. The Hue, Saturation and Lightness sliders immediately update according to the picked color. These three sliders help you fine-tune the selected color and tweak the applied color effect. You can also start by using these sliders for achieving your desired result instead of using the eye dropper tool.
The Cool/Warm and Green/Magenta sliders can be used as an alternative to the Hue, Saturation and Lightness sliders or adjusted additionally. So these two sliders also lets you adjust the color that is used for the color effect. You can make the color more warm or cold with the Cool/Warm slider or push it more towards green or magenta with the Green/Magenta slider. By using both sliders in combination you can achieve every possible color adjustment.
The Shadows and Highlights sliders reduce or increase the amount of the color effect in the shadows and highlight areas of the image.
Above the Hue slider there is a curves diagram, which represents the applied color effect - just like the color bar does - but in a different way. It shows the curves that are applied to the red, green and blue channels of the image and is similar to the diagram known from the Curves dialog. You can also see three big colored circles in the middle and three smaller circles to the left and right. The color in the big circles is actually the color that you picked with the eyedropper or selected with the Hue, Saturation and Lightness sliders and adjusted with the Cool/Warm and Green/Magenta sliders. This color is used for the color correction or colorization effect.
Hold down the Alt key and click the Cancel button (which turns into a Reset button) in order to go back to neutral and start from scratch.
Supported
by Photoshop CS2/CC and higher, Photoshop
Elements 11 and higher
Requirements: An RGB image needs to be opened.
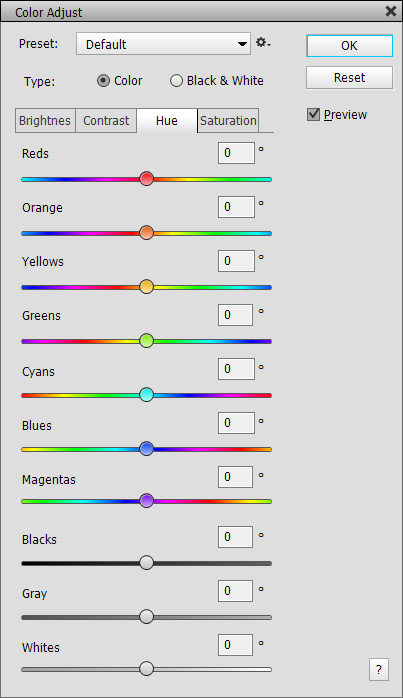
The Color Adjust feature is a very powerful tool, which enables you to adjust very specific image areas. An invisible mask is automatically used for each of the ten visible sliders. You can adjust the brightness, contrast, hue and saturarion of red, orange, yellow, green, cyan, blue, magenta, black, gray and white image areas. You can also produce a sophisticated full or partial black & white effect if you activate Black & White radio button at the top.
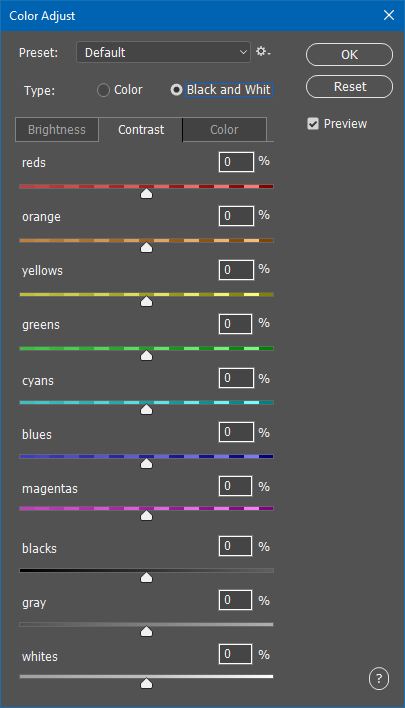
By default the Color effect type is selected, which basically means that the image is not changed if all sliders have a value of zero. You only get an effect by adjusting a slider. If you activate the Black & White effect typ, then a standard black & white effect is applied, which can further be tweaked with the sliders.
The tab sheet buttons at the top let you switch between 3 or 4 effects: Brightness, Contrast, Hue and Saturation for the color effect type and Brightness, Contrast and Color for the black & white effect type. Each of tab sheet offers ten sliders. So there are a total of 70 sliders available even if only 10 sliders can be viewed at a time and only 30 or 40 can be applied to an image.
While sliders of the Brightness and Contrast tab button adjusts the brightness of image areas with a specific color, the Hue sliders change the color hue of these areas. For example, if you want to turn the red dress of a photo into a blue dress, simply click on the Hue tab button and drag the Reds slider until the dress turned blue. Or if you want to make the sky in a photo more blue, click the Saturation tab button and increase the value of the Blues slider.
If you switch to Black & White mode, the sliders of the Brightness and Contrast tab sheets let you increase the brightness and contrast of image areas that had a certain color in the original color image. For example, to make the sky in a photo darker in the black & white version of the image, click on the Brightness tab button and decrease the value of the Blues slider. If you want to add back a certain color to the black & white image, you can use the Color tab sheet. So if you want to give the red dress in the photo back its red color, click on the Color tab button and use the Reds slider. High values of the slider make the red dress even more red than it was in the original color photo thus producing an artistic effect.
Filters with similar features do not provide sliders for adjusting pure black, gray and white image areas. AdjustShop's Color Adjust feature does not let you down in this case. For example, you can give white clouds in a photo a red touch of sunset by cranking up the Whites sliders on the Hue and Saturation tab sheets. For colorizing dark, middle gray and bright white areas even stronger we recommend the Tonal Adjust feature of AdjustShop.
Supported by Photoshop
CS2/CC and higher, Photoshop
Elements 11 and higher
Requirements: An RGB image needs to be opened.
 |
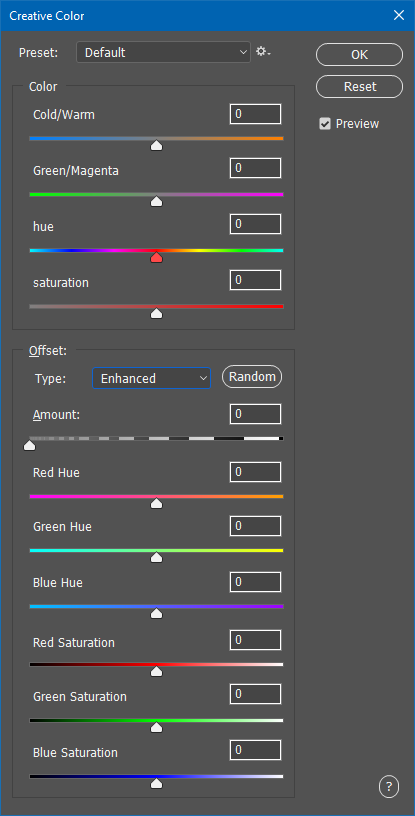 |
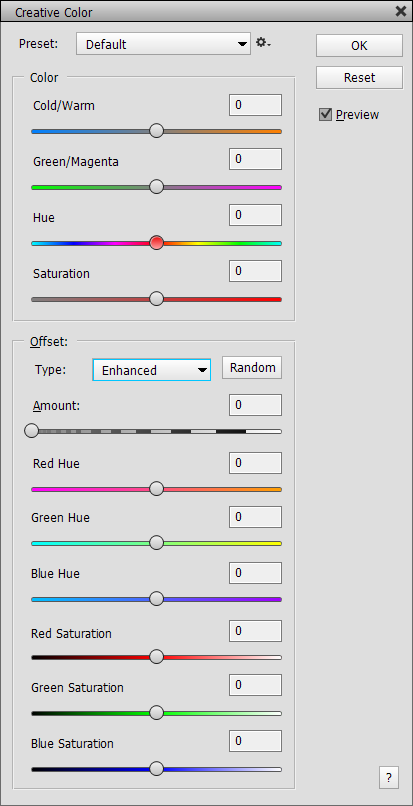
The Creative Color feature produces more extravagant color effects. The Cool/Warm and Magenta/Green sliders produce standard color effects that you probably already know from other AdjustShop filters. The Hue slider shifts the hue channel which means that colors are exchanged with each other. The Saturation slider makes the colors of the image stronger or weaker.
The Offset group offers four additional effect, which can be selected from the Type combo box. These effects are exclusive, so if you choose another effect, the previous one is not applied anymore. The Random button assigns random values to the sliders in this group (except for the Amount slider), which allow you to explore the potential effects.
The Summer Colors effect tries to apply colors that are usually associated with photos taken in summer or indian summer settings. The three other effects are similar to the Hue slider, but work a bit differnetly and offer more effect variations. The Amount slider controls the intensity of the effect. The Hue and Saturation sliders control the hue and saturation shift that occur in the red, green and blue channels. For the Summer Color effects there is only one Hue slider, which changes the color look.
Supported by Photoshop
CS2/CC and higher, Photoshop
Elements 11 and higher
Requirements: One or more RGB images need to be opened.
 |
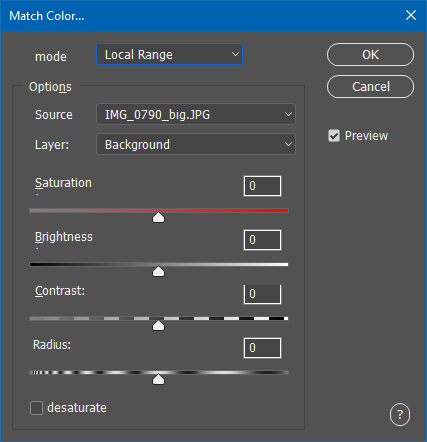 |
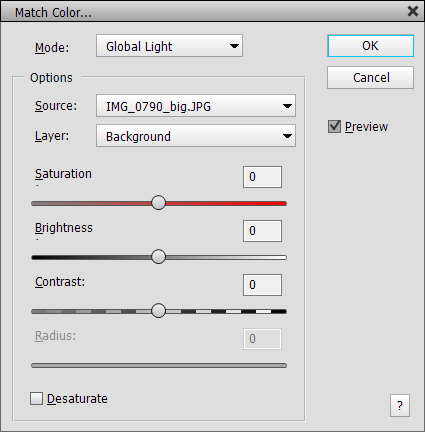
The Match Color filter lets you grab colors from another layer or image and apply them to the currently selected layer in order to equalize the color mood of both layers or images. This way you can make sure that the two images or layers have the same overall look. The image and layer from which the colors are grabbed are defined by the Source and Layer combo boxes. There you can select the current document or any other document that is opened in Photoshop Elements as well as a layer of the selected document or a merged version of all layers of the document. You can also create a selection in the source document. Then the Match Color filter will only use the selected area instead of the whole image area.
There are two effects selectable from the Mode combo box. The Global Light effect takes the average color of the other image or layer to uniformly colorize the current image. The Local Range effect grabs colors from various areas of the other image thus colorizing the current image differently in various places. The Desaturate check box makes sure that the currently selected layer is only adjusted in brightness and not color. The Saturation slider controls the saturation of the color effect. The Brightness and Contrast sliders let you adjust the effect to the brightness and contrast of the source image or layer. The Radius slider determines the size of the areas from which colors are grabbed by the Local Range effect.
Supported by Photoshop
CS2/CC and higher, Photoshop Elements 11 and higher
Requirements: An image needs to be opened.
 |
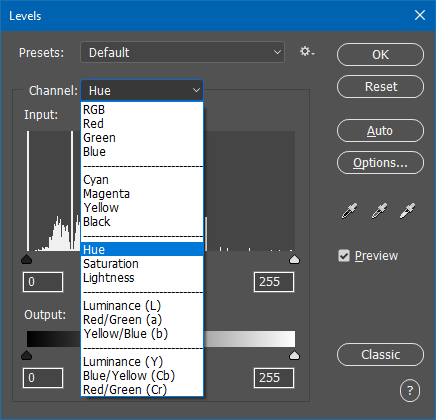 |
The Levels dialog is similar to the one of Photoshop (Elements). However, AdjustShop's Levels version offers 17 channel option instead of just four. So it support four additional color models (CMYK, HSL, Lab and YCbCr), which allow a lot of more adjustments and effects. See the Curves section below for more details on these channels.
You can adjust up to 17 channels at the same time, so switching between the channels in the Channels combo box does not mean that the previous effect is deactivated. Below the Input Levels label you see a histogram of the currently selected channel. You can adjust the white, mid and black point of each channel with the slider knobs below the histogram. The mid point is basically a brightness adjustment, whereas the black as well as white knobs stretch tonal or color values in the image. Stretching these tonal values increases contrast, cuts off colors or adjust the saturation depending on which channel you are adjusting.
The Output Levels bar with its two slider knobs allows cutting off tonal or color values. This is usually not needed for enhancing photos, but can be useful for graphic design tasks.
The Auto button at the left applies an image correction, which is also available on the Curves dialog and from the Image menu in Photoshop and Enhance menu in Photoshop Elements. The Options button displays a dialog for changing the effect of the auto adjustment. The three eyedroppers lets you pick a color for correcting the shadows, midtones and highlights of the image. Hold down the Shift key and double click on each icon to display a color dialog for selecting a color manually. Double click each icon to display a color dialog for selecting a target color, which is used for the adjustment when clicking on the image with the eyedropper tool. When clicking the Classic button you will get the standard Levels dialog of Photoshop (Elements).
Supported by Photoshop
CS2/CC and higher, Photoshop
Elements 11 and higher
Requirements: An image needs to be opened.
The Curves filter lets you change and improve the brightness, contrast and color of digital images by remapping the brightness and color values of the image. It can also be applied to layer masks and smart filter masks for improving them. It offers various new features that the Curves dialog of Photoshop (Elements) does not have.
You can choose a preset from the Presets combo box at the top. 14 presets are already available by default and cannot be deleted. You can save your own presets by clicking on the menu icon on the right hand side of the combo box and choosing Save Preset from the menu. Please save the preset file in the preselected folder, otherwise it will not appear on the Presets combo box. The Load Preset menu item displays a file dialog for opening a preset file, which is handy if you have some presets located in another folder, e.g. after downloading from the web. The Delete Current Preset menu item deletes the preset file that is currently displayed in the Presets combo box.
If the current image is grayscaled or only one channel or a mask is selected, you only have one curve to work with. If all channels of an RGB image are active, you can adjust up to 17 curves (but only four curves in the Curves adjustment layer). You can can switch between them with the Channels combo box.
The RGB curve lets you change the brightness of the image. The Red, Green and Blue options adjust the red, green and blue channels of an RGB image. The Cyan, Magenta, Yellow and Black curves create respective color effects, but as the CMYK color model is the opposite of RGB, you have to drag the curve down add cyan, magenta, yellow or black effects (unless you activate the Pigment/Ink check box). The Hue curve produces color shift effects by mapping one base color to another. The Saturation curve lets you adjust the saturation selectively, e.g. you amplify the saturation of less saturated pixels or desaturate more saturated pixels. You can also use it to create color key effects, e.g. a blue sky in an otherwise black & white image. Whereas the RGB curves changes the brightness of the image while also altering the color slightly, the Lightness curve does that without changing the saturation and hue of the colors.
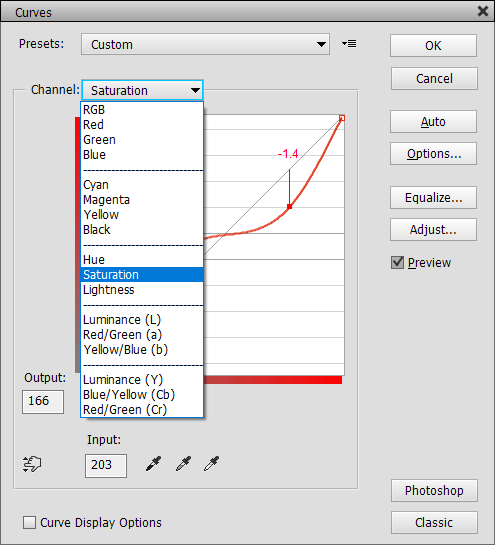
The Saturation curve with 11 Zone Grid and Distance Line options
The remaining six curves represent the Lab and YCbCr color
models, which are quite similar, but the Lab model requires more calculations,
so it renders slower. Both offer a Luminance curve, which works
similar to the Lightness curve, as well as two color channels with Red/Green
and Blue/Yellow curves. Although the names of these four color curves
are the same, the color effects that they produce are a bit different. To produce
color shift effects with these curves you have to use an S or inverted-S shape
for the curve.
By default the "curve" is displayed as a diagonal line in the diagram, which means that the input and output values are the same and no adjustment is applied. The curve can be adjusted with the help of points. To create a new point click somewhere in the diagram and drag. After releasing the mouse button a curve is drawn through the new point. You can adjust your point or add new points until you get the desired result. You can also adjust curve points by entering numbers in the Input and Output boxes. To delete a curve point, select it and hit the Del or Backspace key or drag the point to another point in order to merge both. To start from scratch hold down the Alt key and click on the Cancel button, which will now be renamed to "Reset".
The Auto button automatically creates curves that corrects the brightness, contrast and color of the image according to the settings displayed by the Options button (see the Auto Options dialog above!). Both buttons delete existing curves, so best use this feature right after the Curves dialog is displayed.
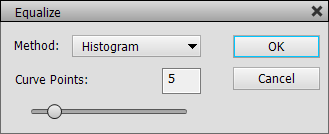
The Equalize button displays a dialog for performing various types of histogram equalizations. The Filter > Adjustments > Equalize filter, which does something similar, applies the effect to the image without the ability to adjust it. The Equalize feature on the Curves dialog creates a curve that produces the effect. This way you can adjust the curve to edit the effect according to your taste.
The Histogram method creates a equalization curve by using the full histogram. The number of created curve points is determined by the Curve Points slider. The more curve points are added the more precise is the effect, but less curve points often produce a more pleasing effect. The Brightness method adds one additional curve point that increases or decreases the brightness. The Contrast and Tonal Range effect add three curve points that equalize the contrast or tonal range of the image. The Simple method is similar to the Histogram method, but only adds three curve points.
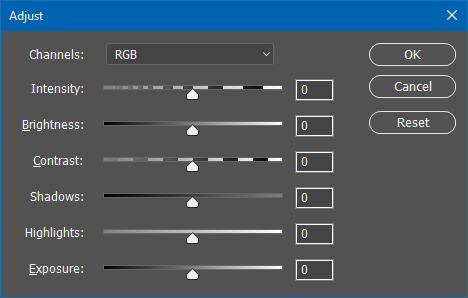
Click the Adjust button on the main Curves dialog to display the Adjust dialog for changing curves with the help of six sliders. As long as the Adjust dialog is displayed you cannot access the main Curves dialog, so a Channel combo box lets you switch between the various curves. The six sliders beneath it adjust the selected curve in order to increase or decrease brightness, contrast, shadows, highlights and exposure. If necessary they add one or two new points to the curve in order to achieve the intended effect.
The Intensity slider increases or decreases the effect of an available curve. If no curve point exists and you also did not use one of the other five sliders, it will has to effect. The Brightness slider adds a new middle curve point (in case there is none available) and moves it vertically to adjust the brightness of the image. The Contrast slider adds up to two new curve point in order to create a S-shaped curve for adjusting the contrast. The Shadows and Highlights sliders may each add a curve point in the left or right region of the curve diagram thus adjusting the brightness in the shadow and highlight areas. Finally, the Exposure slider moves the first or last curve point in order to adjust the brightness more linearly and cut off tones.
To reset the slider values to zero you can click the Reset button. The Cancel button will also undo the adjustments and close the dialog. The OK button keeps the adjustments.

The black curve shows
a typical contrast adjustment with the help of an S curve consisting of two
added points.
There are eye dropper tools for picking a black and white point (the darkest and brightest pixels) from the preview. Additionally the gray eye dropper performs a color correction when you click on a slightly colorized gray area in the preview. Double click on one of these eye dropper icons to display a color dialog for selecting the target shadows, midtones or highlight color. Shift click on them to display a color dialog for manually adjusting the picked color. The hand tool lets you create and adjust a curve point by clicking and dragging on the preview.
The Clipping Mask check box is only available in the dialog of the Curves adjustment layer. It allows adding a clipping mask to the Curves adjustment layer and removing it again. The clipping mask makes sure that the curves are only applied to the layer beneath it and not to all other layers below.
When activating the Curve Display Options at the bottom, more controls show up: Pigment/Ink simply inverts the values of both axes of the diagram, which makes the colors run from white to black and rotates the curve by 180 degrees. The Detailed Grid check box doubles the straight number of lines in the diagram. If you have the RGB displayed, an activated Channel Overlays check box also shows the red, green and blue curves. The Baseline check box removes or adds the diagonal line in the diagram. The Histogram check box only shows histogram behind the curves. The Intersection Line check box displays thick crossing lines when you move a curve point.
The 11-Zones Grid check box displays nine horizontal lines and numbers from 1 to 9 at the left-hand side. This system was developed by black & white photographer Ansel Adams and defines 11 brightness levels from 0 (pure back) to 5 (mid gray) to 10 (extreme white). The Distance Line check box draws a vertical line between the current control point and the diagonal base line. It also displays a value which expresses the tonal increase or decrease with values ranging from -255 to 255 or -9.9 to 9.9 if the 11-Zones Grid is active.
When clicking the Classic button you will get the standard Curves dialog of Photoshop (Elements).
Supported by Photoshop
CS2/CC and higher, Photoshop Elements 11 and higher
Requirements: An image needs to be opened.
 |
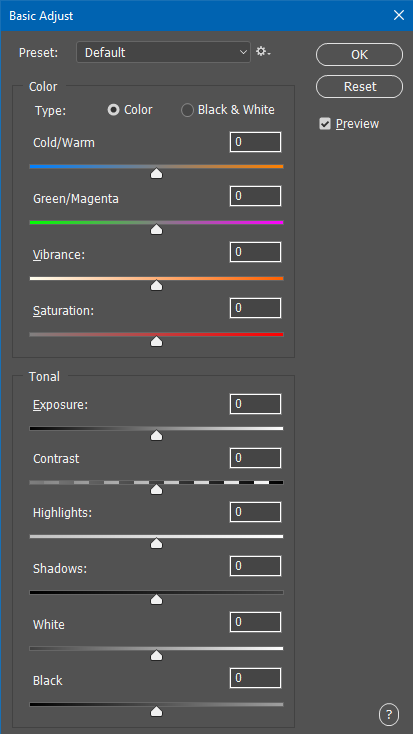 |
The Basic Adjust feature offers a combination of often needed color and brightness adjustment options, so it is a general purpose tool. You can also use it to create a black & white effect with the Type radio buttons at the top.
The Cold/Warm and Magenta/Green sliders allow colorizing the image. In Black &White mode you can use them to create e.g. sepia or cyanotype effects. The Vibrance slider edits the saturation of the image while avoiding to make already saturated colors even more colorful. In Black &White mode it turns into a Hue slider, which lets you choose the color filter for the black & white conversion. The Saturation slider adjust the saturation for color images or produces even more black & white variations.
The Exposure slider lets you increase or decrease the brightness of the image. The Contrast slider adjust the contrast whereas the Hightlights and Shadows sliders influence the brightness in bright or dark image areas. The White and Black sliders work similar to the Highlights and Shadows sliders, but also they also influence the midtones. So you can think of them more as midtone sliders or as an alternative if neither the Exposure, Shadows or Highlight sliders produce the desired result.
Supported by Photoshop
CS2/CC and higher, Photoshop Elements 11 and higher
Requirements: An RGB image needs to be opened.
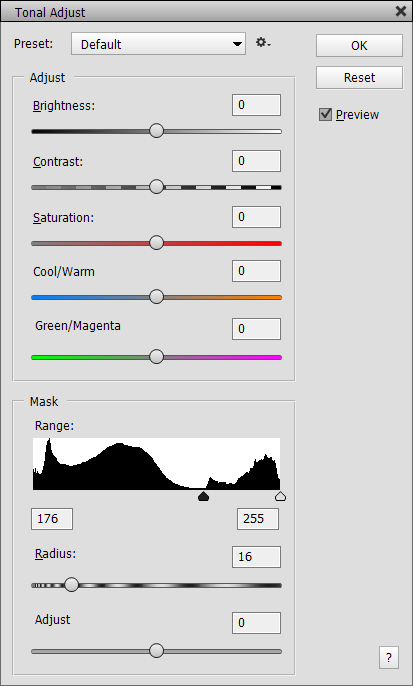
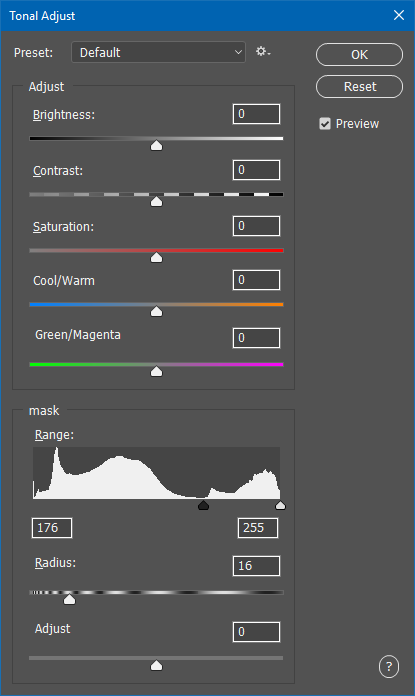
The Tonal Adjust feature lets you target image area with a certain tonal range and change their brightness, contrast and color. It is a more advanced version of a Shadows/Highlight filter, because you can define the shadows or highlights yourself and also adjust the local borders of the image area.
The sliders in the Adjust group change the pixel values. The Brightness slider increases or decreases the brightness and the Contrast slider does the same for the contrast of the targeted image area. The Saturation slider makes colors faded or more vivid. The Cool/Warm and Green/Magents sliders together colorize the image area with every imaginable color.
The Mask group lets you define the image area that is affected by sliders of the Adjust group and basically creates a mask. The Range control displays a histogram and lets you visually select the tonal range that is targeted. You can move the two slider knobs to the left to edit the shadows, keep them in the middle for the midtones and move them to the right for the highlights. You can also edit the whole image by setting the black knob to zero and the white one to 255.
The Radius slider softens the borders of the mask that was defined by the Range control. This smoothly blends the adjusted area with the rest of the image. The Adjust slider moves the mask border forth and back thus allowing to make the transition look even more natural.
Supported by Photoshop
CS2/CC and higher, Photoshop
Elements 11 and higher
Requirements: An image needs to be opened.
 |
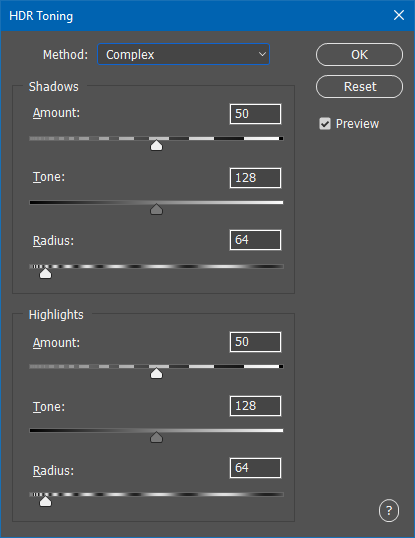 |
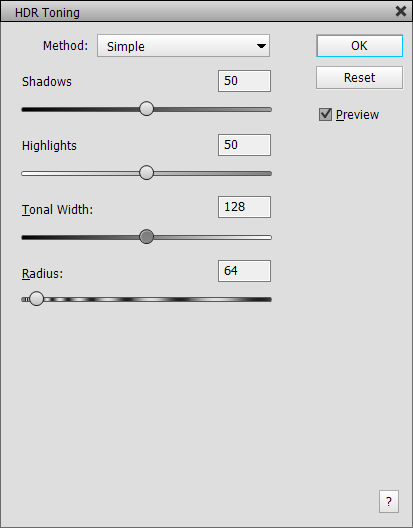
The HDR Toning filter lets you compress the shadow and highlight tones in order to achieve a HDR-like look. This filters is similar to the Shadows/Highlights filter, but usually produces a more natural looking effect. The Simple mode offers less sliders and renders faster than the Complex mode, which offers more sliders for seperate shadows and highlights adjustments. Both modes use individual slider values, so switching to the other mode, does not transfer the slider values of the previous mode to the current.
The Shadows and Hightlight sliders in Simple mode as well as the two Amount sliders in Complex mode moderate the intensity of the effect in the shadow and highlight areas. The Tonal Width slider in Simple mode defines the border between the shadows and highlights. Lower values apply the effect intensity of the Highlights slider in darker image areas whereas higher values apply the Shadows slider's effect intensity in brighter image areas. In Complex mode you can define the tonal limit of the shadows and highlights independently from each other with the two Tones sliders, which means that midtones may receive a weaker or stronger effect depending on the two slider values.
The Radius sliders finally define the softness of the transition area between shadows and highlights. Larger values produce a soft transition and lower values create a more distinct edge between shadows and highlights. Again, in Complex mode you can define the transition independently for shadows and highlights.
Supported by Photoshop
CS2/CC and higher, Photoshop
Elements 11 and higher
Requirements: An image needs to be opened.
 |
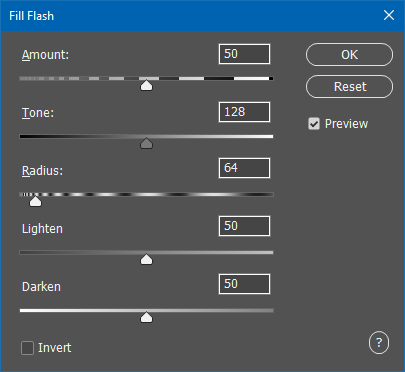 |
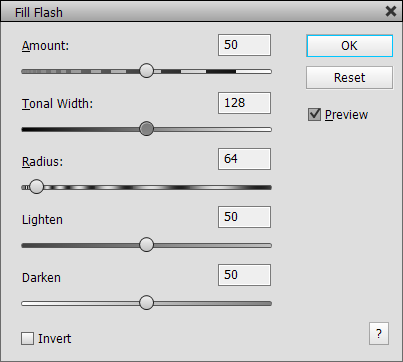
The Fill Flash filter is meant to simulate the effect of using a flash on your camera, which brightens up darker image areas and keeps brighter areas from getting too bright, which effectively darkens them.
The Amout slider controls the strength of the overall effect from 0 to 100%. The Tonal Width slider lets you define dark and bright areas is in terms of tonal value. Larger values apply the brightening effect to midtones or even hightlights whereas lower values keep the brightening effect in the darker image areas. Respectively larger values limit the darkening effect to the highlight areas and lower values also apply it to the shadows.
The Radius slider softens the transition between the brightened and darkened areas. The Brighten slider controls the intensity of the brightening effect of the virtual flash whereas the Darken slider defines the strength of the darkening effect. You can set any of the two sliders to zero to only apply a brighten or darken effect.
The Invert check box basically reverts the effect and darkens dark areas as well as brightens bright areas. This can be used to create a backlight effect.
Supported by Photoshop
CS2/CC and higher, Photoshop Elements 11 and higher
Requirements: An RGB image needs to be opened.
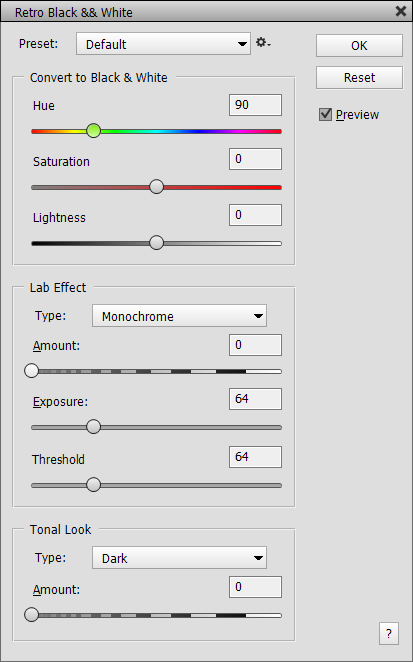
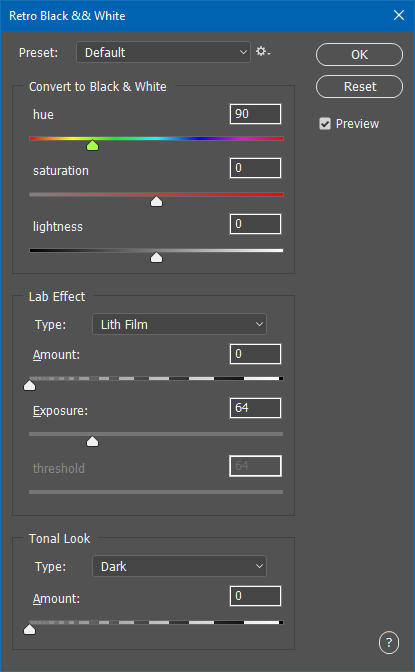
The Retro B&W feature
lets you produce artistic black and white effects and reproduce classic photographic
looks. You can choose black & white conversion options, add a lab effect
and produce a special black & white look. There is a lot of room for creativity
here. Additionally it internally process 8-bit images
with 16-bit precision, which results in more grayscale tones.
The sliders in the Convert to Black & White group determine the color filter for doing the b&w conversion. The Hue slider lets you choose a color for doing the b&w conversion. For example, if you choose a red color with the Hue slider, the red areas of the color image will get bright in the b&w image. As cyan is the complementary color of red the cyan image areas will get dark. All other areas will have mid gray tones. The Saturation slider as an influence on the contrast of the black & white look and the Lightness slider adjust the brightness.
The Lab Effects group offers various effects that can be achieved in the traditional photo lab or darkroom. The Amount slider is available with all Lab methods. It adjusts the intensity of the effect. A value of zero means that no effect will be applied and a value of 100 applies the effect at full strength. The Lith Film effect imitates the look of lithographic film, which can be adjusted with the Exposure slider. A value of zero and 255 produce no effect at all, but values in-between create a faded and dried out look. The Monochrome effect creates b&w looks that do not use the full spectrum of gray values. Its most extreme effect keeps only black and white without any gray tones. The Threshold slider lets you include some image details and exclude others. It is best to use medium values for it, because low and high values can remove some essential details from the image. Posterization is another way to reduce the number of gray tones in the image. The more you move the Amount slider to the left, the more gray levels are removed. Solarization simulates the effect of a partially developed b&w film. The Amount slider lets you adjust the development time from fully developed to not developed at all. The values in the medium range create the most interesting effects. The Double Solarization effect produces a double solarization effect, which looks like solarized negatives of the same scene that were overlayed. The Pseudo-Solarization effect produces more extreme effects that look similar to solarized photos. The Exposure slider lets you vary the effect. The Double Pseudo-Solarization effect allows more complex effects and variations.
The Tonal Look group applies certain tonal distributions to the image. The first five options from Dark to Bright produce generic tonal looks whereas the other items simulate the tonal look of typical photos from famous b&w photographers like Ansel Adams. The Amount slider controls the strength of the effect. If the effect is quite strong, it can also make the photo appear a bit more antique. To deactivate the effect set the Amount slider to zero.
Supported by Photoshop
CS6/CC and higher, Photoshop
Elements 11 and higher
Requirements: An RGB image needs to be opened.
 |
 |
The Clarity filter reproduces the effect that is know from Adobe Camera Raw. It increases the contrast in smaller image details, but more subtle than the Micro Contrast effect. The Amount slider determines the intensity of the effect. The Shadows and Highlights sliders lets you decrease or increase the Clarity effect in the dark and bright image areas.
Supported by Photoshop
CS2/CC and higher, Photoshop Elements 11 and higher
Requirements: An image needs to be opened.
 |
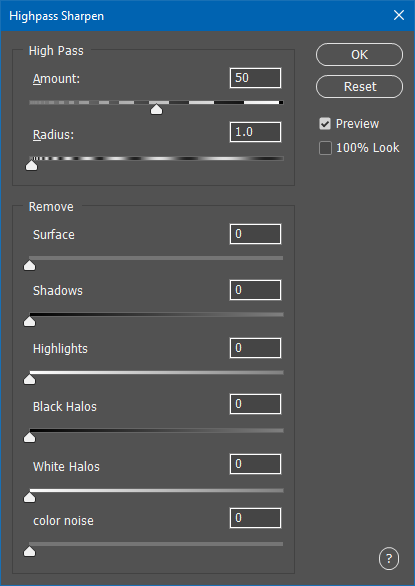 |
The Highpass Sharpen filter lets you sharpen an image while avoiding sharpening artifacts and offering great control over the sharpening procress.
The Amount slider controls the strength of the sharpening effect. The Radius slider defines the size of the details that will be sharpened. Small values bring out small image details whereas larger values emphasize larger image details. The Surface slider lets you reduce the sharpening in flat image areas while keeping the sharpening on the edges of the image details constant. The Shadows and Highlights sliders reduce the sharpening intensity in dark and bright image areas.
The sharpening effect consists of black and white halls, which are drawn around image details. Sometimes white halos may become too visible against a dark background. Same for black halos against a bright background. To avoid that you can use the Black Halos or White Halos sliders to fix this problem and reduce their effect. Please note that the sharpen effect will disappear if you set both sliders to their maximum values. The Color Noise slider reduces color noise that may occur during the sharpening process. This slider does not remove color noise that was already present in the image before sharpening.
The 100% Look check box allows you to view the sharpening effect at 100% zoom. If a preview image is used, the preview feature is deactivated and rendering may take longer.
Supported by Photoshop
CS2/CC and higher, Photoshop
Elements 11 and higher
Requirements: A image needs to be opened.
 |
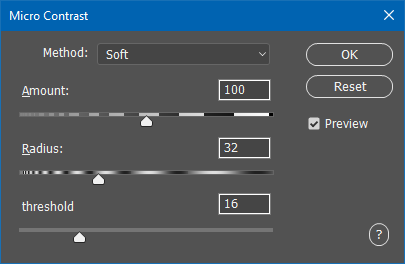 |
The Micro Contrast filter brings out textures in smaller or larger image details. It offers two methods: Soft produces a more smooth effect whereas Grainy creates a more rough surface effect. Please not that the Grainy effect is only available for images with 8-bit per channel and the Soft effect renders much slower for images with 16-bit per channel.
The Amount slider runs from 0 to 200% and controls the effect intensity. The Radius slider defines the size of the details that will be enhanced. A very small slider values produces an effect that looks more like sharpening whereas a very large slider value moves more into the direction of a conventional contrast effect. Middle Radius slider values emphasize the contrast in smaller or larger image details.
The Threshold slider is generally similar to the Amount slider but also increases the number and size of image details that will be amplified. For the Soft method it additionally amplifies the intensity of the contours in the image. For the Grainy method larger slider values also make the effect a bit softer.