The Settings window lets you adjust the parameters of the Adobe DNG Converter and MetaRaw's own raw converter.
The Settings dialog is similar to the Preferences dialog of Photoshop and Photoshop Elements. The list box on the right works similar to a tab sheet. Click its entries to display different control groups. The Prev and Next buttons switch between the items in the list box. The Reset button restores the default settings. The OK button leaves the dialog and stores the changed settings. The Cancel button also exits the dialog but restores the old settings. The ? button displays this help page.
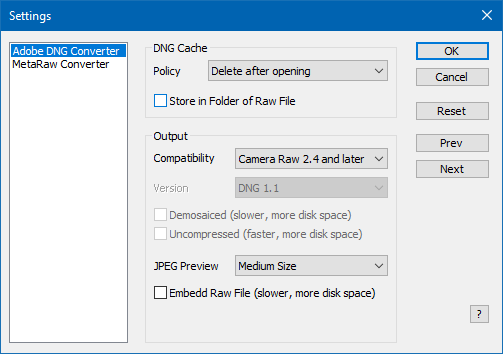
DNG Cache
The Adobe DNG Converter converts all kinds of raw files to DNG files which MetaRaw then passes to Adobe Camera Raw. DNG files are also a type of raw files, but they are supported by all versions of Adobe Camera Raw. They are usually a bit smaller then the raw files themselves.
By default the produced DNG files are stored in the MetaRaw cache folder and deleted after opening them in Photoshop or Photoshop Elements. This corresponds to the Delete after opening option of the Policy combo box.
If you often repeatedly open the same raw file in Photoshop or Photoshop Elements, better activate the Delete on exit option. Then the MetaRaw cache folder will be emptied when exiting Photoshop or Photoshop Elements. This makes opening the same raw files much faster if you have the Open cached file if available check box on the main dialog activated. If you batch process hundreds of raw files, better not use this option, otherwise your main hard drive could be filled up by the cache files.
By default the cache folder is located in the temp folder on the system drive. If the Store in Folder of Raw File check box is activated, the temporary files are saved in the folder where the raw file is located - provided the folder is writable. This has the advantage that you do not need to select this folder manually on the Save Image(s) dialog of Adobe Camera Raw. However, if the drive of the raw files is slower than the system drive the conversion process may take longer.
Should you want to keep the DNG files indefinitely, you have to activate the Keep converted files option of the Policy combo box. As a result the Location combo box will be displayed. It lets you decide whether you want to store the files in the same folder as the raw file or in a sub folder called "dng".
Output
The Compatibility combo box defines which version of Adobe Camera Raw is able to open the file. By default it is set to the most compatible setting of Camera Raw 2.4 and higher. This setting produces the most compatible and smallest DNG files and usually ensures the fastest conversion process. When using Adobe DNG Converter for converting raw files for Adobe Camera Raw, we recommend keeping this setting. If you choose the Custom option from the Compatibility combo box, three new settings can be manually adjusted for producing other types of DNG files.
The DNG format has been improved over time, so there are a few specifications available, which can be chosen with the Version combo box. By default it is set to the most compatible setting of DNG 1.1.
The Demosaiced check box makes Adobe DNG Converter convert the raw data. As a result image data and not raw data will be stored in the DNG file and the file size increases by a factor of 3-4 with compression and 6 without compression. This also means that the conversion will take longer, but the image will be opened a bit faster in Photoshop. Unless you want to keep such a DNG file (a so-called linear DNG file) for a special purpose, we advice against activating this setting.
The Uncompressed check box makes Adobe DNG Converter produce uncompressed DNG files, which usually consume up to two times more disk space. If you do not have the Demosaiced check box deactivated, an activated Uncompressed check box does normally not speed up the conversion process. If you have Demosaiced activated, the conversion is faster with the Uncompressed check box activated.
The JPEG Preview combo box determines if a preview image in JPEG format is embedded in the DNG file and what size it has. The None option will make the DNG files only slightly smaller, but prevents a faster image preview. The Large Size option embeds a full size JPEG into the DNG files, which will make it much larger and slow down the conversion process. We recommend to keep this setting at Medium Size.
The Embed Raw File check box embeds the original raw file in the DNG file. This makes the DNG at least twice as large as normal. This option is only recommended if you want to delete the original raw file and only keep the DNG file. Should you ever need the original raw file again, you can extract it again with Adobe DNG Converter. We do not recommend to use this option.
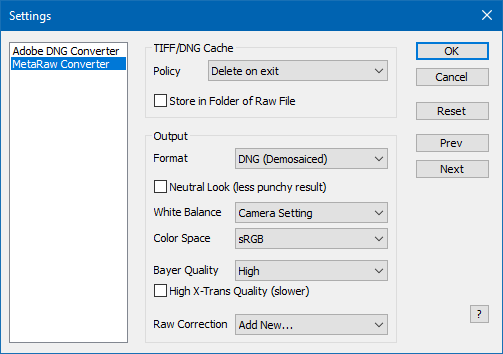
TIFF Cache
MetaRaw Converter saves converted raw files as DNG (or TIFF) files, which are then passed to Adobe Camera Raw. By default these files are stored in the MetaRaw cache folder and deleted after they were opened in Photoshop or Photoshop Elements. This corresponds to the Delete after opening option of the Policy combo box. If you repeatedly open the same raw file in Photoshop or Photoshop Elements, better activate the Delete on exit option. Then the MetaRaw cache folder will be emptied when exiting Photoshop or Photoshop Elements. This makes opening the same raw files much faster, provided that you have the Open cached file if available check box on the main dialog activated.
By default the cache folder is located in the temp folder on the system drive. If the Store in Folder of Raw File check box is activated, the temporary files are saved in the folder where the raw file is located - provided the folder is writable. This has the advantage that you do not need to select this folder manually on the Save Image(s) dialog of Adobe Camera Raw. However, if the drive of the raw files is slower than the system drive the conversion process may take longer.
If you want to keep the TIFF/DNG files indefinitely, you have to activate the Keep converted files option of the Policy combo box. As a result the Location combo box will be displayed. It lets you decide if you want to store the files in the same folder as the raw file or in a sub folder called "tiff".
Output
MetaRaw Converter saves raw files as demosaicked DNG files (or TIFF files) before they are handed over to Adobe Camera Raw. Whereas raw files (and mosaiced DNG files) store the unprocessed data of the camera sensor, demosaiced DNG files (or TIFF files) contain the final processed image and are thus much bigger. A 25 megapixel uncompressed TIFF file is 150 MB large and a 50 megapixel one is 300 MB large. So demosaiced DNG files are usually six times larger than raw files (and mosaiced DNG files).
You can use the Format check box to switch between DNG and TIFF format. The default is "DNG (Demosaiced)" and we recommend to keep this setting, because it offers three advantages:
1) The Lens Correction and Chromatic Aberration Removal options on the MetaRaw main dialog work in Photoshop Element 10 and higher.
2) The lens profile is preselected in Camera Raw and lens correction is automatically activated in Photoshop CS5 and higher.
3 ) The Camera Raw settings are stored in .xmp files and can be used again when opening the raw file again.
4) When clicking the Done button on the Camera Raw dialog there is no error message anymore.
On the other hand if you set the format to TIFF you can produce a stronger noise reduction effect with the same settings in Camera Raw, which is the only advantage of using TIFF. In Photoshop CS1/CS2 and Photoshop Elements 3-5 MetaRaw Converter only outputs demosaiced DNG files, because Adobe Camera Raw 2 and 3 do not support TIFF files. The Format combo box is disabled in this case.
The MetaRaw Converter tries to produce a similar look like Adobe Camera Raw. If you like to have a less punchy image in order to adjust the shadows and highlights yourself manually, you can activate the Neutral Look check box. This produces a less bright and contrasty image.
The White Balance combo box defines which white balance operation is applied if any. The Camera Setting option applies a color correction that corresponds to the color temperature recorded by the camera. If no color temperature was stored or is found by MetaRaw, an automatic color correction will be performed. The Automatic option ignores the stored color temperature and performs an automatic color correction. In some cases this may produce better colors, but we recommend to use the Camera Setting option nevertheless and adjust the color with Adobe Camera Raw or directly in Photoshop or Photoshop Elements. The None option does not perform any white balancing and usually produces incorrect or dirty colors. This is only something for color correction experts, who want to want to do this step manually.
The Color Space combo box lets you choose the color space of the image produced by the MetaRaw Converter. We recommend to set it to the color space that you use for your workflow. In most cases it is sRGB or Adobe RGB.
Please note: The color space of the image is actually determined by the color space setting in Adobe Camera Raw. So if you choose sRGB here in MetaRaw and have Adobe Camera Raw set to Adobe RGB, the image opened in Photoshop or Photoshop Elements will be Adobe RGB. But the net result is that some color values will be lost on the way, even if there is no visible difference. So make sure that this combo box has the same color space as the corresponding setting in Adobe Camera Raw.
The Bayer Quality combo box lets you choose the quality of the conversion for raw file that were captured with a conventional Bayer sensor. Such a sensor is used in all cameras except those with a X-Trans sensor (some Fujifilm cameras) or a Foveon sensor (only Sigma cameras). This option basically defines the demosaicing algorithm that is used. Here are some comments about the different options:
The High X-Trans Quality check box only concerns raw files that were recorded with a Fujifilm X-Trans sensor. If you activate it there are less colored edges in the converted image, but the conversion time is 2.5 times longer. You usually only see a difference at zoom ratios of 400% or higher if you look really close, so we do not really recommend activating this check box.
The Raw Correction combo box provides options for fixing the colors and cropping of raw files of unknown future cameras. To add a new correction and display the Raw Correction dialog please select the "Add New ..." item of this combo box. If you already added corrections for cameras, you will see their names here. To edit (or delete) an existing correction, simply select it. All options display the following dialog.
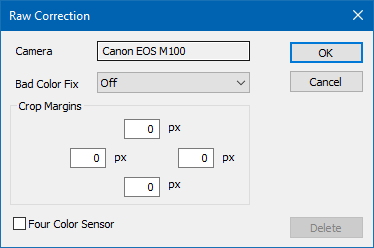
The Raw Correction dialog appears when you choose an option of the Raw Correction combo box on the Settings dialog. It allows fixing the colors and cropping of raw files of unknown future cameras. This way you can increase the raw format support of MetaRaw Converter. Once MetaRaw officially supports a camera, for which you added a raw correction manually, please delete the corrections again, otherwise you may, for example, crop away pixels unnecessarily.
The Camera text field shows the camera name of the currently opened raw file. You cannot edit this entry as it has to be identical with the camera name in the EXIF data of the raw file. So please open a raw file of the camera for which you want to add corrections.
The Bad Color Fix combo box provides options for fixing faded, extreme or otherwise false colors. The values correspond to the intensity of the color correction. If the colors are faded start with a value of 512. If the colors are too strong, start with a value of 128. Then open the raw file again. Now if the color are faded, try a higher value. If the colors are too extreme, try a lower value. Repeat this process and adjust the value until the image looks good.
Please note: If the image needs to be cropped, first try adjusting the cropping with the Crop Margins options. In some cases this also fixes bad colors and you do not need to use the Bad Color Fix option.
The four Crop Margins text boxes let you define how many pixels will be cropped at the top, left, right and bottom of the image. This is needed if you noticed that the opened raw images have either a black border or contain artifacts at the margins. As Bayer sensors consist of a 2 x 2 grid, it can happen that cropping the top and left margin produces bad colors. In such a case try increasing the top value and then the left value by one.
Some cameras use a four color Bayer sensor grid. In case MetaRaw does not detect it correctly and you see strange artifacts in the image at 100% zoom, you can try to activate the Four Color Sensor check box.
The OK button will add the new correction to the Raw Correction combo box of the previous dialog, the Cancel button cancels it and Delete button deletes an existing correction.