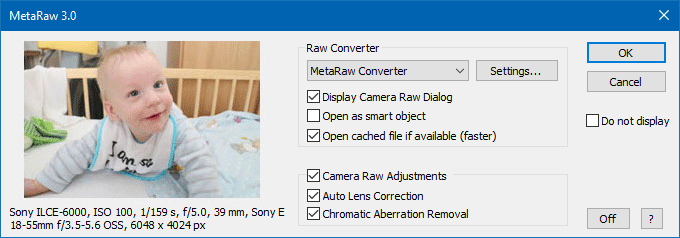
After initiating the opening of one or more raw files, MetaRaw's main dialog shows up (unless you activated the Do not display check box described below). It lets you define how MetaRaw works. Clicking the OK button continues opening raw files whereas the Cancel button aborts the opening process. The ? button displays this help page.
On the left side of the MetaRaw dialog you can see a preview of the opened raw file. If you opened multiple raw files, you will only see the first one. For a few raw file types no preview will be shown, because they contain no embedded JPEG image.
The preview shows the embedded JPEG image of the raw file, so you see the photo as it was converted by the camera. The raw conversion result of MetaRaw may look very similar or sometimes even different. Below the thumbnail you can see some EXIF data of the raw file, e.g. camera name, ISO value, exposure time, focal range and pixel dimensions.
MetaRaw supports three raw file converters: Adobe Camera Raw, Adobe DNG Converter and MetaRaw's built-in converter. You can choose one of these four options from the combo box. The chosen converter will be used for the raw conversion process provided that it recognizes the raw file. Otherwise one of the other options will be automatically used.
In addition to the three raw converters there is also a JPEG Extractor option, which extracts the JPEG preview data that is embedded in raw files instead of converting the raw data. The JPEG image that will be opened was produced by the camera itself. Extracting the JPEG data is much faster than raw conversion but you will get an 8-bit image in jpeg quality. Many cameras store full resolution JPEGs in raw files, but some embed only a sized-down image. So depending on the raw file you may not get a full size image. This feature can also be used to compare the raw conversion of the camera to the raw conversion of the converters used by MetaRaw.
It is best to keep the combo box set to "Adobe Camera Raw". If Adobe Camera Raw is selected and it does not recognize a raw file, MetaRaw tries converting it with Adobe DNG Converter. If Adobe DNG Converter also fails, the MetaRaw Converter is used. If MetaRaw Converter should fail, the JPEG Extractor is triggered. Setting this combo box to "Adobe DNG Converter" only makes sense if you want to produce DNG files while opening raw files. In this case you have to click the Settings button and activate the Keep converted files option.
If you want to make use of the special abilities of the MetaRaw Converter, e.g. larger image size or higher quality demosaicing, select "MetaRaw Converter" from the combo box. Otherwise it will only be used if Adobe Camera Raw and DNG Converter do not know the raw file type.
Settings
The Settings button displays the Settings dialog for choosing the output parameters for the Adobe DNG Converter as well as the MetaRaw Converter.
Display Camera Raw dialog
This check box is activated by default and makes sure that the dialog of Adobe Camera Raw shows up regardless which raw converter you have chosen. If you want to open raw files without displaying this dialog, deactivate the check box. If you prefer to edit your images in Photoshop and Photoshop Elements rather than with Adobe Camera Raw, this saves you one or more clicks.
Open as smart object
This check box has the same functionality as the Open as Smart Object menu item of the Photoshop's File menu. It opens the raw file as a smart object for applying non-destructive image adjustments, the so-called smart filtering.
Photoshop Elements normally does not support smart filtering, but our other ElementsXXL product enables it. Please note: Photoshop Elements does not support smart objects for images with 16-bit per channel. So please choose 8-bit per channel in Adobe Camera Raw to open the raw file as a smart object, otherwise you will be asked to convert it to 8-bit per channel or to a normal layer.
Open cached file if available
This check box is only enabled if you choose Adobe DNG Converter or MetaRaw Converter from the top combo box, so it has no meaning for Adobe Camera Raw and JPEG Extractor. Even if you mainly use Adobe Camera Raw you should keep it activated, in case the other raw converters are automatically used for opening a raw file that is not known by Adobe Camera Raw.
If activated, MetaRaw searches for a converted version of the raw file and opens it instead of converting the raw file again, which saves some time. It looks for a dng or tiff file with the same file name in the following way:
1. A .dng file in the
folder of the raw file
2. A .dng file in dng sub
folders of the raw file folder
3.
A .tiff file in the folder of the raw file
4. A .tif file
in the folder of the raw file
5. A .tiff file in tiff
sub
folders of the raw file folder
6. A .dng file in tiff
sub
folders of the raw file folder
7. A .dng file in
the MetaRaw cache folder
8. A .tiff file in
the MetaRaw cache folder
The likelihood of finding
a converted file is higher if you have the the Keep converted
files or Delete on Exit option activated on the Settings
dialog.
These features are only available if you use MetaRaw in Photoshop Elements 10 and higher or Photoshop CS5 and higher. Older versions of Camera Raw in Photoshop 7 to CS4 and Photoshop Elements 3 to 9 do not support them anyway.
MetaRaw is able to activate two image correction features of Camera Raw, which are not accessible from the Adobe Camera Raw dialog in Photoshop Elements. This way you can benefit from an automatic lens correction and chromatic aberration removal when opening raw files. In Photoshop CS5 (and higher) you can access them from the Adobe Camera Raw dialog itself, but having them automatically activated by MetaRaw saves some additional clicks.
Automatic lens correction means that if Adobe Camera Raw has a profile for the lens that was used to take the photo, it applies the correction described in the corresponding lens profile. Landscape photos may look better, but portrait shots are sometimes negatively affected as they may look better with the lens distortion. Please note: This feature does not work if MetaRaw Converter is used for the conversion. It will be supported in a future update.
Chromatic aberration removal tries to remove tiny color shifts along object edges in a photo. Chromatic aberration is more visible with lower quality lenses and caused by reflecting different wave lengths of the light differently, especially in the outer areas of the lens.
First of all, you have to activate the Camera Raw Adjustments check box. Then you can activate or deactivate the other two check boxes (Automatic lens correction and Chromatic aberration removal) as needed.
Please note: If you have the Camera Raw Adjustments check box activated and the other two check boxes are deactivated, the automatic lens correction and chromatic aberration removal features will be deactivated in Adobe Camera Raw. This only concerns the case where these two features were previously activated or deactivated when opening the same raw file with MetaRaw or in Photoshop. So if you want to open the raw file with the same automatic lens correction and chromatic aberration removal settings as last time, deactivate the Camera Raw Adjustments check box.
By default the main dialog of MetaRaw is displayed whenever you try to open one or more raw files. Once you have found the settings that work best for you, you usually do not need to have this dialog displayed all of the time. You can avoid it by activating the Do not display check box.
In case you want to use other settings for MetaRaw, you can make it display again by holding down the Alt key when opening a raw file or by choosing the following menu command: Help > About Plug-Ins > Camera Raw (under Windows) or Adobe Photoshop (Elements) > About Plug-Ins > Camera Raw (under MacOS). You will see two Camera Raw items on the About Plug-Ins menu. Try both until you see the MetaRaw dialog.
However, there are two exceptions when MetaRaw does not display its dialog:
1) When a raw file is opened from an action in Photoshop.
2) While ActionsXXL is batch processing. ActionsXXL 1.05 and higher is required to make it work.
Unfortunately there is no way for MetaRaw to check if Photoshop or Photoshop Elements are performing batch processing. So in order to suppress the MetaRaw dialog during batch processing in Photoshop, you have to record an open step in your action and activate the "Override Action 'Open"commands" check box on the Batch dialog. Otherwise you have to use the "Do no display" check box on the MetaRaw dialog.
Under special circumstances it may be necessary to deactivate MetaRaw completely. Luckily, you do not need to uninstall MetaRaw to achieve it. If you click on the Off button on the MetaRaw dialog, you can switch off MetaRaw. MetaRaw will then be bypassed when a camera raw file is opened and lets Adobe Camera Raw do the work.
To activate MetaRaw again simple go to the Help > About Plug-Ins > Camera Raw (under Windows) or Adobe Photoshop (Elements) > About Plug-Ins > Camera Raw (under MacOS) menu item. Once the MetaRaw dialog shows up, you can be assured that it is active again.