
ElementsXXL adds several menu items to the Edit Menu of Photoshop Elements, including an item for changing the ElementsXXL preferences.
Supported by Photoshop
Elements 11 and higher
Requirements: An image adjustment or effect should be applied before using it.
Added in ElementsXXL 1.0, improved in 2.0
The Fade command lets you adjust the opacity and blend mode of the last operation, respectively the last item shown in the History panel. So make sure that the last history item is an operation that changes the image pixels, otherwise Fade will have no effect.
Fade saves you the work of undoing the last image editing step, creating a new layer, reapplying the image editing, adjusting the opacity and blend mode of the new layer and merging the new layer with the old one.
If you work with an image with 16 bits per channel, there will be three more blend modes available. The Subtract and Divide blend modes are known from Photoshop CS5 and higher. The Exposure blend mode is unique (not available in Photoshop) and can be used to transform blur effects into sharpening and contrast enhancement effects. To convert an image to 16 bits per channel use the Image > Mode > 16 Bits / Channel command.
Supported
by Photoshop CS2, CC, 2020 and higher
Supported
by Photoshop Elements 11 and higher
Requirements: An image has to be opened and a task has to be performed
Added in ElementsXXL 7.0
Fade Pro is an enhanced version of the Fade feature. It allows you to use presets, offer many new blend modes, an Opacity slider that goes beyond 100% for more intense blend effects, quick sliders for blending only certain brightness or color areas and advanced masking controls.
Just like the Fade feature it takes the previous history step and blends it with the currently selected layer. Set the Opacity slider to below 100 to reduce the intensity of the last applied pixel history step. Increase the opacity above 100 up to 200% to increase the intensity. This way you can produce a stronger effect even if e.g. the previously applied filter did not allow that.
New Blend Modes
The Mode combo box offers the standard blend modes of Photoshop Elements plus 39 new ones. Assuming that you know the standard blend modes here are some explanations of the new modes: The Subtract and Divide blend modes are also available in Photoshop and subtract and divide the pixel values of one image from/by the other. Rather extreme effects, but useful for certain techniques

The Exposure blend mode is not available in Photoshop and can be used to transform blur effects into sharpening and contrast enhancement effects. The image should be blurred for this purpose. Exposure 2 uses the luminosity channel only, so the result is less saturated and without potential color artifacts. When using normal photos with the Exposure blend modes, you get a negative look. Overexposure also adds a negative look but to the image of the previous history state. In the case of a blurred image, it produces a negative edge look.
Highpass produces a grayish result which looks similar to the Highpass filter if the image is blurred. Otherwise it produces a more visible negative effect than the Exposure modes. Reveal Shadows and Reveal Highlights makes the shadows or highlights of the current image layer transparent if the opacity slider is below 100. The Opacity slider defines the areas that get transparent.
Soft Mood and Hard Mood are softer versions of the Soft Light and Hard Light blend modes. Reflect, Glow, Freeze and Heat are variations of the Color Dodge mode. Helow uses the Heat for the highlights and Glow for the shadows, Frect does the same with Freeze and Reflect, Gleat mixes Glow and Heat and Reeze combines Reflect and Freeze.
Color Burn 2 and Color Dodge 2 are variations of the original blend modes with a slightly different effect. Solarize, Equivalence and Negation produce color inversions. Soft Mix is a much softer versions of the Hard Mix blend mode. The two Penumbra modes are also variations of the Hard Mix mode. The Red, Green, Blue, Cyan, Magenta and Yellow modes combine only certain color channels of the previous history image and the current one. XOR, AND, OR apply the corresponding binary operations. For photos you rather get a popart-esque result with them. The four Modulo blend modes produce similar exotic effects by using variations of the modulo operation.
Adjust Sliders
The sliders in the Quick group let you reduce the Luminance, Color and Saturation (like the blend modes of the same name) of the last applied effect. You can also fade a certain color, which can be selected by clicking the color box left of the slider. Additionally the Shadows, Midtones and Highlights sliders fade the effect in these image areas. This is basically like applying 7 additional blend modes at the same time. You can also use a slider value above 100 for increasing the intensity of the previously applied effect.
Mask
Controls
The Type combo offers Tonal, Linear and Circular masking features. Tonal lets you choose a tonal range, which will not be faded, via the slider knobs below the histogram. The Smoothness slider blurs the edges of this tonal area for smooth transitions. The Invert check box uses the inverse of the selected tonal range.
The Linear and Radial options use a linear or circular gradient for gradually fading certain image areas. The Offset slider moves the linear gradient towards the top or bottom of the image thus making the gradient cover less or more of the image. For the Circular option the Size slider moves the circular gradient towards the corners of the image. The Density slider controls the softness of the gradient edge. A low slider value will produce a hard edge between the unmodified image areas and the gradient and a high value will result in a soft transition. For the Circular option you have an additional Shape slider, which transforms the gradient from a circular to an elliptical one. Finally, the Rotation slider rotates the gradient. It has no effect on circular gradients, only on linear and elliptical ones.
The Invert check box makes the gradient cover the parts of the image that it did not cover before. A linear gradient then runs from bottom to top instead of top to bottom and a circular one covers the center of the image instead of the corners.
Supported by Photoshop Elements 11 and higher
Requirements: One ore more layer has to be selected in the Layers panel
Added in ElementsXXL 6.0
ElementsXXL lets you copy and paste more one or more layers within a document or between documents. To copy more than one layer, please select them in the Layers panel by holding down the Ctrl or Shift key while clicking on them. Then select this menu command or use the Ctrl + C keys. To paste the copied layer(s), please use the paste command. Do not delete the copied layers before pasting, otherwise pasting will not work.
Supported by Photoshop Elements 11 and higher
Requirements: A layer with layer styles has to be selected
Added in ElementsXXL 5.0
The Copy Layer Styles command copies the settings of layer styles to the clipboard. To apply them to other layers you have to use the Paste Special > Paste Layer Styles command. You can also select this menu item from the Layer > Layer Style sub menu.
Supported by Photoshop Elements 11 and higher
Requirements: A shape layer needs to be selected
Added in ElementsXXL 5.0
The Copy Shape Attributes command copies the properties of a shape layer to the clipboard. To apply them to other shape layers you have to use the Paste Special > Paste Shape Attributes command. You can also select this menu item from the context menu of the Layers panel.
Supported
by Photoshop Elements 11 and higher
Requirements: One ore more layer has to be selected in the Layers panel
Added in ElementsXXL 6.0
ElementsXXL lets you copy and paste more one or more layers within a document or between documents. After you copied one or more layers with the Copy command, you can switch to another document to paste the layers there. You can either paste with this menu command or with the Ctrl + V key. Do not delete the copied layers (in the source document where you triggered the Copy command) before pasting, otherwise pasting will not work.
Supported by Photoshop Elements 11 and higher
Requirements: A document has to be opened and a copy command previously executed.
Added in ElementsXXL 5.0
The Paste Outside command pastes the clipboard content outside a selection in the current document. This means that the selection area stays unchanged and only if the image on the clipboard is larger than the current selection, you will get a result.
Supported by Photoshop Elements 11 and higher
Requirements: A document has to be opened and a copy command previously executed.
Added in ElementsXXL 5.0
The Paste In Place command copies pixels from the clipboard into the same location in the current document as it occupied in the source document. The clipboard content is pasted as a new layer. This spares you the work of adjusting the position of the new layer in case you want it to be placed at the same position as in the source document.
Supported by Photoshop Elements 11 and higher
Requirements: A document has to be opened and a copy command previously executed.
Added in ElementsXXL 5.0
The Paste Into command pastes the clipboard content into a selection in the current document. Unlike the Paste Into Selection command the clipboard image is pasted as a new layer and the selection is converted into a layer mask.
Supported by Photoshop Elements 11 and higher
Requirements: A document has to be opened and a copy command previously executed.
Added in ElementsXXL 5.0
The Paste Outside command pastes the clipboard content outside a selection in the current document. Unlike the Paste Outside Selection command the clipboard image is pasted as a new layer and the selection is converted into an inverted layer mask.
Supported by Photoshop Elements 11 and higher
Requirements: One or more non-background layers have to be selected
Added in ElementsXXL 5.0
The Paste Layer Styles command applies the layer styles settings from the clipboard to the currently selected layers(s). This requires that you previously used the Copy Layer Styles command. You can also select this menu item from the Layer > Layer Style sub menu.
Supported by Photoshop Elements 11 and higher
Requirements: One or more shape layers need to be selected
Added in ElementsXXL 5.0
The Paste Shape Attributes command applies the shape properties from the clipboard to the currently selected shape layer(s). This requires that you previously used the Copy Shape Attributes command. You can also select this menu item from the context menu of the Layers panel.
Supported
by Photoshop CS2, CC, 2020 and higher
Supported
by Photoshop Elements 11 and higher
Requirements: One or more shape layers need to be selected
Added in ElementsXXL 7.0
The Paste As Smart Object command inserts the clipboard content as a smart object. This saves you the extra steps of creating a layer of the clipboard content, converting the layer into a smart object and transferring the smart object to another document.
This has several advantages: You can reduce the pixel size of the smart object layer non-destructively as often as you like. You can insert an image with 16-bit per channel into a 8-bit per channel image without having to reduce it to 8-bit. And you can edit the content of the smart object in a separate document window and add additional layers within the smart object.
Supported
by Photoshop CS2, CC, 2020 and higher
Supported by Photoshop Elements 11 and higher
Requirements: Two documents need to be opened
Added in ElementsXXL 3.0, extended in ElementsXXL 5.0 and 9.0

The Copy To Document sub menu offers menu items for copying the selected layer(s), a selection, a selected layer area or all alpha channels to another document. If only two documents are opened, the other document is automatically used as the target for copying. If more documents exist, you will be prompted to select the target document from a dialog.
If the Preview check box is active and you select another document from the list on the Select Target Document dialog, then the selected document is automatically displayed. This way you can be sure to select the right document in case you do not remember its file name or title.
If the target document does not have the same image size as the source document, the layers, selection or alpha channels will be center aligned and the outer areas will be either cut off or transparent. You can still use the move tool to reposition the copied elements. Sometimes it makes sense if the copied elements are sized up or down according to the difference in size between both document. To automatically do that, please use the versions of these menu commandes that have "(Resize)" in the name.
If you chose to copy the alpha channels but you only need one of them, you can switch to the target document and delete the superfluous alpha channels with the Select > Delete Selection command or use the Channels panel from Window > Channels to do that.
Supported by Photoshop Elements 11 and higher
Requirements: A text layer has to be selected in the Layer panel.
Added in ElementsXXL 1.0
The Spell Check menu item checks the spelling of the currently selected layer or that of all layers if the Check All Layers check box is activated.

This feature does not work with all Photoshop Elements versions and not all systems. Sometimes only a "Spell Check Complete" message appears. So far it is unclear why it works on some computers and not on others, but it may help if Photoshop is also installed on your computer.
Supported by Photoshop Elements 11 and higher
Requirements: A text layer has to be selected in the Layer panel.
Added in ElementsXXL 1.0
With the Find and Replace Text item you can find certain letters or words in a text layer and exchange them by others. It works similar as you know it from text editing programs.

In the Find What text box above you insert the text that you want to exchange. In the Change To text box below you insert the text that is to replace the search term of the Find What text box. The "Find Next" button selects the first found word. Clicking it again highlights the next occurrence. The Change button replaces the search term accordingly. Change All replaces all occurrences of the search terms. Change/Find executes both actions, changing and finding, but requires to firstly click Find Next at first. Done exits the dialog.
If the Search All Layers check box is activated, all text layers are searched. A deactivated Forward check box searches the text backwards. An activated Case Sensitive check box makes sure that the case of the letter of the search term is not ignored. Whole Word Only treats the search term like a single word and not as multiple ones. For example, the term "of the" would not be separately found as"of" and "the" words but only as combined "of the" text blocks.
Supported by Photoshop Elements 11 and higher
Requirements: An image has to be opened or a selection has to be created
Extended in ElementsXXL 5.0

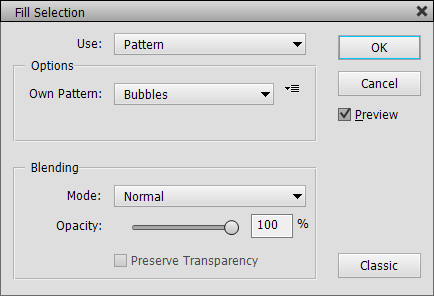


ElementsXXL replaces the classic Fill Layer and Fill Selection dialog of Photoshop Elements with its own dialog, which includes additional features and options. The only downside is that is only offers an Own Pattern combo box instead of pattern thumbnails. If you want to see pattern thumbnails, please click the Classic button to switch to the original dialog or activate the Fill Layer check box under Edit > Preferences > ElementsXXL > Classic.
The Use combo box offers various modes. The top and bottom modes simply fill the layer or selection with a color. The Pattern option lets you choose a pattern for filling the layer or selection. The following options are provided by ElementsXXL.
The Content-Aware option only work in Photoshop Elements 13 and higher with a selection present. It automatically fills the selection with image content from outside the selection and tries to repair the image. By activating the Color Adaptation check box you can trigger an alternative version of the algorithm which tries to adjust for color.
The History option lets you fill the selection or layer with an image from another history state. Please select the history state from the History combo box.
The Layer option fills the selection or layer with the contents of another pixel layer from the same or another document. Please select the document and the layer from the appropriate combo boxes.
The Blending controls allow blending the fill result with a certain blend mode and opacity values. This additionally lets you adjust or weaken the effect. When activated, the Preserve Transparency check makes sure that transparent areas are not filled with content and made opaque.
Supported by Photoshop
Elements 11 and higher
Requirements: A selection has to be available
Extended in ElementsXXL 7.0
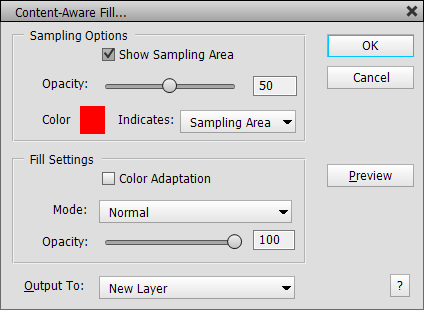
The Content-Aware Fill feature is an advanced version of the Content-Aware option of the Fill Layer / Fill Selection dialog. Before using it you have to create a selection which will be filled automatically, e.g. to remove an object or other image area. The advantage of the Content-Aware Fill feature is that possibility to define the areas from which image content will be used for automatically filling the selection. This avoid that unsuitable image content will be used and improves the final result.
When you run the Content-Aware Fill command an area around the selection is automatically colored red. This is the sampling areas which will be used for grabbing the fill content. The red mask is identical to the Quick Mask feature. Now you can use the brush tool to remove or add parts of the image to the sampling area. Switch between the black and white colors in the tool bar to increase or decrease the sampling area. For variations of the content-aware effect click the Preview button multiple times. Each time the result varies a little.
The Sampling Options group lets you hide the sampling area, adjust its opacity, change its color and invert it. The Fill Settings group offers a Color Adaptation option for making the content-aware fill focus on adjusting colors. The Mode and Opacity controls blend the fill content with the underlying image. The Output To combo box defines if the filling will be added to the current layer, as a new layer or on a duplicated layer.
Supported by Photoshop
Elements 11 and higher
Added in ElementsXXL 2.0
Text on Path tool is displayed on the Tools sub menu, which supplies several new tools that are otherwise not accessible. You can also display it by clicking on the right icon at the bottom of the tool bar.
This menu item actually activates the Text on Path tool, which can also be used for creating and editing paths as well as modifying shapes and vector masks, which consist of paths. Normally when switching to another tool Photoshop Elements automatically deletes the created path. ElementsXXL suppresses this behavior. For deleting a path please use the Path panel.

On the Tool Options bar you see Draw and Modify icons. By default the Draw icon is active, so if you want to edit the created path, you have to click the Modify icons. The anchor points of the path will appear then and you can drag them around to modify the path. To add another anchor point hold down the Shift key and click on the path. To delete an anchor point hold down the Alt key and click on it. To reposition a path activate the Draw icon, hold down the Ctrl key, click on the path line and drag.
There is also a Pen Tool button on the Path panel, which activates this tool. We recommend that you display the Path panel, because it provides several other useful features when working with paths.
Supported by Photoshop
Elements 11-14
Added in ElementsXXL
5.0

The Pen Tool lets you create a path by clicking on the image. Each click defines a new anchor point. If you click but hold the mouse button, you can move the mouse to change the curvature of the newly created path section. If you click on the first anchor point again, you can close the path.
If you hold down the Ctrl key, you can drag the path to another position. If you hold down the Alt key and move the mouse cursor over an anchor point, the mouse cursor changes to an arrow and you can drag to change the curvature.
If the Auto Add/Delete check box on the Tool Options window is activated, you can you move the mouse cursor along the path. If you see a + sign appear in the mouse cursor, you can click to add another anchor point to the path. If a - sign appears, you can click to remove an anchor point.
The Rubber Band check box appears when you click the gear icon. If you activate it, a line will be displayed between the last path point and the mouse cursor. Additionally you will have to close the path to get rid of this "rubber band". The other controls on the Tool Options window do not seem to have any functionality.
If you want to reposition individual anchor points, you have to switch to the Text on Path tool and click the Modify icon on the Tool Options window.
Freeform Pen Tool

The Freeform Tool works very similar to the Text on Path tool, but additionally offers a Magn. check box on the Tool Options window. This check box transform the tool into a magnetic pen which sticks the path points to the edges in the image. If you click on the gear icon on the Tool Options window you get various options for adjusting the curve fitting, magnetic feature and the pen pressure. The other controls on the Tool Options window do not seem to have any functionality.
If you hold down the Ctrl key, you can drag the path to another position. If you hold down the Alt key and move the mouse cursor over an anchor point, the mouse cursor changes to an arrow and you can drag to change the curvature.
You can you move the mouse cursor along the path. If you see a + sign appear in the mouse cursor, you can click to add another anchor point to the path. If a - sign appears, you can click to remove an anchor point.
If you want to reposition individual anchor points, you have to switch to the Text on Path tool and click the Modify icon on the Tool Options window.
Direct Select Tool
The Direct Tool lets you drag the whole path to another location. You can do the same by using the Pen, Freeform Pen or Text on Path tool and holding down the Ctrl key.
Add Anchor Point
Tool
The Add Anchor Point Tool lets you add another anchor point to the path. You can do the same by using the Pen, Freeform Pen or Text on Path tool.
Delete Anchor Point
Tool
The Delete Anchor Point Tool lets you delete an anchor point of the path. You can do the same by using the Pen, Freeform Pen or Text on Path tool.
Convert Point Tool
The Convert Tool Point Tool lets you edit the curvature of an anchor point. You can do the same by using the Pen, Freeform Pen or Text on Path tool and holding down the Alt key.
Supported
by Photoshop Elements 11 and higher
Requirements: An
image has to be open
Added in ElementsXXL
7.0

A path is a vector line that can be used to draw outlines of objects in the images for mask creation. You can also use path to create icons or other vector-type drawings. The Text on Path tool of Photoshop Elements is rather limited and ElementsXXL's Pen Tool only works up to Photoshop Element 14. So ElementsXXL now provides a new Pen Pro Tool, which offers most of the functionality of the various pen/path tools in Photoshop. You can also activate this tool with the Pen Pro button on the Paths panel or via the icon menu at the right bottom of the tool bar.
If no path exists you can create one or more paths with the tools displayed at the top of the Pen Pro panel. If one or more paths already exist, you can use the Pen Pro feature to edit them. To exit the Pen Pro feature and erase all drawn path you can press the Esc key or click the red cross icon that is displayed in a box below the paths. To use the created paths hit the Enter key or click the green checkmark icon. You can also directly convert the path into a selection using the Selection button, apply it as a mask via the Mask button and transform it into a colored shape using the Shape button.
The Pen Pro Tool of ElementsXXL displays path as colored thick lines with control points. Photoshop Elements shows them as a thin gray line. So after you exited the Pen Pro feature, the path will be displayed as a thin gray line. To edit it again you have to activate the Pen Pro Tool again. The first combo box of the second row defines the visual thickness of the path lines and the second one lets you chose their color. The third combo box is only important if you want to create a shape that consists of multiple paths. This will allow you to specify whether the currently selected path is simply combined with other shapes (Combine Shapes), renders other shapes transparent (Subtract Front Shape), if only the overlapping areas are shown (Intersect Shape Areas) or overlapping areas are made transparent (Exclude Overlapping Shapes).
The Pen tool (first icon at the top) lets you create a path by clicking on the image which adds new anchor points that together make up a path. Once you click on the first anchor point again, the path is closed and you can create further paths. To create a straight path line simply click at two different locations. To make a path line curvy you have to hold down the left mouse button after clicking and move the mouse. Then two new handles, which are connected to the anchor point, emerge and change their positions as you move the mouse. These two points define the curviness of the line between the first and second anchor point. Release the mouse button when you are satisfied with the shape of the path curve.
If you click on an existing anchor point, you can delete it with a click. Alternatively press the Del key to delete all selected points. Hold down the Ctrl key to temporarily activate the Direct Selection tool and move the anchor point with it. Hold down the Alt key to activate the Convert Point tool and convert the anchor point into a corner point with a click. If you move the mouse to any point on the path curve between existing anchor points you can click there to add a new anchor point. You can also change the course of the path curve by holding down the Ctrl key and dragging the path curve. As a result the two handles of the neighboring anchor points are automatically moved.
The Freeform Pen (second icon) tool works similar to the Lasso tool. Draw a line in a single stroke with it. After you release the mouse button, the line is automatically converted into a path with multiple anchor points. Now you can do the same things with the path as explained above for the Pen tool.
The Add/Remove Anchor Point tools (3rd & 4th icons) let you add new or delete existing anchor points from a path.
The Convert Point tool (5th icon) converts an anchor point into a corner point, which means that you can adjust the two handles of the point independantly and produce a sharp edge in the path curve. You do not have to convert an anchor point directly with a click. You can also drag one of the two control points with this tool.
If you created more than one path, the Path Selection tool (6th icon) lets you select a path. If you hold the mouse button an drag, a selection marquee is drawn. When you release the mouse button, all paths that run through the selection rectangle are selected. You can also drag a path to a new location with this tool. Hold down the Alt key and drag a path to duplicate it. Hold down the Ctrl key to temporarily activate the Direct Selection tool. Hold down the shift key to select more than one path.
The Direct Selection tool (7th icon) is for selecting individual anchor points of a path. Hold down the Shift key and click on another anchor point to add it to the selected points. If you drag an anchor point, all selected points are moved simultaneously. Hold down the Alt key and drag a path to duplicate it. Hold down the Ctrl key to temporarily activate the Path Selection tool.
Once you are finished hit the Enter key or click the checkmark symbol on the Pen Pro window. The circle symbol or Esc key cancel the operation.
Supported by Photoshop
Elements 11, 13 and higher
Requirements:
An image has to be open
Added in ElementsXXL
2.0
The Puppet Warp Tool works with images up to 6000 x 6000 pixel. If the image is larger, the areas outside the 6000 x 6000 pixels can not be targeted with it. When activating this tool, a web-like grid is placed over the image. Firstly you have to click somewhere to set a pin point, otherwise the image will be moved if you hold down the mouse button and move the mouse. Then you can click and drag to distort a certain image area. When finished hit the Enter key or click the checkmark icon on the Tool Options bar. Clicking the checkmark icon on the image does not work.
Each click sets a new pin point that can be dragged. Unfortunately the pin points are not indicated clearly in Photoshop Elements (other than in Photoshop). You can only hunt them down by watching your cursor, which changes when you move over one of them.
![]()
On the Tool Options bar you have various controls for changing the behavior of the Puppet Warp tool in order to undo all pins and complete or abort the operation.
Supported by Photoshop
Elements 11-14
Requirements: An image
has to be open
Added in ElementsXXL 2.0
The Mixer Brush simulates painting techniques, e.g. mixing colors on the canvas, combining colors on a brush, and varying paint wetness across a stroke. You can sample an image area by holding down the Alt key and clicking on the image. The sampled area can be seen on the Tool Options bar.

On the Tool Options bar you can choose a brush tip and switch between various options which influence the brush drawing. The "More Options..." button displays the Brush panel of ElementsXXL and offers many new options for adjusting the brush. The Wetness Jitter and Mix Jitter features there under Transfer are exclusively for the mixer brush tool.
Supported by Photoshop
Elements 11-14
Requirements: An image has to be open
Added in ElementsXXL 2.0
The Ruler Tool lets you draw a line on the image and read out its coordinates, length and angle on the Tool Options bar. The ruler line can also be repositioned and its ending points can be modified. Press the Clear button on the Tool Options bar to delete the line.
![]()
Supported by Photoshop
Elements 11-14
Requirements: An image has to be open
Added in ElementsXXL 2.0
The Slice tool lets you draw rectangles on the image, so-called slices, for defining image areas as HTML tables. These tables and their related image tiles can later be exported to a html file with the File > Save HTML menu command. You can turn slices into buttons and then connect these buttons to another html file or web address. Every slice you create (so-called user slices) automatically produces other slices (so-called auto slices) that cover the entire image outside the user slice.
The created slice is displayed as a rectangular frame. You can change the slice dimensions by dragging its handles and reposition it by clicking on it and dragging. If multiple slices exist, you can select another slice by holding down the Ctrl key and clicking on it.

If you right click a slice, you will see a context menu with additional options. The Edit Slice Options menu item displays a dialog where you can enter an URL or html file that is loaded when later clicking on it in the web browser.
The Slice Select Tool lets you switch between slices by clicking on them. You can also create new slices with the Slice Select Tool if you hold down the Ctrl key. So you do not need to switch to the Slice tool in order to do that. To select multiple slices hold down the Shift key when clicking on them. With multiple slices selected you can align the slices with the icons on the Tool Options bar.
To remove all slices choose View > Clear Slices from the menu. To save the web page that is defined by the slices, choose File > Export > HTML.
Supported by Photoshop
Elements 13 and 14, already included in Photoshop Elements 15 and higher
Requirements: An image has to be open
Added in ElementsXXL 3.0, extended in ElementsXXL 4.0, 5.0 and 8.0

The Perspective Crop tool lets you crop the image and at the same time correct its perspective. After you have chosen the Perspective Crop menu item, you have to draw a rectangle on the image. Then a grid with four handles (one at each corner) appears. Click and drag the corner handles to change the image area that will be cropped and prospectively corrected. Once you are finished hit the OK button or click the green check mark. The Cancel button or Esc key cancel the operation.
On the Perspective Crop dialog you can enter the dimensions and resolution of the image after the crop. Click the Image button to paste the current width, height and resolution. As a result the image size will not be changed by the perspective crop operation. The image will then be upsized to keep its previous dimensions. The Clear button clears the three text boxes, which will change the image size but apply no additional image resizing. The Show Grid check box displays additional vertical and horizontal lines for better judging the perspective of the image. The Content-Aware check box fills blank or transparent areas from outside the image borders with image content after applying the Perspective Crop tool. An activated Color Adaptation check box tells the content-aware algorithm to adjust colors in the process, so it only triggers a variation of the content-aware algorithm.
Supported by Photoshop
Elements 11 and higher
Requirements: An image has to be open
Added in ElementsXXL 3.0, extended in ElementsXXL 5.0
The History Brush lets you paint the image data of another history state at the current history state. At first you will see a Select History State dialog for choosing the history state that you want to paint with. If the Preview check box is active, the selected history state is automatically displayed. This way you can be sure to select the history state in case you are not sure of its name. After clicking OK the selected history state will be copied as a new layer, whose content can now be revealed by painting with the automatically activated brush tool. If you do not want to use the brush tool and reveal the whole history state, simple use the Ctrl + I key shortcut or select Filter > Adjustments > Invert.

Supported by Photoshop
Elements 11-14
Requirements: An image has to be open
Added in ElementsXXL 2.0
When activating the Mixer brush, Ruler, Slice and Slice Select Tools it is not possible to activate the brush, color picker and crop tools on the tool bar (unless you press the B, I and C keys). The Restore Tools command makes the brush, color picker and crop tools again visible on the tool bar.
Supported by Photoshop
Elements 11 and higher
Requirements: An image needs to be opened
Added in ElementsXXL 2.0, extended in ElementsXXL 4
The Slices sub menu offers various items for creating and editing slices. Slices are used to create a html page from an image by dividing into various clickable sections. For more information see the Slice Tool above. As the Slice and Slice Select tools are not available in Photoshop Elements 15, you have to use the commands on the Slices sub menu to create and edit slices.
The New Slice command creates a new slice from a selection. If the selection is not rectangular, the imaginary rectangle that encloses the selection will be used for the new slice. You can also choose the Slices From Guides menu item to create slices according to guides, which you added beforehand.
The Edit Slice Options menu item displays a dialog where you can enter an URL or html file that is loaded when later clicking on it in the web browser. The Divide Slice menu item displays a dialog for dividing the current slice vertically and horizontally into new slices. The currently selected slice can also be deleted again with the Delete Slice menu item. If two or more slices overlap, you can bring the currently selected slice to the front, to the back, or step-wise forward or backwards with the appropriate menu items.
To remove all slices choose View > Clear Slices from the menu. To save the web page that is defined by the slices, choose File > Save > HTML.
Supported by Photoshop
Elements 11 and higher
Requirements: An image needs to be opened
Added in ElementsXXL 9
ElementsXXL stores subject masks for each layer as channels to accelerate various features. The following features use a subject mask: Background Blur, Enhance Skin, Smooth Skin, Select > Subject, Select > Background, Select > Skin, Select > Skin+ as well as Image > Replace Background > Auto Select.
ElementsXXL automatically deletes unnecessary subjects masks if you use one of the mentioned features. If you want to clean up your PSD document, you can use this menu command to delete all alpha channels that are used as subject masks. As a result the mentioned features will need to calculate a subject mask again, which can take quite some time. Best to use this command before you save a PSD file which is not supposed to be edited again.
To completely disable subject mask caching, you can also activate the "No Subject Mask Caching" check box on the Tools page of the ElementsXXL Preferences. See below.
Supported by Photoshop
Elements 11 and higher
Requirements: None
Added in ElementsXXL 3.0

ElementsXXL replaces the limited Color Settings dialog of Photoshop Elements with one of its own. You can still access the old dialog by clicking the Classic button in the bottom right corner. The options of the old dialog are available as presets in the Settings combo box at the top.
In the Working Space group you can define the default color space for the RGB, CMY and Grayscale color models as well as a Spot color space. For example, the working RGB space determines which color space is output by Adobe Camera Raw. However, only the sRGB and Adobe RGB color spaces will make an impact. If you have another space selected here, Camera Raw will open images as sRGB. The sRGB and Gray working spaces have an influence on the File > New > Blank File menu item, because new images automatically use the color profile that is selected here. The working CMYK space is used by the File > Save > PDF and View > Proof Setup > Working CMYK menu items.
Under Color Management Policies you can choose if opened and newly created images keep their profile (Preserve Embedded Profiles), loose their profile (Off) or if they will be automatically converted to the working space profile (Convert to Working RGB/Gray). As CMYK files cannot be opened in Photoshop Elements yet, the CMYK option is disabled.
In the Conversion Options group there is only one check box usable. The other options are not adjustable yet, but may be supported in a future version of Photoshop Elements or ElementsXXL. The Compensate Scene-referred Profiles option adjust the contrast when converting from scene to output profile. It is useful if you also working with After Effects, where it is the default.
Under Advanced Controls you can display all images desaturated in Photoshop Elements by activating the Desaturate Monitor Color By check box and entering a percent value. This may be useful if you monitor displays too saturated color and you have no calibrated it. It can also help to simulate the colors on a printer for which you have no profile. The Blend RGB Colors Using Gamma option determines if RGB image data is gamma adjusted when it is blended, e.g. with blend modes. This affects the look of the edge pixels. Best keep it deactivated or set to 1.0. The Blend Text Colors Using Gamma feature does the same as the previous option, but is only applied to type layers.
When moving the mouse cursor over a certain option of the Color Settings dialog, you will see a detailed explanation about it or the selected option in the Description group.
Supported by Photoshop
Elements 11 and higher
Requirements: None
Added in ElementsXXL 9
ElementsXXL already offers some standard key shortcuts known from Photoshop, but now you can change the key shortcuts of any menu item that you like. This way you do not need to click on a menu item (which offers no key shortcut) and instead use a key shortcut to execute it. Any key shortcut you define here has priority over the other key shortcuts of ElementsXXL and Photoshop Elements. If other commands have the same key shortcut as you define here, they won't work.

To define a new key shortcut select the menu item in the list, then activate the Alt, Shift and/or Ctrl check boxes and enter a letter, number or F1 to F12 into the text box. Then click the Apply button to activet the key shortcuts. To restore the key shortcut of the selected item, click the Restore button. Click the Own Keys button to see a list of all key shortcuts that were defined with this dialog.
The Set combo box at the top offers various features for changing multiple key shortcuts. The Reset option deletes all self-defined key shortcuts. The Save Set option lets you save all self-defined key shortcuts as a file. The Open Set option lets you open a saved key shortcut file to restore a certain set of key shortcuts. This way you could open different sets of key shortcuts tailed to different tasks.
Partially supported
by Photoshop CS2, CC, 2020 and higher
Supported by Photoshop
Elements 11 and higher (except as stated below)
Requirements: None
Added in
ElementsXXL 1.0, extended in 2.0 to
9.0
If you click on this menu item on the Preferences sub menu, a dialog window is opened that lets you change the settings of Elements XXL. You can switch between different preferences groups by using the list on the right or by clicking the Prev and Next buttons. To set all options to the original default values click the Reset button. Press OK to apply the changes on this dialog or Cancel to discard them.
ElementsXXL

The Activated Features combo box allows you to turn off ElementsXXL without uninstalling it. You can disable ElementsXXL completely with the None option or just leave FilterHub and/or ActionsXXL enabled. The All option makes all functions of ElementsXXL accessible. You have to restart Photoshop Elements to make the deactivation work. To reactivate ElementsXXL again please choose File > Automation Tools > ElementsXXL from the menu. This option works in all versions of Photoshop Elements.
When running ElementsXXL for the first time, all menu items, icons and buttons of ElementsXXL have a blue background, so that you immediately see which features were added. To retain this highlighting activate the Colorize Icons & Menu Items check box. Once you know ElementsXXL well enough, you can deactivate it again. This option works in Photoshop Elements 4 and higher.
If you are using a non-English version of Photoshop Elements and would like to see the menu items and dialogs of ElementsXXL in English language, you can activate the Force English Localization check box. You have to restart Photoshop Elements for this feature to start or stop working. This feature can be helpful if you want to look up certain things in the English manual or if the localization to your language does not work perfectly.
The UI Color option lets you choose the color of all ElementsXXL dialogs. You can choose the Gray style of Photoshop Elements 11 to 2021, the Bright style of Photoshop Elements 2022 and higher or a Black style that looks more like Photoshop Elements 5 to 10. This option has no effect on the UI and dialogs of Photoshop Elements itself.
General

The Interpolation check box lets you adjust the interpolation that is used for the move tool and functions from the Image menu, e.g. Free Rotate Layer, Free Transform, Skew, Distort, Perspective and Scale.
If the Auto-Update Open Documents check box is activated, Photoshop Elements constantly checks whether the currently opened documents were updated on the hard drive or on a network location. If the file of one of the documents was modified by another software or the operating system, the file will automatically be loaded and appears as a new item in the History panel. So even if the file is automatically updated, you do not lose your current editing work in Photoshop, because you can undo the automatic update if you want.
With deactivated the Export Clipboard check box Photoshop Elements does not allow you to exchange images with another application via the clipboard. The only advantage you have from this is that you save some RAM. This may be handy when working with huge images.
The Resize Image during Place check box resizes images placed via File > Place to the document bounds. If you want to avoid this, deactivate this check box. The Always Create Smart Objects when Placing check box creates a smart object when placing an image file. When deactivates, it creates a normal pixel layer. When placing an image file, the Transform tool is activated for adjusting the image size. Activating the Skip Transform when Placing check box avoids this.
Tools

The Show Slice Numbers check box makes the slice number in the top left corner of each slice rectangle appear or vanish. For more information about slices see the Slice Tool.
The Deactivate Crop Presets check box removes the presets combo box from the Tool Option bar of the crop tool in case it causes problems. The Use ElementsXXL's Color Range check box displays the Color Range dialog of ElementsXXL instead of the one of Photoshop Elements, which is a bit buggy.
If you experience problems with the right-click context menu of the Layers panel, you can keep ElementsXXL from adding its own menu items to it, which should solve the problems. To do that you can activate the No Layers Context Menu Item check box.
Since ElementsXXL 7 most ElementsXXL adjustment layers display their controls on the Adjustments panel by default. If you want them to display their own bigger dialog, you can activate the Display Adjustment Layer Dialogs check box.
The Combo boxes instead of icon bars combo boxes deactivates the Channels and Mode icon bars on some dialogs (e.g. Curves, Channel Mixer, Color Balance).
The No File > New Features check box deactivates some ElementsXXL functionality that was added to the New sub menu of the File menu. This avoids problems on some computers.
The No Subject/Sky Mask Caching check box deactivates the subject/sky mask caching mechanism of ElementsXXL, which speeds up certain features like Replace Sky, Background Blur, Enhance Skin and Smooth Skin.
File Handling

The Save in Background check box makes Photoshop Elements use a background thread when saving an image file. This means that you do no need to wait until the saving is complete and can continue working. We recommend that you activate this check box if you use the Save recovery information feature discussed below.
The Save recovery information combo box allows you to automatically save all open documents to a temporary folder in a certain time interval. When the documents are saved for recovery, you can see a small progress window in the top left corner of the Photoshop Elements main window. If you have a lot of documents or very big documents opened, the saving process can take some time and you have to wait. The recovery information is deleted if Photoshop Elements exits without crashing. If Photoshop Elements crashes and is run again, a message will ask you if you want to recover the documents that were lost during the crash.

Once the recovered documents are opened, you should save them to their original location again. Additionally when you exit Photoshop Elements you are also asked if you want to discard the recovery information. If you do not confirm it, you will be asked to recover again the next time you run Photoshop Elements.
Normally Photoshop Elements automatically rotates an image when opening it in case it detects rotation metadata in the file. The Ignore Rotation Metadata check box lets you deactivate this feature.
Export

The Export Page displays the settings that are used when using the "File > Export > Quick Export as ..." menu item, the "Layer > Quick Export as ... " menu item and the "Quick Export as ... " menu item on the context menu of the Layers panel. First of all, you can choose between three formats for saving from the Format combo box: PNG, JPEG or GIF. Depending on which of them is selected, some of the other options are enabled or disabled.
The Transparency check box lets you include transparency information in PNG files. This is automatically done for GIF and not supported by JPEG files. The Smaller File (8-bit) check box saves 256 color PNG files instead one with 16 million colors, which produces smaller files. For JPEG files you can set the Quality slider. The higher the slider value, the less compression is used and the larger and the better looking the file is.
If the Location combo box is set to "Ask where to export each time", then a file or folder dialog appears and lets you specify the folder and/or filename for the image file(s). The "Export files to an asset folder ..." option creates a sub folder with the current document name and saves the image(s) by using the layer or document name.
The None option of the Metadata combo box does not include any meta data when saving an image. The "Copyright and Contact Info" option only saves the mention information in the meta data of the image file. As GIF files support no meta data, this option does not work with them.
The Convert to sRGB check box makes sure that the saved images were converted to sRGB. The Embed Color Profile check box adds the color profile of the current document to the saved file. This is not necessary for sRGB images. It makes the image files larger. As GIF files support no color profiles, both option are disabled for them. 8-bit PNG files also do no support profiles.
The Display Save for Web Dialog check box opens the Save For Web dialog when using the "Layer > Quick Export as" menu item. Altenatively you can also hold down the Shift key when clicking the menu item to do the same.
Filter

The Filter page offers options concerning filters and smart filters. The Preview Image feature crops or sizes down the image in order to speed up the effect rendering while using a filter dialog. After clicking the OK button on the filter dialog, the preview image is then removed and the effect is applied to the original larger image. The Off setting deactivates the preview image whereas the High Resolution option creates a preview image that has the same resolution as your screen. If you use a 4K screen, the preview image will be twice as large with a Full HD screen, which also means slower preview rendering. The Medium Resolution setting produces a 50% sized down preview. On a 4K screen the Medium Resolution option will render just as fast as the High Resolution option on a Full HD screen, all other things equal. Finally, the Low Resolution option creates a 25% scaled down preview image. This makes filters render even faster, but the preview image usually looks quite pixelated.
This Preview Image feature works with the following filters: Blur Gallery, Curves, Fill Flash, HDR Toning, Highpass Sharpen, Lighting Effects, Micro Contrast, Perspective Warp, Range Adjust, Shadows/Highlights, Skin Smoother, Warp. Additionally if you use a 16-bit/channel image and you have the "Use native filters for 16-bit images" check box (see below) deactivated, a preview image is also used for these filters: Black & White, Channel Mixer, Color Balance, Exposure, Vibrance and Selective Color. However, a few filters disregard this feature: Highpass Sharpen & Multi-Frequency Sharpen always use a high resolution preview image if a lower resolution option is selected, which makes sure that the sharpen effect can be viewed correctly. Blur Gallery always uses a medium resolution preview image if no preview image or a high res preview image is set to make sure that the rendering is fast enough.
In older ElementsXXL versions the Blending Options dialog was automatically shown for the native smart filters of Photoshop Elements. This produced quite some delay, especially with multiple smart filters applied. Since ElementsXXL 4 this is not the case anymore unless you activate the Show Blending Options Dialog for Native Smart Filters check box. The Blending Options dialog can be manually displayed if necessary via the Smart Filter panel.
In old ElementsXXL versions the smart filter mask was automatically selected after applying a smart filter. This had the downside that filters that did not support grayscale images were disabled and not selectable anymore on the Filter menu. Since ElementsXXL 4 the Select filter mask after combo box is set to "Smart Filter Panel" by default, which means that the smart filter mask is only selected after applying a smart filter from the Smart Filter panel. If you apply a smart filter by choosing a menu item from the Filter menu, the filter mask is not selected, so that all Filter menu items remain selectable. To select the filter mask nevertheless you have to use the Layer > Smart Filter > Select Filter Mask menu item. The "Filter Menu Item" option has the opposite effect of only automatically selecting the filter mask after using a Filter menu item. The "Both" option restores the old ElementsXXL 1-3 behavior. The "None" option makes sure that the filter mask is never selected automatically.
Some native filters of Photoshop Elements, which ElementsXXL makes accessible, only support images with 8-bit per channel. ElementsXXL provides its own versions of these filters that also work with 16-bit/channel images. However, sometimes these filters do not produce exactly the same effect. So ElementsXXL now allows applying the native filters, which actually only support 8-bit per channel, to images with 16-bit per channel. This is done with the help of a color lookup table that is added at the top of the image. ElementsXXL uses it to transfer the 8-bit color effect to a 16-bit image without loosing tonal values. This is done for the Black & White, Color Balance, Color Lookup (Photoshop Elements 13 and higher only), Exposure, Selective Color and Vibrance filters provided that the Use native filters for 16-bit images check box is activated. If you deactivate this check box, the ElementsXXL versions of these filters are applied to 16-bit images. Unless you experience a problem, we recommend that you keep this check box active.
Classic

The Classic page lets you deactivate some dialogs of ElementsXXL, which normally replace the native dialogs of Photoshop Elements. ElementsXXL replaces these classic dialogs in order to provide more options or avoid problems, so it is usually not a good idea to activate these check boxes. But they are provided here if you nevertheless prefer a classic dialog.
The Perspective Crop check box is only enabled in Photoshop Elements 14. If you activate it and execute Perspective Crop, you are not allowed to draw a crop rectangle anymore, but instead the crop rectangle already covers the whole image. Options are then available on the Tool Options window instead of a floating dialog. The green check mark for finishing the crop does not work in this case, but you can press the Enter key or click on the green check mark of the Tool Options window. The other check boxes display the classic and more limited Fill Layer/Selection, Color Settings, Image Size, Shadows/Highlights, Curves and Channel Mixer dialogs.
Lightroom
The Lightroom page offers option for the Render 16-bit to Lightroom command. See the Lightroom Options menu item for more information.
History

The Auto-Create First Snapshot check box is activated by default and displays a snapshot item in the History panel when an image is opened. Deactivate it to avoid the snapshot item.
When you undo steps and apply a new operation, the undone steps vanish from the History panel. By activating the Non-Linear History check box you avoid that they vanish when you apply a new operation. Now you can still switch back to these unused history states.
The Log History to Metadata check box adds all steps of the History panel to the metadata of the image, which is saved together with the image data to a file. Now you can see which editing steps where applied to an image by using the File > File Info menu command and switching to the History tab sheet on the appearing window. This option only works in Photoshop Elements 11.
Key Shortcuts

The Deactivate Key Shortcuts check box deactivates (and activates again) the key shortcuts of ElementsXXL. All available key shortcuts are shown in the list below.
Camera
Raw

The Always open ... in Camera Raw check boxes let you always display JPEG or TIFF files in Camera Raw when opening them in Photoshop Elements.
Open As Layers Page

This page lets you change the behavior of the Open As Layers item on the File menu. The Show Camera Raw combo box determines if the Camera Raw dialog is never shown, only displayed for raw files or appears for raw, jpg, tiff and psd files.
The With one selected raw file combo box defines what is done if only one file is selected on the Open As Layers dialog. The No Bracketing option simply opens only one file. The Auto Bracketing option shows the Camera Raw dialog only once and then automatically creates two additional exposure variations, whose exposure difference depends on the Bracketing Range combo box. The Manual Bracketing option displays the Camera Raw dialog three times: The first time with normal exposure, the second time with under exposure and the third time with overexposure. In each case you can manually adjust the Camera Raw settings. Please note that Manual Bracketing overrides the Never setting of the Show Camera Raw option.
The Bracketing Range combo box controls the intensity of the Auto Bracketing and Manual Bracketing options of the second combo box (labeled "With one selected file") . For best result keep the -2/+2 EV option. With -1/+1 option the exposure variations may be too similar and with -3/+3 option the difference is sometimes too extreme. These exposure variations can be used with the the HDR-Combine Layers command for improving the dynamic range.
The Auto-Align Layers combo box lets you automatically align the layers right after the Open As Layers and Place Document as Layers commands performed its task. This way you do not need to run the Auto-Align Layers feature manually. The No option deactivates this feature. The Show Dialog option displays the Auto-Align Layer dialog, which lets you choose options. The Auto Apply option automatically aligns the layers without showing a dialog.
The other three options (Remove Transparency, Auto-Blend Layers and HDR-Combine Layers) are also automatically excuted after the Open As Layers and Place Document as Layers commands if you do not set them to No. But ElementsXXL automatically detects if the images are panoramas or HDR images. In the case of a panorama, the Auto-Blend Layers command is executed. In the case of HDR images (with different brightness levels) the Remove Transparency and HDR-Combine Layers commands are triggered. Otherwise only the Remove Transparency command is launched. However, the Align Layers combo box should not be set to No, otherwise the automatic panorama detection will not work and the HDR effect will be unsightly.