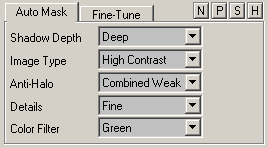
The Auto Mask tab sheet is a good starting place when adjusting the shadow/highlight mask. It basically does the same job as the Light Mask method of the Fine-Tune tab, but offers a more structured approach. This makes it easier to use for beginners, but it also allow a quick correction for pros.
N, P, S, H
If one of these four buttons is activated you will see the mask that is used for the correction in the preview. The N button shows a negative view of the mask, the P buttons shows the positive version of the mask. The S buttons shows only the shadow areas, spot areas or selected color areas depending on which mode you are currently using. The H button shows the highlight or background areas.
If you have Split View and the Multiple check box active, you can use these four buttons to display the processed image side by side with the mask.
Shadow Depth
Lets you define how deep or flat the shadows are in the image. If you only want to have the really black shadows lifted, you should select "Very Deep" or "Deep". For many cases a "Normal" setting will do. If you want the lower midtones brightened up, too, you can select "Flat". Including the whole midtones is seldom necessary, but you can do that by selecting "Very Flat".
If some shadow areas still look too dark, or if a strange border appears in the image you should select a stronger option. If some areas are brightened up too much, try a lower setting. The Shadow Depth feature adjusts the Threshold slider on the Fine-tune tab sheet.
Image Type
Image Type only offers two choices: "Low Contrast" for images that have a soft brightness graduation and no hard edges where very bright areas meet very dark areas. "High Contrast" images on the other hand have one or more regions where bright areas meet dark areas without a smooth transition. The Image Type feature sets the Range slider of the Fine-tune tab to zero for high contrast images and to 100 for low contrast images.
Anti-Halo
If you chose "High Contrast" in the Image Type combo box the Anti-Halo feature will appear, otherwise the Shadow Shift combo box will replace it. The Anti-Halo combo box offers three methods for halo removal at various strengths. There are basically only two methods plus both combined.
Halos are the bright glows that may appear where a bright image area meets a dark one. Method 1 tries to remove halos by shifting the shadow/highlight border. It adjusts the Shift slider on the Fine-tune tab sheet. Method 2 tries to remove halos by blending them away. That can be quite effective in some cases, but may decrease the effectivity of the shadow removal or highlight suppression. It adjusts the Anti-Halo slider on the Fine-tune tab sheet. The Combined options applies both methods for the really tough cases.
Shadow Shift
If you choose "Low Contrast" in the Image Type combo box the Shadow Shift feature will be displayed, otherwise the Anti-Halo combo box will appear. The Shadow Shift feature decreases the size of the shadow areas in the shadow mask thus keeping some shadows areas from being brightened. Shadow Shift adjusts the Shift slider on the Fine-tune tab sheet.
Details
The Details combo box smoothes the shadow/highlight border and also produces a light diffusion effect at higher settings. Although it avoids hard edges in the image, it can also create halos at high contrast borders in the image. Using a lower Details setting isn't usually the best solution, so you should set Image Type to "High Contrast" and use the Anti-Halo feature.
If you have a very thin border between dark and bright areas in the image, it is better to use a "Very Fine" or "Fine" setting. If the brightness gradiations in the image are larger and softer, you can also use a "Large" or "Very Large" setting. The Details feature adjusts the Radius slider on the Fine-tune tab sheet.
Color Filter
The Color Filter feature lets you exclude image objects with certain colors from the shadows and add them to the highlights. If you want to add certain colored image areas to the shadows, you have to select the antagonistic color from the Color Filter combo box. For Red that would be Cyan, for Green it would be Magenta, for Blue it would be Yellow and vice versa.
The Color Filter feature adjusts the Color Filter slider on the Fine-tune tab sheet.