
LayerShop adds an item on the Preferences sub menu of the Edit menu for changing the LayerShop preferences. You display the same dialog by using the LayerShop menu item on the File > Automation Tool sub menu.
Supported
by Photoshop Elements 11 and higher, Photoshop CS3 and higher
Requirements: An image has to be opened and a task has to be performed
Added in Version 2.0
Fade Pro is an enhanced version of the Fade feature. It allows you to use presets, offer many new blend modes, an Opacity slider that goes beyond 100% for more intense blend effects, quick sliders for blending only certain brightness or color areas and advanced masking controls.
Just like the Fade feature it takes the previous history step and blends it with the currently selected layer. Set the Opacity slider to below 100 to reduce the intensity of the last applied pixel history step. Increase the opacity above 100 up to 200% to increase the intensity. This way you can produce a stronger effect even if e.g. the previously applied filter did not allow that.
New Blend Modes
The Mode combo box offers the standard blend modes of Photoshop Elements plus 39 new ones. Assuming that you know the standard blend modes here are some explanations of the new modes: The Subtract and Divide blend modes are also available in Photoshop and subtract and divide the pixel values of one image from/by the other. Rather extreme effects, but useful for certain techniques
The Exposure blend mode is not available in Photoshop and can be used to transform blur effects into sharpening and contrast enhancement effects. The image should be blurred for this purpose. Exposure 2 uses the luminosity channel only, so the result is less saturated and without potential color artifacts. When using normal photos with the Exposure blend modes, you get a negative look. Overexposure also adds a negative look but to the image of the previous history state. In the case of a blurred image, it produces a negative edge look.
Highpass produces a grayish result which looks similar to the Highpass filter if the image is blurred. Otherwise it produces a more visible negative effect than the Exposure modes. Reveal Shadows and Reveal Highlights makes the shadows or highlights of the current image layer transparent if the opacity slider is below 100. The Opacity slider defines the areas that get transparent.
Soft Mood and Hard Mood are softer versions of the Soft Light and Hard Light blend modes. Reflect, Glow, Freeze and Heat are variations of the Color Dodge mode. Helow uses the Heat for the highlights and Glow for the shadows, Frect does the same with Freeze and Reflect, Gleat mixes Glow and Heat and Reeze combines Reflect and Freeze.
Color Burn 2 and Color Dodge 2 are variations of the original blend modes with a slightly different effect. Solarize, Equivalence and Negation produce color inversions. Soft Mix is a much softer versions of the Hard Mix blend mode. The two Penumbra modes are also variations of the Hard Mix mode. The Red, Green, Blue, Cyan, Magenta and Yellow modes combine only certain color channels of the previous history image and the current one. XOR, AND, OR apply the corresponding binary operations. For photos you rather get a popart-esque result with them. The four Modulo blend modes produce similar exotic effects by using variations of the modulo operation.
Adjust Sliders
The sliders in the Quick group let you reduce the Luminance, Color and Saturation (like the blend modes of the same name) of the last applied effect. You can also fade a certain color, which can be selected by clicking the color box left of the slider. Additionally the Shadows, Midtones and Highlights sliders fade the effect in these image areas. This is basically like applying 7 additional blend modes at the same time. You can also use a slider value above 100 for increasing the intensity of the previously applied effect.
Mask Controls
The Type combo offers Tonal, Linear and Circular masking features. Tonal lets you choose a tonal range, which will not be faded, via the slider knobs below the histogram. The Smoothness slider blurs the edges of this tonal area for smooth transitions. The Invert check box uses the inverse of the selected tonal range.
The Linear and Radial options use a linear or circular gradient for gradually fading certain image areas. The Offset slider moves the linear gradient towards the top or bottom of the image thus making the gradient cover less or more of the image. For the Circular option the Size slider moves the circular gradient towards the corners of the image. The Density slider controls the softness of the gradient edge. A low slider value will produce a hard edge between the unmodified image areas and the gradient and a high value will result in a soft transition. For the Circular option you have an additional Shape slider, which transforms the gradient from a circular to an elliptical one. Finally, the Rotation slider rotates the gradient. It has no effect on circular gradients, only on linear and elliptical ones.
The Invert check box makes the gradient cover the parts of the image that it did not cover before. A linear gradient then runs from bottom to top instead of top to bottom and a circular one covers the center of the image instead of the corners.
Supported by Photoshop
Elements 11 and higher,
Photoshop CS3 and higher
Requirements: One or two layers have to be selected
Added in Version 2.0
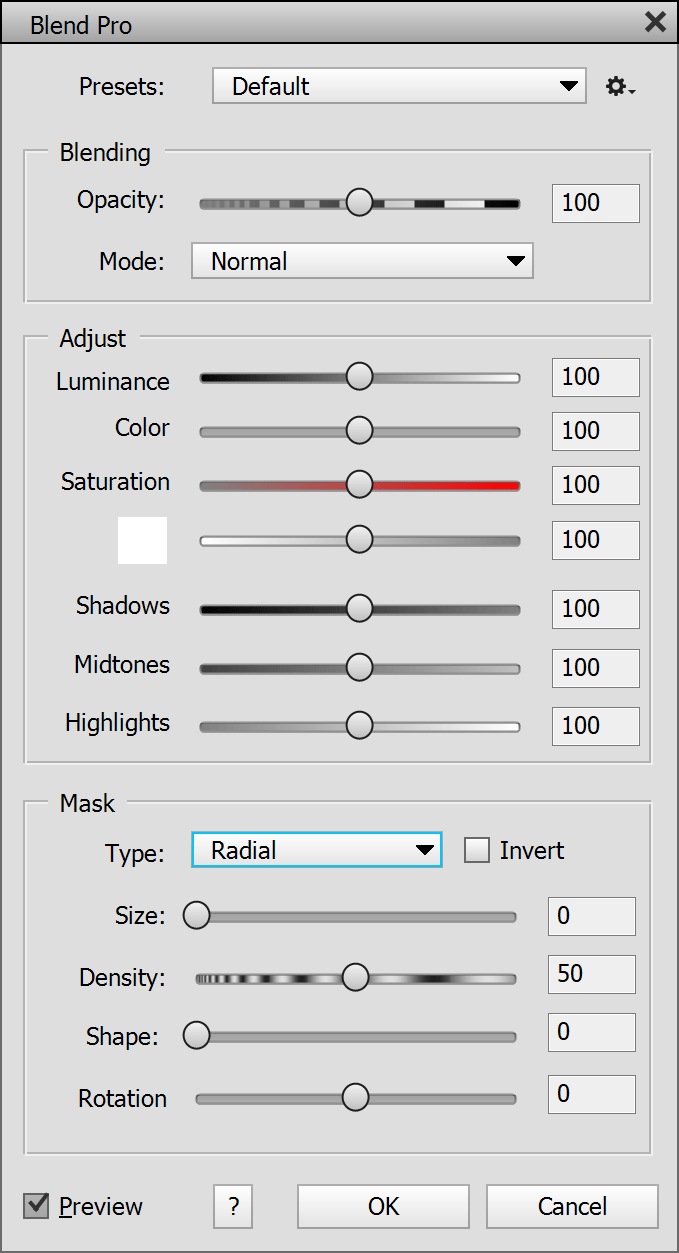
Blend Pro is similar to the Fade Pro feature. Instead of blending the current layer and last history step like Fade Pro it blend two layers. If you want to blend a layer and the layer beneath it, you only have to select the top layer. If you want to blend two non-neighboring layers, you have to select both of them in the Layers panel.
You can set the Opacity slider to below 100 to make the layer below shine through. If you increase the opacity above 100 up to 200% to increase the intensity of the blend effect.
For a detailed description of all features see the Fade Pro dialog above.
Supported
by Photoshop Elements 11 and higher,
Photoshop CS3 and higher
Requirements: None
Added in Version 1.0, extended in 2.0
If you click on this menu item on the Preferences sub menu, a dialog window is opened that lets you change the settings of LayerShop. You can switch between different preferences groups by using the list on the left-hand side or by clicking the Prev and Next buttons. To set all options to the original default values click the Reset button. Press OK to apply the changes on this dialog or Cancel to discard them.
LayerShop Page
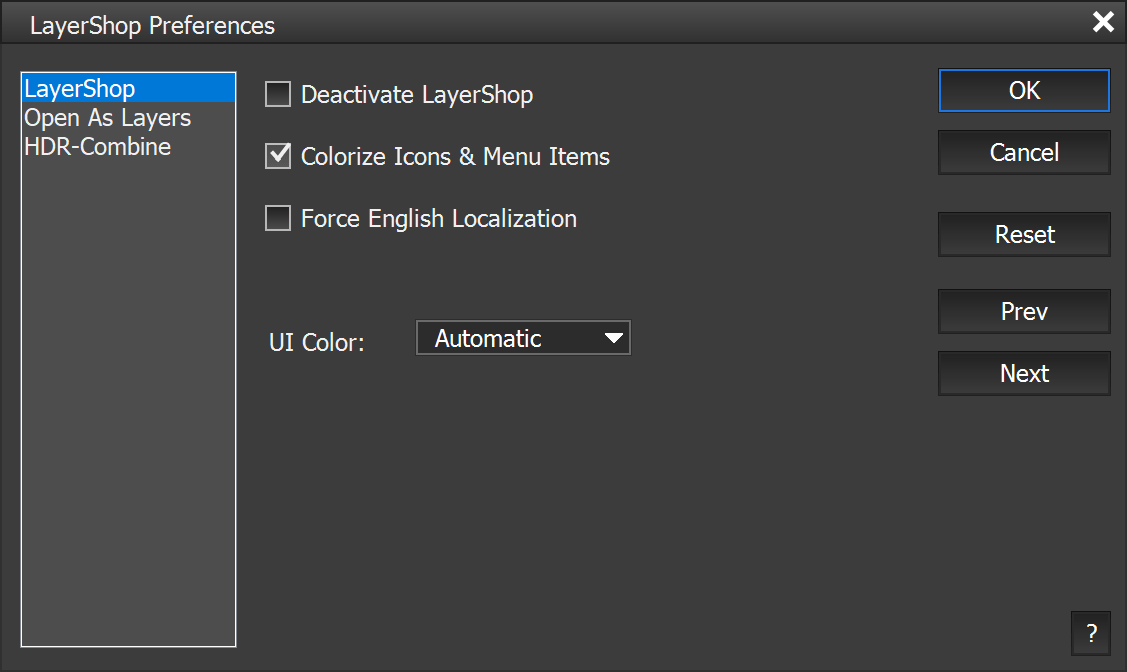
The Deactivate LayerShop check box lets you deactivate LayerShop without installing it. You have to restart Photoshop Elements to make the deactivation work. To reactivate LayerShop again please choose File > Automation Tools > LayerShop from the menu.
When running LayerShop for the first time, all menu items, icons and buttons of LayerShop have a blue background, so you immediately see which features were added. To remove this highlighting, once you know LayerShop well enough, deactivate the Colorize Icons & Menu Items check box.
If you are using a non-English version of Photoshop Elements and would like to see the menu items and dialogs of LayerShop in English language, you can activate the Force English Localization check box. You have to restart Photoshop Elements for this feature to start or stop working. This feature can help if you want to look up things in the English manual or if the localization to your language is not perfect.
The UI Color option lets you choose the skin color of all LayerShop dialogs in Photoshop Elements. This has no effect on the UI and dialogs of Photoshop Elements itself. In Photoshop this check box does not work, because LayerShop automatically adjusts itself to the UI brightness of Photoshop. The default Automatic option automatically changes the LayerShop UI color between bright and dark, if you switch it in the Photoshop Elements 2024 preferences. But Photoshop Elements 2024 needs to be restarted twice until LayerShop notices the new UI color.
Open As Layers Page
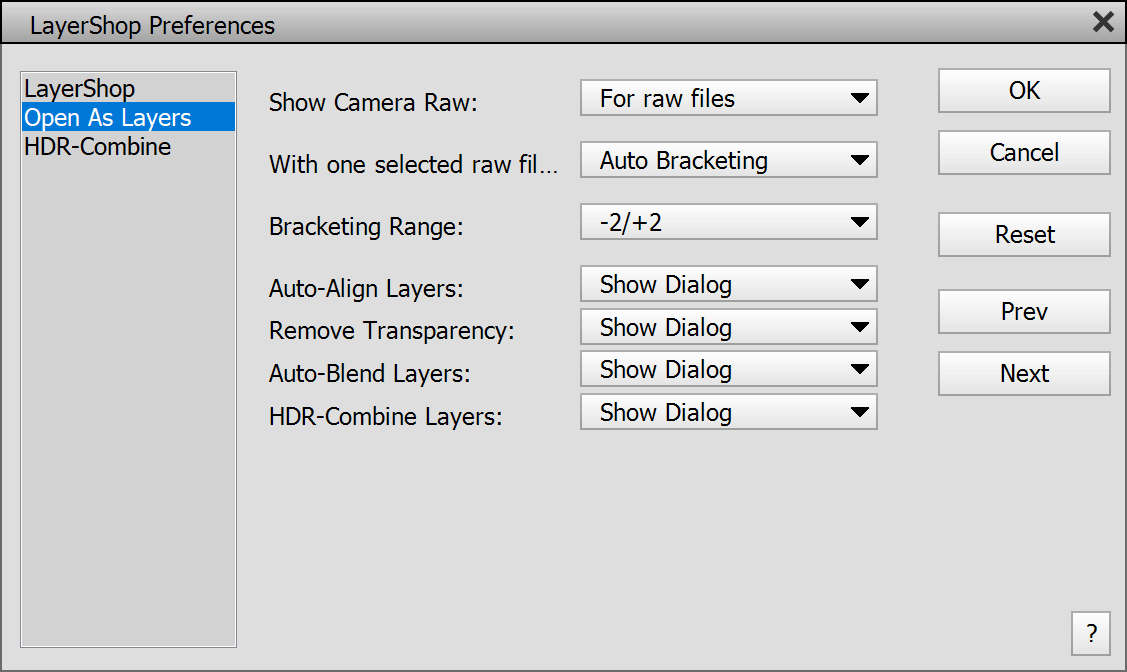
This page lets you change the behavior of the Open As Layers item on the File menu. The Show Camera Raw combo box determines if the Camera Raw dialog is never shown, only displayed for raw files or appears for raw, jpg, tiff and psd files.
The With one selected raw file combo box defines what is done if only one file is selected on the Open As Layers dialog. The No Bracketing option simply opens only one file. The Auto Bracketing option shows the Camera Raw dialog only once and then automatically creates two additional exposure variations, whose exposure difference depends on the Bracketing Range combo box. The Manual Bracketing option displays the Camera Raw dialog three times: The first time with normal exposure, the second time with under exposure and the third time with overexposure. In each case you can manually adjust the Camera Raw settings. Please note that Manual Bracketing overrides the Never setting of the Show Camera Raw option.
The Bracketing Range combo box controls the intensity of the Auto Bracketing and Manual Bracketing options of the second combo box (labeled "With one selected file") . For best result keep the -2/+2 EV option. With -1/+1 option the exposure variations may be too similar and with -3/+3 option the difference is sometimes too extreme. These exposure variations can be used with the the HDR-Combine Layers command for improving the dynamic range.
The Auto-Align Layers combo box lets you automatically align the layers right after the Open As Layers and Place Document as Layers commands performed its task. This way you do not need to run the Auto-Align Layers feature manually. The No option deactivates this feature. The Show Dialog option displays the Auto-Align Layer dialog, which lets you choose options. The Auto Apply option automatically aligns the layers without showing a dialog.
The other three options (Remove Transparency, Auto-Blend Layers and HDR-Combine Layers) are also automatically excuted after the Open As Layers and Place Document as Layers commands if you do not set them to No. But LayerShop automatically detects if the images are panoramas or HDR images. In the case of a panorama, the Auto-Blend Layers command is executed. In the case of HDR images (with different brightness levels) the Remove Transparency and HDR-Combine Layers commands are triggered. Otherwise only the Remove Transparency command is launched. However, the Align Layers combo box should not be set to No, otherwise the automatic panorama detection will not work and the HDR effect will be unsightly.
HDR-Combine
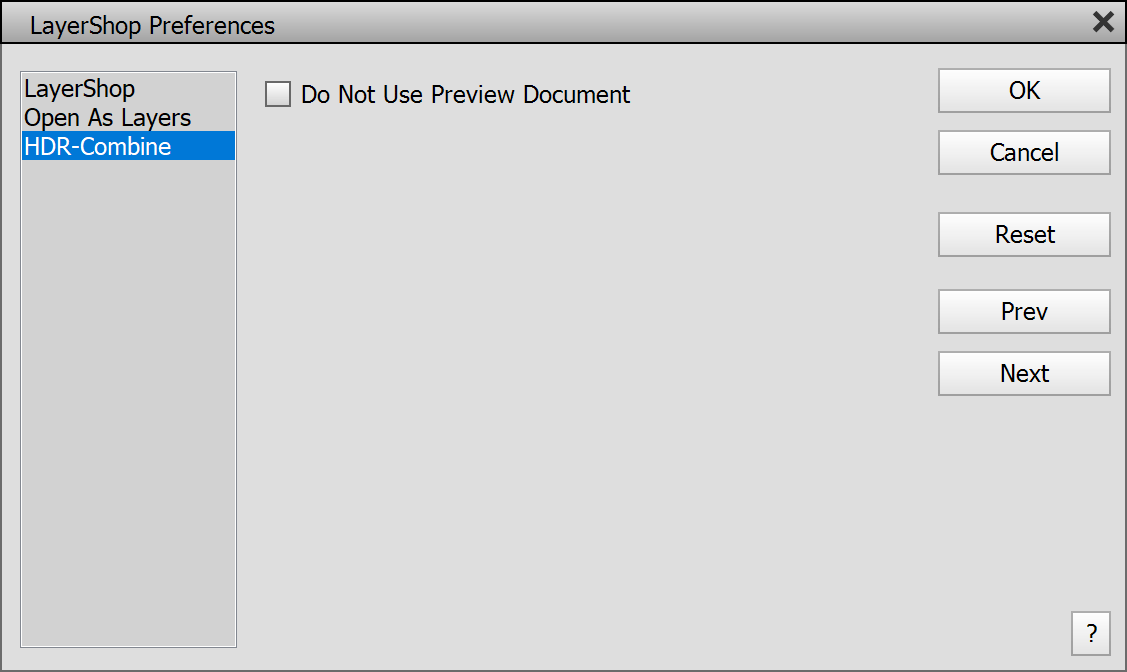
This HDR-Combine page contains an option for the HDR-Combine Layers command. By default, a new document for previewing the HDR effect is opened. As the preview image is downscaled, the effect is rendered and displayed faster when adjusting some sliders. As a downside it increases the render time before and after displaying the HDR-Combine dialog slightly. The Do Not Use Preview Document check box makes sure that no preview document is used. This means that the HDR-Combine will show up and vanish faster, but adjusting some of the slider will be slower. If you play a lot with the HDR settings, better keep this check box deactivated. If you often apply the same HDR settings, better activate it.