|
|
|
Step 1:
Open a new image in your image
application. Add some text with the text tool and make
sure that the text is placed on a new layer.
|
| |
|
|
|
|
|
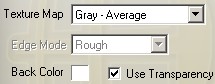
Step 2:
Run HyperTyle and select one
of the Erosion effects from the top Main Effects combo
box. "Erosion - Rough" was used here. Then select one
of the Gray items from the Texture Map and click on the
Back color box and select the color white. To make parts
of the text transparent, please activate the "Use Transparency"
check box.
If the "Use Transparency" check box should be grayed out,
exit HyperTyle and make sure that the text is placed on
a layer.
|
| |
|
|
|
|
|
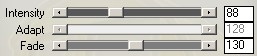
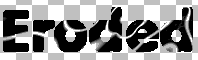
Step 3:
Drag the Intensity slider until
you get a suitable erosion effect. Change the Fade slider
to a value above zero to get a smooth effect.
|
| |
|
|
|
|
|
Step 4:
If you don't want to use the
presently opened texture, please click on the "Open Texture"
to open a new one.
|
| |
|
|
|
|
|
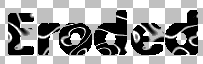
Step 5:
To change the erosion details,
switch to the Texture tab and experiment with the Zoom.
In this case Zoom was set to 50%.
|
| |
|
|
| |
|
|
|
|
|
Variation 1:
For this variation the Back Color
was set to green, the Texture Map combo box was set to
Colored and a different texture was opened.
|
| |
|
|
|
|
|
Variation 2:
Variation 2 was created with
the "Erosion - Dust" main effect. The "Use Transparency"
check box was deactivated, the Back Color was set to Black,
the Texture Map combo box was set to Colored and one of
the photo textures was used. Additionally the Flat slider
on the Adjust tab was set to a value of 2 to get a smoother
effect.
|
| |
|
|
|
|
|
Variation 3:
For this variation HyperTyle
was first used to fill the text with a texture. The scratches
were produces by using a metal texture and the "Erosion
- Soft" main effect.
|
| |
|
|
|
|
|
Variation 4:
Again the "Use Transparency"
check box was deactivated. The "Erosion - Soft" main effect
was used, the Back Color was set to Yellow, the Texture
Map combo box was set to "Gray - Average" and the Green
slider from the Adjust tab was set to 54.
|
| |
|
|