Supported by Photoshop
Elements 11 and higher
Requirements: An image has to be opened.
Added in ElementsXXL
1.0, extended in 3.0
The Proof Setup features simulate how the image looks on other devices, e.g. when displayed on another monitor, when printed with a certain printer or printing method. There are also options to see how an image looks though the eyes of color-blind people. This way you can notice and correct color problems before they actually occur. These features basically convert the color values from the color space of the image to the color space of the selected device when displaying the image on your monitor screen.
The Custom menu item offers the most adjustment on its Customize Proof Condition dialog. The Device to Simulate combo box has the current color profile selected, which is usually sRGB, by default. To view your image with another profile, select another item from this combo box. Best keep the Preserve RGB Numbers check box activated unless you have some color management knowledge. To restore the original proof settings simply select the menu item again and press OK or choose the "Off" item on the Proof Setup sub menu.
The other menu items which start with "Working" in their name let you preview CMYK plates. The CMYK work space that is used for them is defined on the Edit > Color Settings dialog. The Macintosh, Internet and Monitor items simulate standard screen looks. There are also two options for previewing an image like two types of color blind people see them. Finally, the Off menu item switches color proofing off.
Supported by Photoshop
Elements 11 and higher
Requirements: An image has to be opened.
The pixel aspect ratio of the computer image is 1.0, so the width and height of a pixel are the same and form a square. However, there are some video formats that do not use square pixels. Here are examples of such formats and their aspect ratio:
| D1/DV
NTSC |
0.91 |
|
D1/DV PAL |
1.09 |
| D1/DVNTSC
Widescreen |
1.21 |
| HDV
1080/DVPRO HD 720 |
1.33 |
| D1/DV
PAL Widescreen |
1.46 |
| DVCPRO
HD 1080 |
1.5 |
| Anamorphic
2:1 |
2.0 |
The Custom Pixel Aspect Ratio menu item lets you set a special pixel ratio in
case you edit frames of such video files. To restore the pixel aspect ratio
simply select the menu item again and press OK.
In Photoshop the image is displayed stretched according to this ratio. Unfortunately in Photoshop Elements this setting only seems to influence the shape of the brush tip of various tools.
Supported by Photoshop
Elements 11 and higher
Requirements: An image needs to be opened
Added in ElementsXXL 9
The Fit Layers on Screen menu item checks if the layers are smaller than the image canvas and zoom in to display them as big as possible. The 200% menu item displays the image at 200% zoom.
The Actual Size feature chooses a zoom value that makes the image appear at a similar size on the screen than it would be printed out. It uses the dpi value of the screen and the image to calculate the appropriate zoom percentage.
Supported by Photoshop
Elements 11 and higher
Requirements: None
Added in ElementsXXL
3.0
The Full Screen Mode command maximizes the Photoshop Elements window and hides the tool bar as well as all panels. Choosing this menu item again restores the previous state. You can also use the Ctrl + F key short key to trigger this feature.
Supported by Photoshop
Elements 14 and higher
Requirements: An image needs to be opened.
Added in ElementsXXL
5.0
The New Guide Layout dialog lets you automatically add guides according to certain settings. You can select, open and save your own guide preset files with the help of the Presets combo box. There is also an option to delete presets from the list. The Target combo box has no functionality so far.
You can add guides as columns and/or rows. The Number text box defines the number of added guides that are added vertically (Columns) or horizontally (Rows). The Width and Height values determine the number of pixel between the guides. If you keep them empty, the guides are evenly spaces across the image. By entering a pixel value in the Gutter text box you can transform each guide into two guides which have the entered pixel value as the distance between them.
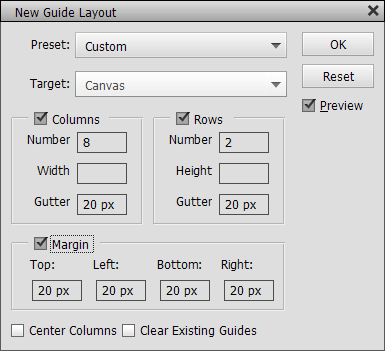
The Margin group lets you define margins for the added guides. For example, if you enter a pixel value of 20 in each of the four text boxes, this means that no guides will be added in the 20 pixel area at the borders of the image.
The Center Columns check box makes sure that the vertical guides are centered in case you have entered a value in the Width text box of the Columns group. The Clear Existing Guides check box deletes already existing guides when you click the OK button.
Supported by Photoshop
Elements 14 and higher
Requirements: A selection needs to be available or a shape layer, type layer,
transparent layers or a layer with a layer masks needs to be selected in the
Layers panel.
Added in ElementsXXL
5.0
The New Guides From Shape menu item creates guides from a shape, other layer type or a selection. The priority list of this command is the following:
1. If a selection is present,
the created guides form a rectangle around the selection.
2. If a shape layer, type layer, pixel layer with transparent areas is selected
and no selection is available, the created guides form a rectangle around the
transparent areas of the layer.
3. If a non-transparent layer with a layer mask is selected and no selection
is available, the created guides form a rectangle around the layer mask.
4. If a non-transparent layer without a layer mask is selected and no selection
is available, the guides are created around the whole document.
Supported by Photoshop
Elements 11 and higher
Requirements: A slice has to be created.
Added in ElementsXXL
2.0
The Clear Slices menu item deletes all slices and you can start adding new slices from scratch if you want. Even if all slices were removed, a slice rectangle that covers the whole image is still displayed until you close and reopen the document or restart Photoshop Elements. For more information about slices see the Slice Tool.