ElementsXXL adds one new menu item to the Filter menu of Photoshop Elements. Additionally, if the currently selected layer is a smart object, ElementsXXL applies filters from the Filter menu (as well as Enhance menu) as smart filters.
Supported by Photoshop
Elements 11 and higher
Requirements: An image has to be opened.
Added in ElementsXXL
1.0
This command converts a
layer into a smart object, which is the requirement for applying filters
as smart filters. The Convert For Smart Filters
command is identical to Layer > Smart Object > Convert
To Smart Object, but better accessible in case you want to apply filters
as smart filters to a smart object.
Once you created a smart object you can apply
smart filters either from the menu items on the Filter menu or with the Filter
> Add Smart Filter command discussed below.
Supported by Photoshop
Elements 11 and higher
Requirements: An 8-bit image has to be opened.
Added in ElementsXXL
1.0, improved in 2.0 and 5.0
The Add Smart Filters menu item lets you apply smart filters to a smart object with the help of the Smart Filter panel. The panel can also be displayed by clicking the smart object icon or smart filter symbol on the Layers panel. For more information see the Windows Menu page. Alternatively you can use the Filter > Convert For Smart Filters command for creating a smart object and apply the smart filters by choosing a filter item on the Filter menu.
Supported by Photoshop
Elements 11 and higher
Requirements: An image has to be opened.
Improved in ElementsXXL
9
ElementsXXL allows Filter Gallery to be applied to images with 16-bit per channel.
Unterstützt von Photoshop CS2, CC, 2020 und höher
Supported by Photoshop
Elements 11 and higher
Requirements: An image has to be opened.
Added in ElementsXXL
2.0,
extended in 8.0
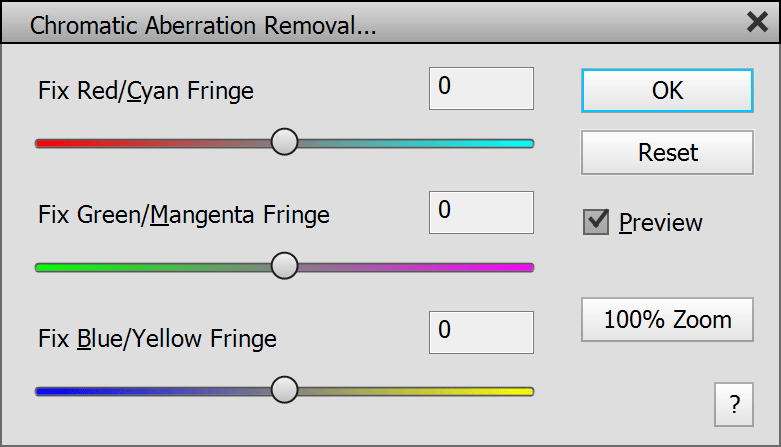
The Chromatic Aberration Removal filter removes color fringes that are caused by lower quality lenses in the corners of the photo.
Each of the three sliders removes fringes of different color. Try various slider values until the fringes are less visible or vanish completely.
To able to see the chromatic aberrations and target them better with the sliders of this filter, it is recommend to zoom the image to 100% or higher and scroll one of the four image corners into view. If you did not do that before running the filter, you can still click the 100% Zoom button and use the hand tool or image scroll bars to do that.
Supported
by Photoshop CS2, CC, 2020 and higher
Supported
by Photoshop Elements 11 and higher
Requirements: An image has to be opened.
Added in ElementsXXL
6.0, extended in 8.0
The Lighting Effects filter allows you to add an unlimited number of virtual lights to the image in order to give the image a different lighting look. It has the following advantage over the Photoshop version of the same effect: Shadow effects are possible with negative Intensity slider values, there are menu items for pasting light properties, centering and aligning, it has an option for avoiding overexposure and it renders faster.
The Presets combo box at the top offers various lighting presets, which can you use as a starting point if you like. The Default item restores the default settings. Alternatively you can also hold down the Alt key and click the Cancel button to do this. The Custom item is displayed every time you change a setting.
The Current Light group offers all parameters of the currently selected light (see the list box at the bottom). The Type combo box defines if the current light is a spot, point, infinite light or volumetric light. A spot light has clear borders whereas a point light is more diffuse and an infinite light affects all pixels the same. Volumetric light can affect the whole image or limited to a certain area.
Click on the Color box and choose a color from the appearing color dialog in order to change the color of the light. For a neutral color select pure white. The Intensity slider adjusts the brightness of the current light. Negative slider values darken the image or other lights. The Width and Height sliders define the width of the light in percent. To rotate a spot light you can use the Angle slider. The volumetric light type offers an R button that generates a new random number for changing the look of the rays. Its Smooth slider reduces the amount of rays with higher values. The Focus slider lets you focus the light beam of a spot light by decreasing or increasing the size of the darkest or brightest light areas.
The All Light group contains options for adjusting all lights and the background at the same time. The Exposure slider works similar to the Intensity slider, but changes the brightness of all lights. The Metallic slider adjusts the contrast of all lighting effects. The Ambience slider controls the brightness of the background areas outside the light spot. Thus it lets you brighten or darken the background. For Ambience values below zero, all light are dimmed. The Colorize box determines the color of the background. The color is only used if the Ambience slider is above zero. Normally the applied lights are able to overexpose the image, which usually allows more artistic effects. If you do not want that, you can also deactivate the Allow Overexposure check box.
The Lights group at the bottom contains a list box, which displays all added lights. Click on one of the list items to select a certain light. You can also select a light by clicking its center circle on the image. You can only adjust the position of a light by dragging its center circle on the image. To edit the light use the controls in the upper Current Light group. To deactivate or reactivate a light click on its eye icon in the list box. The Outline check box activates or deactivates the shape that is displayed around every spot light. The Preview check box lets you see the image without the lighting effects applied.
To create a new light you can click the Duplicate button (and drag the center circle of the new light to a new position) or click anywhere on the image and change its properties in the Current Light group. To remove a light select it in the list box or by clicking it on the image and then click the Delete button or press the Del or Backspace key. You can also position, size and rotate spot lights directly on the image. Clicking and dragging a white circular handle lets you rotate the blur effect and change its width or height at the same time. The elliptical outline can be clicked and dragged to scale the size of the blur effect. Depending on the available action a different mouse cursor is displayed.
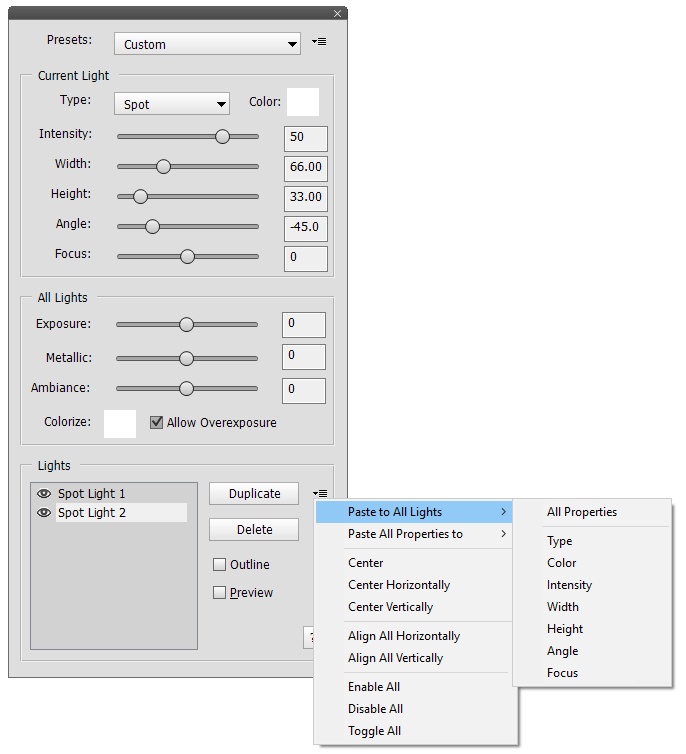
Clicking the icon at the right hand-side of the Duplicate button displays a menu. The Paste to All Lights sub menu lets you paste all or one property of the currently selected light to all other lights. The Paste All Properties to sub menu transfers all properties of the current light to another light that you have to select on the sub menu. The three Center menu items center the currently selected light vertically, horizontally or both. The Align All menu items align all lights either horizontally or vertically by calculating the average horizontal or vertical position of all lights and assigning it to them. The Enable All menu item enables all disabled lights as indicated by the eye icon. The Disable All menu item disables all lights. The Toggle All disables enabled lights and enables disabled lights, which allows you to basically compare two lighting setups.
To cancel the filter you can either press the Esc key, click on the x symbol at the top of the dialog or click on the Cancel button. For applying the effect and leaving the filter you can press the Enter key or click the OK button.
Supported
by Photoshop CS2, CC, 2020 and higher
Supported by Photoshop
Elements 11 and higher
Requirements: An image has to be opened.
Added in ElementsXXL
8.0, extended in
9.0
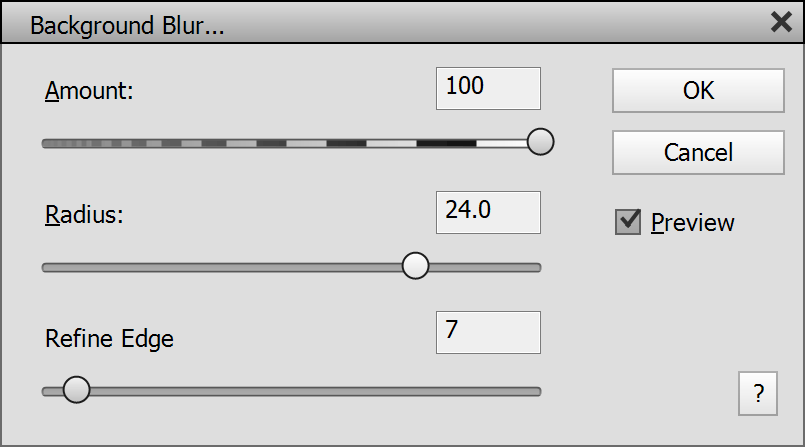
The Background Blur filter only blurs the background of an image and keeps the subject in the foreground untouched. This is similar to using a low aperture value with a SLR camera to soften the background areas or the portrait mode in the camera apps of many smart phones.
The Amount slider controls the opacity of the blur effect. The Radius slider determines the softness of the blur effect. The Refine Edge slider lets you adjust the edges of the blur mask to fix some issues, e.g. with hairs.
Please note: If you use Photoshop Elements 2019 or lower you will have to manually create a selection of the background, because a background detection feature is not supported. So we recommend using it with Photoshop Elements 2020 and higher. If you create a selection before running Background Blur in Photoshop Elements 2020 and higher, the selection will be combined with the detected background. Selection areas outside the background are removed.
Supported
by Photoshop Elements 11 and higher
Requirements: An image has to be opened, CameraXXL or MetaRaw has to
be installed
Added in ElementsXXL
8.0
The Camera Raw Filter menu item runs Adobe Camera Raw, so you can apply any effect of Camera Raw on the currently selected layer.
Normally this feature is accessible from the File > Automation Tools sub menu if you have CameraXXL or MetaRaw installed. ElementsXXL places it on the Filter menu for easier access. If neither CameraXXL nor MetaRaw is installed, this menu item does not appear.
Supported
by Photoshop Elements 14 and higher
Requirements: An image has to be opened.
Added in ElementsXXL
8.0
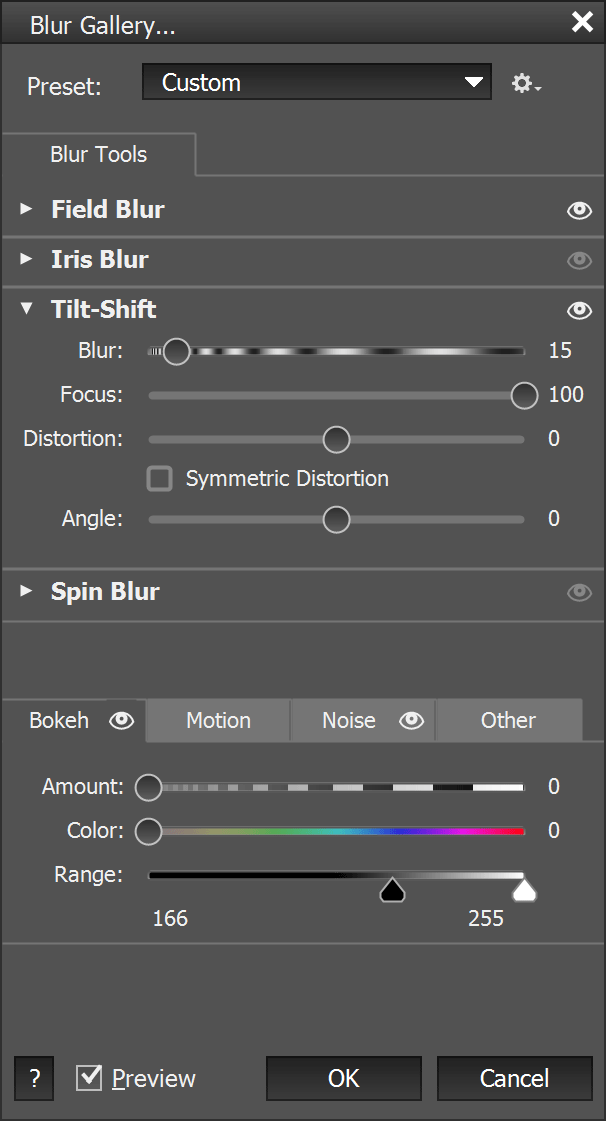
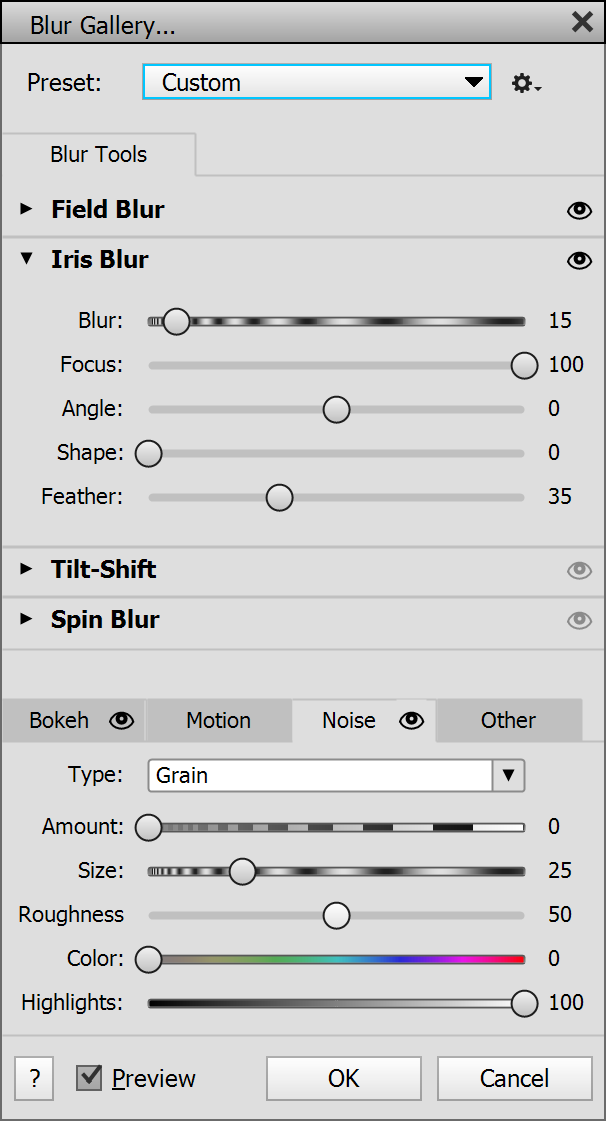
The Blur Gallery filter lets you apply different sophisticated blur effects at the same time. In a way it is similar to the Lighting Effects feature, but you can add blur points instead of light spots.
Each effect has a control point on the image and uses different settings which can be adjusted on the Blur Gallery dialog. The central point of each blur spot can be moved around by dragging it. To create a new blur point select one of the four effect types on the dialog (by making its panel appear). If no blur point of this type exists, one is automatically created in the center of the image. To add a second point of the same type click somewhere on the image to place it. To remove a blur spot select it in the image and press the Del key. When selecting the handle of a blur spot in the image, the appropriate controls with its settings appear on the Blur Gallery dialog.
You can also position, size and rotate the displayed lines, circles or ellipses of the blur spots directly on the image. Clicking and dragging a white circular handle lets you rotate the blur effect (see the Angle slider) and in some cases change its width or height at the same time. The circular or oval outlines can be clicked and dragged to scale the size of the blur effect. The straight lines can be clicked and dragged to change their position. Depending on the available action a different mouse cursor is displayed.
Blur Gallery offers four types of blur effects, which can be chosen by clicking on one of the collapsible panels at the top. Field Blur is a highly flexible blur effect, which allows setting blur spots with different radius values using its Blur slider.
Iris Blur produces vignette-style blur and miniature effects. Its Blur slider controls the blur radius. Reducing the value of the Focus slider lets you add the blur effect inside the oval area that is normally untouched. The Angle slider rotates its oval shape. The Shape slider transforms the oval blur shape into a rounded rectangle with higher values. Finally, the Feather slider increases or decreases the transition between the blurred and non-blurred area.
The Tilt-Shift effect creates vertical blur effects and simulates tilt-shift lenses. Its Blur slider determines the softness of the blurred areas. Reducing the value of the Focus slider lets you add the blur effect inside the horizontal area that is normally not blurred. The Distortion slider varies the look of the blur effect at the bottom. If you additionally activate the Symmetric Distortion check box, the same effect is also applied to the top area. The Angle slider lets you rotate the effect.
The Spin Blur effect adds a radial blur effect within a circular area to simulate spinning objects like the tires of driving cars. Its Blur Angle slider controls the speed of the spinning object, so to say. The Feather slider changes the size of the transition between the blurred and non-blurred area.
At the bottom are four tab sheets with various additional effects. The Bokeh tab sheet adds a bokeh effect to the blurred areas, which means that bright spots will produce a circular effect. The Amount slider controls the amount of bokeh that is added. The Color slider adds more colors to it. The two Range knobs define the brightness range that receive the effect.
The controls on the Motion tab sheet are only enabled if the Spin Blur panel is currently displayed. The Strength, Flashes and Duration sliders emulate the effect of a camera flash with different settings.
The Noise tab sheet lets you add noise and film grain effects to the blurred areas. You can choose between Uniform, Gaussian and Grain effects from the Type combo box. The Amount slider controls the intensity of the noise. The Size slider defines the size of the noise or grain particles. The Roughness slider makes the particles appear more or less turbulent. The Color slider turns the luminance noise into color noise. Reducing the Highlights slider values removes the noise from the highlight areas of the image.
On the Other tab sheet you can also find a Save Mask as Channel check box, which stores the blur mask as a channel that can be accessed from the Channels panel. The High Quality check box produces even better looking blur effects, but renders much slower. Both features are only triggered after clicking the OK button and applying the effect to the image.
The panels and tab sheets of Blur Gallery display an eye symbol on the right hand-side. You can click it to deactivate or activate the appropriate effect. To return all settings to their initial state, hold down the Alt key and click the Cancel button, which now shows "Reset". Alternatively, select Default from the Preset combo box.
For storing your blur effects you can click the gear icon at the right of the Preset combo box and choose the Save Preset item from the appearing menu. To reapply the preset either choose it from the Preset combo box or use the Open Preset menu item. There is another menu item for deleting your preset again.
Supported
by Photoshop CS2, CC, 2020 and higher
Supported by Photoshop
Elements 11 and higher
Requirements: An image has to be opened.
Added in ElementsXXL
6.0, extended in 9.0
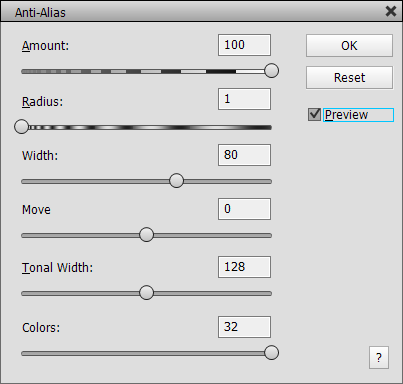
The Anti-Alias effect softens hard edges in a pure black and white image (without gray tones). If you apply it to a photo or color image, it produces a pencil drawing or water color effects by adding dark stroke lines.
The Amount slider sets the intensity of the effect. The Radius slider controls the softness of the edges or stroke lines that are added. Larger values produce a more soft effect whereas lower values a more sharp one. The Width slider increases or decreases the size of the the soft edges or strokes. Larger values make more details visible. The Shift slider moves the edge line between the black & white areas or moves the strokes around.
The last two sliders are only enabled for color images. The Tonal Width slider makes more or less strokes visible. The Colors slider lets you reduce the number of used colors. A value of 32 does not reduce any colors whereas values between 1 and 31 reduce the color count for a water color effect. A value of zero produces a pure black and white pencil drawing.
Supported by Photoshop
CS2, CC, 2020 and higher
Supported by Photoshop Elements 11 and higher
Requirements: An image has to be opened
Added in ElementsXXL
11.0
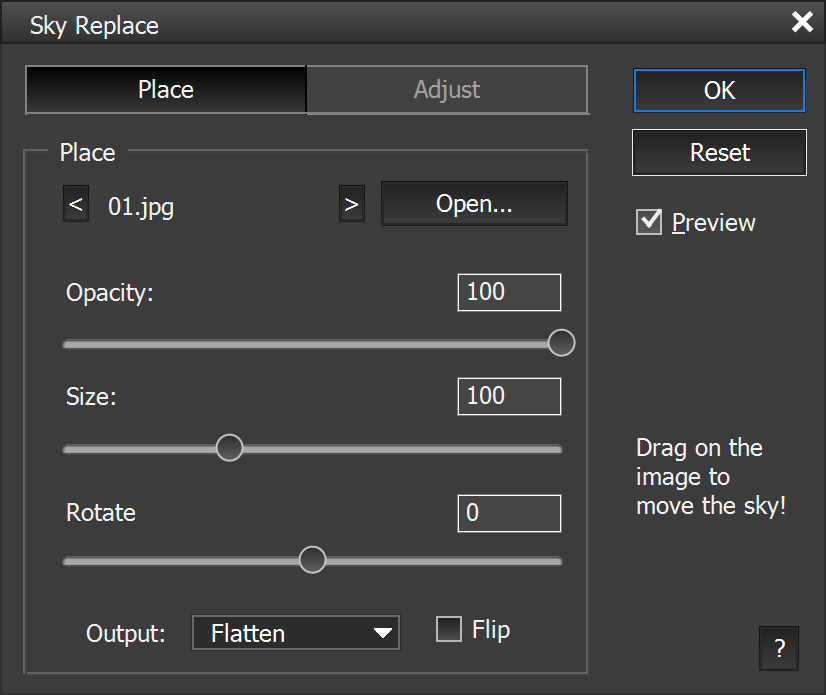
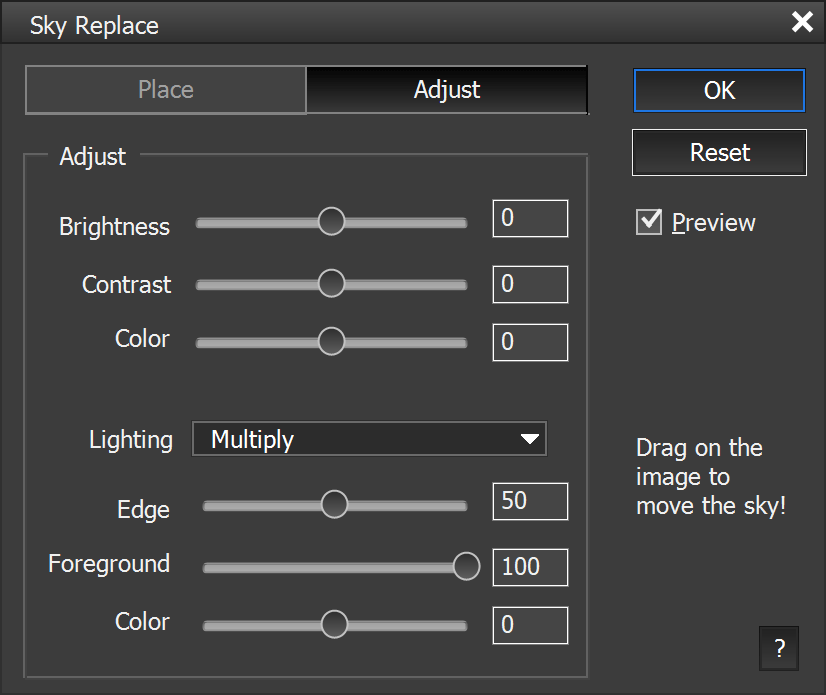
The Sky Replace dialog detects the sky in an image and allows you to replace it with the sky from another image. ElementsXXL comes with 500 sky images. 23 are installed together with ElementsXXL. The rest has to be installed with 2 separate installers. This feature works best in Photoshop 2021 (and higher) as well as Photoshop Elements 2024 (and higher), because Sky Replace uses their built-in sky detection. Otherwise a less good method is applied or you can choose to manually create a sky selection.
The Place tab sheet offers controls for adding a new sky to the current image.By default a predefined sky image or the last used one will be opened. To change the sky file click on the Open button and select a new sky image from the file dialog. Please set the file dialog to "Thumbnails" or "Large Icons" to see a preview of the sky images. The < and > buttons switch between the files in the same folder as the opened sky file. The sky files are installed at C:\Program Data\The Plugin Site\ElementsXXL\Skies\.
The Opacity slider reduces the transparency of the currently selected sky and makes the original sky shine through. The Size slider scales the new sky image to match its proportions with the current image. The Rotate slider lets you rotate the sky to adjust it better. The Flip check box simply mirrors the sky horizontally. To move the sky and show another part of it you can simply drag it in the image window.
On the Adjust tab sheet are various features for adjusting the mask and look of the replaced sky. The Brightness, Color and Color sliders change the brightness, contrast and warmth of the sky to match it with the original image. The Lightning combo box offers different blend mode for combining the sky with the original image. The Edge and Foreground sliders adjust the transition between the sky and the rest of the image. The Color slider alters color of non-sky areas of the image.
The Output combo box decides how the new sky will be added. Flatten applies it to the current layer, Duplicate Layer outputs a single new layer andNew Layers adds the sky as multiple layers. If you want to edit the new sky manually, the New Layers option is the best choice. Otherwise, one of the other two are recommended. With the New Layers option you can quickly launch the Sky Replace dialog again without having to recalculate everything. You just have to make sure that the original image layer is selected and that all output layers are intact, otherwise Sky Replace will ask you to delete the incomplete layers.
ElementsXXL is able to apply up to 112 native filters as smart filters from the Enhance and Filter menus. Additionally more than 300 third-party filters can be used as smart filters from the Filter menu.
If you choose a filter from the Filter menu and it does not work as a smart filter, you are asked to simplify the layer, which means removing the smart object. Some native filters, e.g. Liquify or the filters from the Filter > Adjustments sub menu, do not support smart filtering and thus require simplification.
These filters from the Enhance menu are applied as smart filters in Photoshop Elements 11-14:
Shadows/Highlights
Color Variations (Photoshop Elements 11)
Unsharp Mask
Smart Sharpen
Sharpen
Sharpen More
Sharpen Edges
In Photoshop Elements 15 and higher you can additionally apply these 12 smart filters:
Levels
Curves
Exposure
Vibrance
Color Balance
Black & White
Channel Mixer
Selective Color
Color Lookup
Photo Filter
Invert
Posterize
The following native filters from the Filter menu do not support smart filtering:
Equalize
Gradient Map
Invert (in Photoshop Elements 11-14)
Posterize (in Photoshop Elements 11-14)
Photo Filter
(in Photoshop Elements 11-14)
Threshold
Lens Blur
Liquify
3D Transform
Texture Fill
Comic
Graphic Novel
Pen and Ink
For a list of supported third-party smart filters see the Compatibility page. For more information on smart filtering see the Smart Filter section of the Layer menu page.