Supported by Photoshop CS2 and higher, Photoshop Elements 11 and higher, no requirements
FilterHub is a powerful replacement for the Filter menu of Photoshop and Photoshop Elements and offers many advantages over it. It supports built-in filters (from the Filter, Adjustments and Enhance menus), filter plugins and third-party automation plugins.
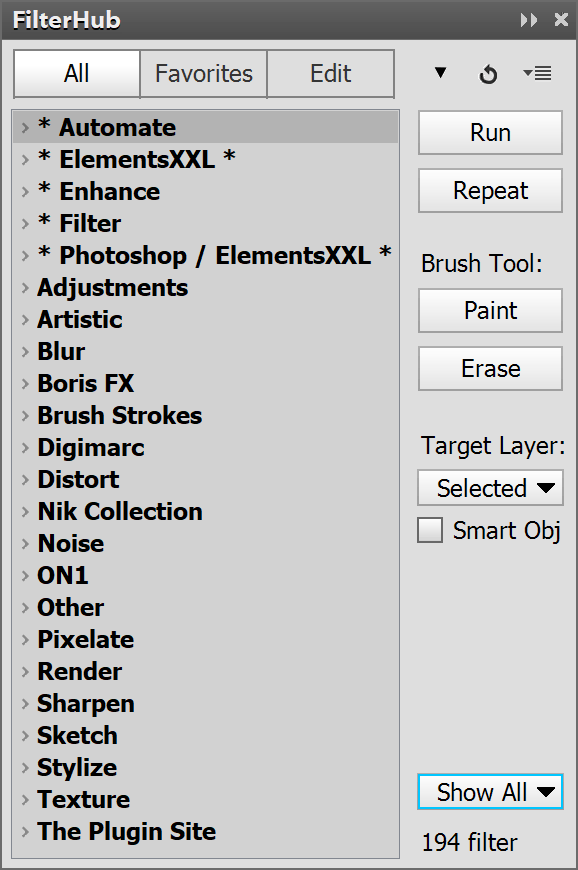
The button bar at the top of FilterHub lets you switch between three views. The All view displays the filters and automation plugins that Photoshop offers whereas the Favorites view contains a list of your favorite filters. The Favorites list is empty, when you run FilterHub for the first time, but you can populate it in Edit view.
In All view the filters are sorted into various groups. These group represent the sub menus that you see on the Filter menu. There are few exceptions tough: The * Adjustments * group features the filters that are located on the Adjustments sub menu of the Image menu in Photoshop. The * Enhance * group contains the filters that are located on the Enhance menu in Photoshop Elements. The * Photoshop * group offers up to six filters that are not available otherwise in Photoshop Elements. The * Automate * group includes third-party automation plugin that are located on the Automate or Automation Tools sub menu of the File menu. The * Filter * group on the other hand offers the filters that are displayed directly at the top of the Filter menu. If you have our other plugin installed, you will also see * ElementsXXL *, * AdjustShop * and * LayerShop * groups with filters from these products.
You can expand and collapse a filter group by clicking on it. Additionally you can expand or collapse all groups with the arrow icon in the top right corner next to the undo icon. Best keep only these groups expanded that contain filters that you use more often.
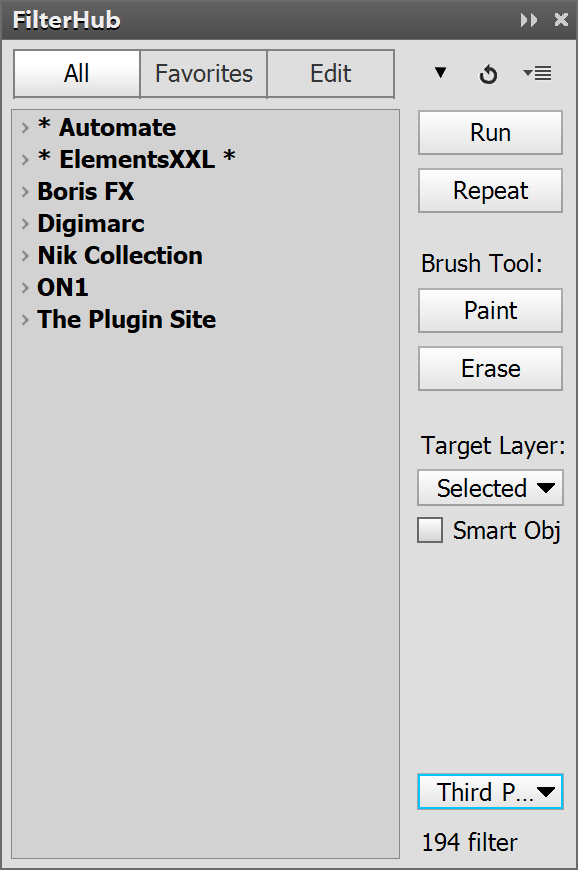
In the bottom right corner of the panel you can see the number of filters that are displayed in the list. In All view there is an additional combo box located above this label. It offers four options: Show All displays all available filters, Hide Gallery hides the groups that contain filters from the Filter Gallery plugin and Third-Party only shows the filters and automation plugins that were installed later and are not part of the original Photoshop installation. In Photoshop CS6/CC and later the effects of the Filter Gallery plugin are not displayed as separate items on the Filter menu by default, so choose the "Hide Gallery" option to get a more precise representation of its Filter menu.
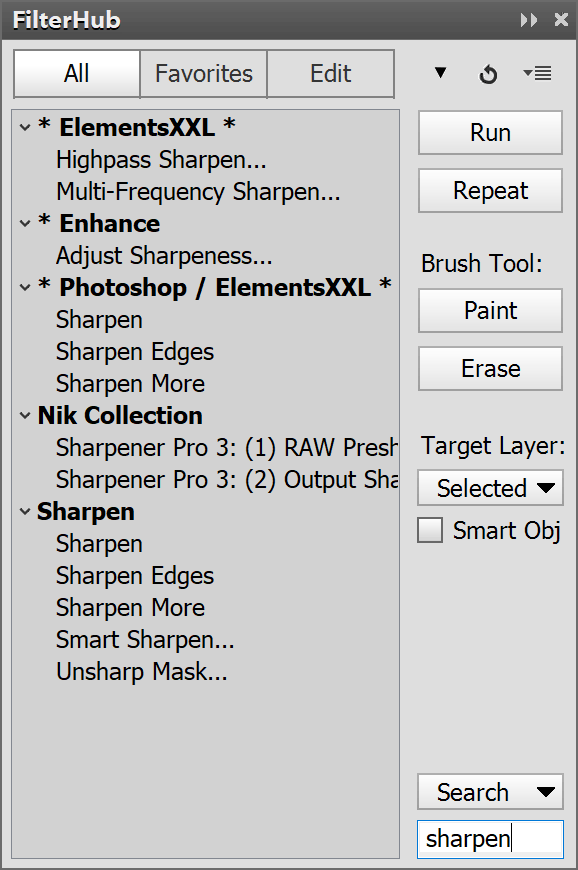
The fourth option is called Search and displays a text box for entering a search string. The search is case-insensitive and also supports multiple alternative key words if you place a comma or semicolon between them. FilterHub searches the filter as well as group names. Here is a list of typical search words and an explanation what they do:
| Keywords | Explanation |
| Eye Candy | Displays the Eye Candy filters in case they are installed |
| ColorStyler 1.02 | Displays the ColorStyler 1.02 filter in case it is available |
| blur | Displays all filters or groups that have the word blur in it |
| blur,sharpen,focal | Displays all filters or groups that contain the words blur, sharpen or focal |
| the plugin site | Displays all filters of The Plugin Site |
| alienskin,auto fx,nik,topaz,onone | Displays only the filters of these five companies |
| color;blur | Displays filters with "color" or "blur" in their name or their group name |
| 2.0 | Displays filters that have the version number 2.0 in their name |
| * | Displays only groups that have * in the name and are located at the top |
The Search feature lets you quickly display a certain filter if you do not want to look out for it in different groups. With the help of multiple keywords (separated by a commaor semicolon) you can also create a customized filter list, which only displays the filters that you want to see. Nevertheless, you should add your preferred filters to the Favorites list for faster access and for running multiple filters in one pass.
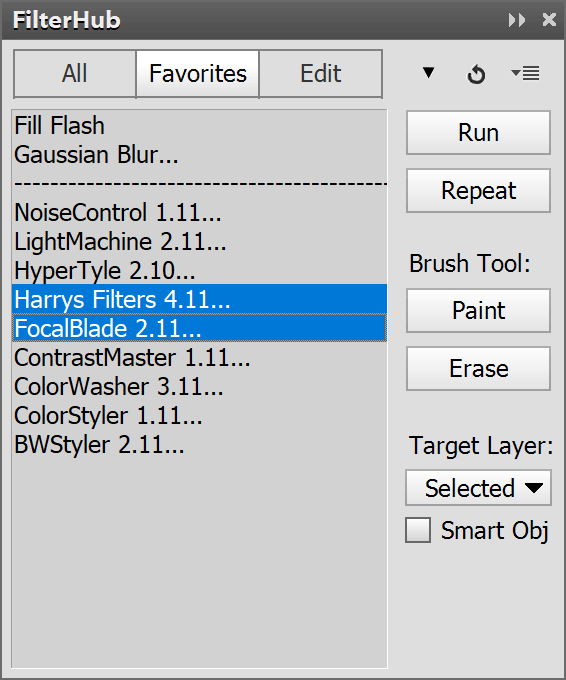
The Favorites view does not contain filter groups. It only lists individual filters without a group name, so there is also no combo box at the bottom right for hiding certain filters. Other than that it is similar to the All view and offers the same options. To add filters to the Favorites list, switch to Edit view. The Favorites view has one specialty though: It lets you run multiple filters in one pass. Read more about it below.
Before you can apply a filter
to your image, you need to select one from the list. You can then run the selected
filter by clicking on one of the four buttons on the left hand side. Alternatively
you can or press the Enter key or double click a filter in the list to run it.
If a plugin does not run,
try holding down the Shift key while double clicking it or while clicking one
of the four buttons (Run, Repeat, Paint or Erase). This will run the plugin
differently in some cases. Please contact us nevertheless and report the problem,
so that we can fix it in the next update.
Run
The Run button runs a filter as like the Filter menu does it. Thus it displays the filter window, so that you can adjust the filter settings and apply them to the image. Double clicking a filter in the list or hitting the Enter key has the same effect as the Run button.
Repeat
The Repeat button runs a filter without showing its UI. The last used settings of the filter are applied to the image.
For many filters the Repeat button works as expected. But if certain third-party plugins were not executed before, they may nevertheless display a window. Some other plugins may not show a window nor produce a change in the image at all. In both cases the Repeat button will work as intended when used a second time with the same filter.
Paint
The Paint button runs a filter, displays its window and then hides the applied effect. You can then paint the effect on the image with the brush tool.
With the help of the X key you can switch the effect of the brush tool. Pressing X once lets you brush away the painted effect. Pressing the X key again makes the brush tool apply the effect again. Pressing Ctrl + I inverts the brush strokes. If you did not paint anything and press Ctrl + I, the filter effect vanishes.
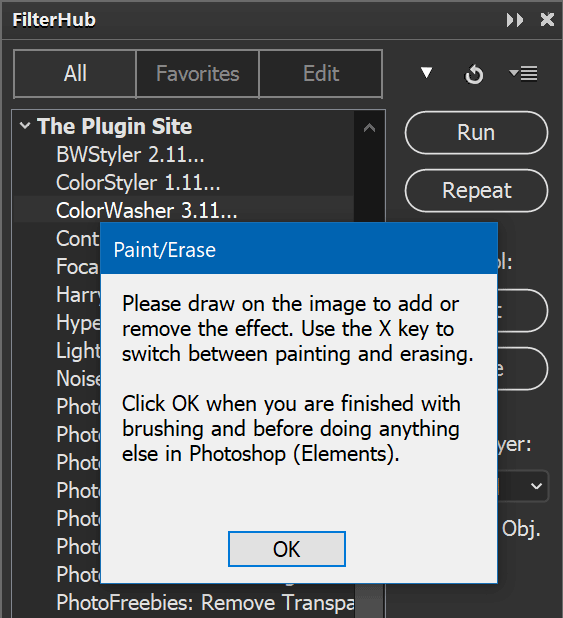
FilterHub displays a message box in the panel area that asks you to paint the effect on the image. Please click the OK button of this message once you are finished with the brush tool. This allows FilterHub some additional steps that are necessary. If you do some other things in Photoshop before confirming the message box, it may produce some unwanted side effects.
If you want to keep the brush strokes in order to change them again later, make sure that the "Duplicated" or "Stamped" option is selected in the Target combo box. If another option is chosen the brush strokes will not be editable later.
Erase
The Erase button works like the Paint button, except that it shows the effect after applying the filter and lets you remove it with the brush tool. Pressing Ctrl + I inverts the brush strokes. If you did not paint anything and press Ctrl + I, the filter effect appears. The X key switched to painting and pressing it again reverts back to erasing.
The Target Layer combo box defines to which layer a filter is applied.
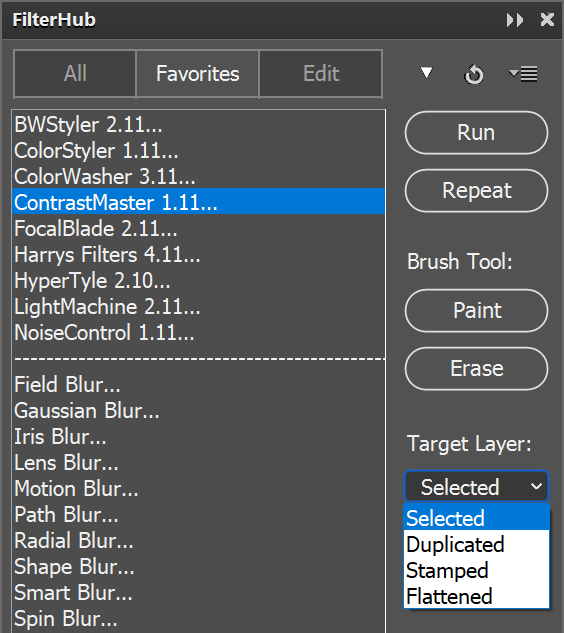
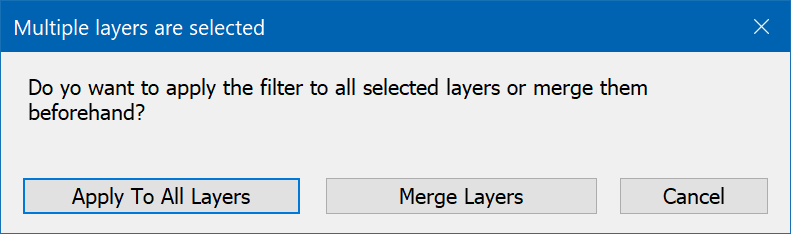
The "Selected" option runs the filter on the layer that is selected in the Layers panel. If multiple layers are selected in the Layers panel, you are asked if you want to apply the filter to all of them or if you want to merge them to one layer before the filter is executed. This option modifies the original layer(s). If you want to keep the current layer(s) untouched, better use the "Duplicated" or "Stamped" option.
The "Duplicated" option duplicates the selected layer and runs the filter on this duplicated layer. If multiple layers are selected in the Layers panel, all of these layers are duplicated. Then you are asked if you want to apply the filter to all duplicated layers or if you want to merge them to one layer. This option works best if you want to filter a certain layer only.
The "Stamped" option produces a merged copy of all layers. When using this option it does not matter which layer or layers are selected in the Layers panel. This option simply duplicates all layers, merges them and places the new merged layer on top of all other layers. This is usually the best option if you want to apply a filter to the whole image while keeping existing layers untouched.
The "Flattened" option flattens the image before running a filter. This means that all layers will be combined to one layer, which is then turned into the background image. This option is only recommended if you do not care about layers and want to combine them.
An activated Smart Object check box turns the target layer into a smart object before a filter is executed. If multiple layers are selected, each of them will be converted to a smart object.
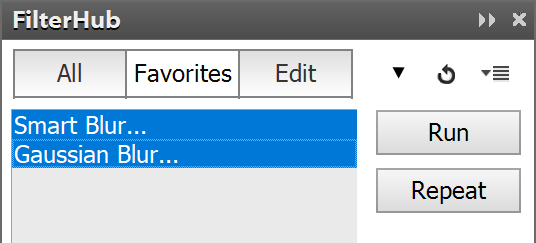
The Favorites view lets you select multiple filters that are executed one after the other. After selecting the filters in the list (by using the Shift or Ctrl key), you have to click the Run, Repeat, Paint or Erase button. As a result the filters are executed beginning with the first one selected at top of the list down to the last selected one at the bottom. If you click the Repeat button it will be done instantly without showing any window. If you click Paint or Erase, all filter windows appear and need to be confirmed before you can start brushing.
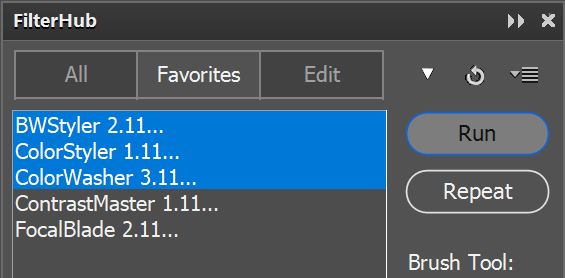
When running multiple filters, all filters are applied to the same layer. There is no new layer created for each executed filter, even if the the Duplicated or Stamped option is chosen in the Target Layer combo box. To apply each filter on a new layer you need to run them separately and without a multiple selection in the list.
To apply a filter to multiple layers in one pass, please select the layers in the Layers panel, e.g. by using the Shift or Ctrl key.
Then make sure "Selected" or "Duplicated" is chosen in the Target Layer combo box of FilterHub. Finally, select a filter from the list and run it. You will then be asked if you want to apply the filter to all selected layers or if you want to merge the layers. Click on the "Apply to All Layers" button.
Now the filter window appears, and you can adjust the effect. After clicking OK on the filter window, the filter is applied to all selected layers one after the other.
The Paint or Erase buttons automatically merge multiple selected layers, so they cannot be used for multiple layer processing. The Repeat button on the other hand works.
Please note that some filters may not correctly render multiple layers in one pass. Some of them will work fine after you clicked the Undo icon and tried it a second time. A few filters may work on the first layer, but produce a blank image for the second, third etc. layer.
Although the Edit view is dedicated to editing the favorites, you can also add filters to the favorites in All view and remove them in the Favorites view. To do that select a filter and right click somewhere on the panel. This displays a context menu. If you are in the All view, the context menu shows the "Add to Favorites" item, which adds the selected filter to the favorites. If the Favorites view is active, the context menu offers a "Remove from Favorites" item, which removes the selected filter. If you want to add or remove more than one filter, it can be done more conveniently in Edit view.
In Edit view you can copy filters from the All list to the Favorites list, remove them again and change their position. That is why Edit view contains both the lists from the All and Favorites views.
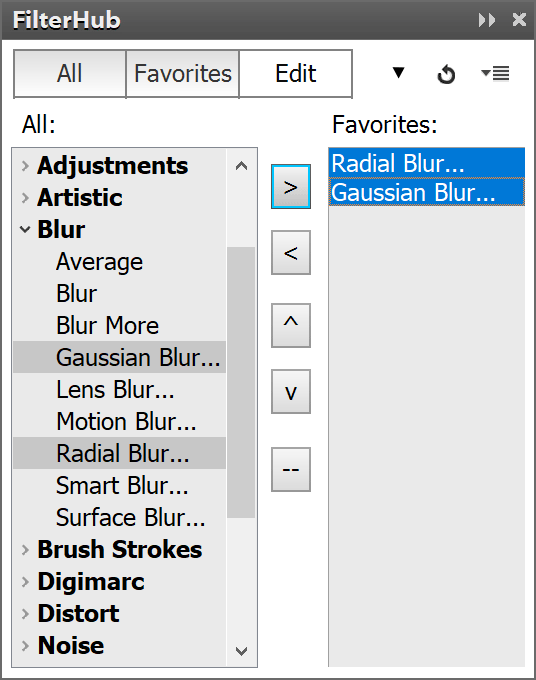
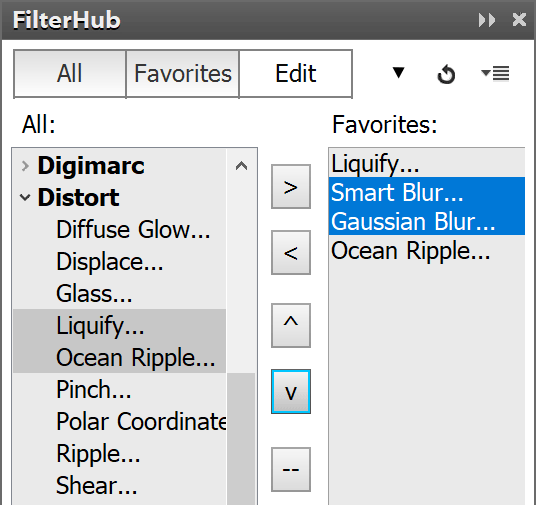
To add one or more items from the All to the Favorites list, please select them in the All list first. To select multiple items hold down the Shift or Ctrl key and click on the items. Then click the > button to copy them to the Favorites list. The new items will be inserted after the last selected item in the Favorites list. If nothing is selected in the Favorites list, they will be added at the end.
When you switch to Favorites in the top button bar, you will also see the newly added filters there.
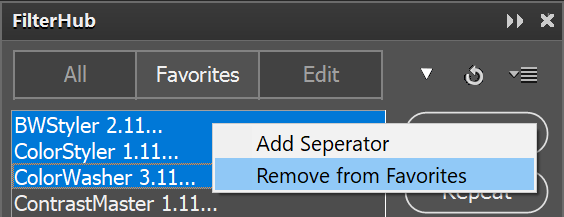
To remove items from the Favorites list, select them in the Favorites list
and click the < button. This removes them. Again the list in
the Favorites view is automatically updated. Alternatively select them
in Favorites view, right click on them and selecte Remove from
Favorites in the context menu.
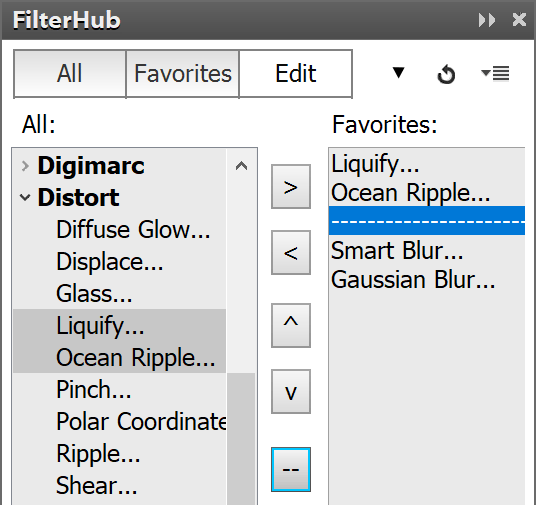
To position items in the Favorites list, select them there and click on the arrow up or arrow down buttons.
The -- button adds a separation line to the Favorites list. It helps
you to visually group certain filters.
You can add multiple
copies of the same filter to the Favorites list if you like. This is useful
if you want to run multiple filters in one pass in Favorites view. Together
with the separation line feature you can create groups of filters for certain
tasks that way.
Although the Edit view is meant for editing the Favorites list, you can also run a filter here. To do that double click an item in one of the two lists. This way you can check a filter before you add it to your favorites.
After executing a filter with the help of FilterHub, you can undo the history steps that it created by clicking the undo icon in the top right corner of the panel. If no filter has been run from FilterHub yet or if it was just clicked, the undo icon does not work. The undo icon does not undo steps that you did outside of the panel in Photoshop. Please use the History panel for undoing these steps or choose File > Undo from the menu.
![]()
The arrow down icon at the left of the undo icon expands all groups in the
list and displays all available filters. Click again to hide all filters again.
You can use it in the All view as well as Favorites view.
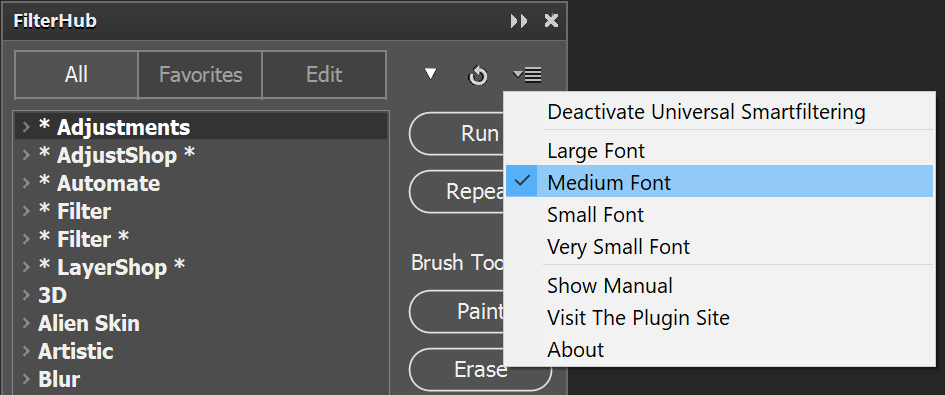
In the top right corner of the panel you can see the panel menu icon. Click it to display the panel menu.
Enable/Disable Universal Smartfiltering
Some filters do not support smart filtering, so they are disabled in the Filter menu when you have a smart object selected in the Layers panel. If you activate universal smart filtering, all filter can be applied to a smart object. However, the settings of the filters, which do not support it, are not stored in the smart object and will be lost once you close Photoshop.
FilterHub automatically enables universal smart filtering before it runs a filter and deactivates it again afterwards, unless it was already activated before.
This feature is not available in Photoshop Elements.
Large / Medium /
Small Font / Very Small Font
These options change the size of the font that is used in all filter lists. It does not change the font size of other controls. The Medium Font option is activated by default and resembles the font size of the Photoshop or Photoshop Elements UI.
If you want to make the filter lists more readable, use the Large Font options. If you would like to display more items, use the Small or Very Small Font option.
Right click on a filter to select it and display a context menu for adding or removing it.
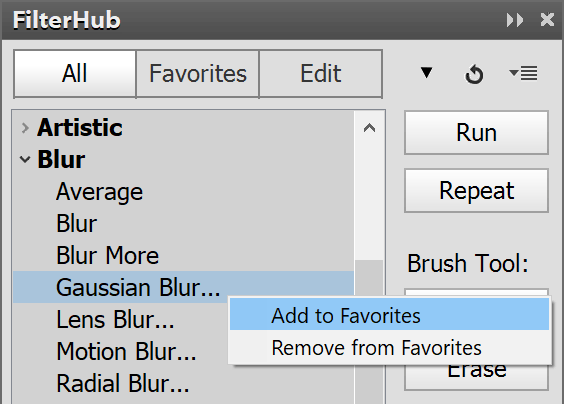
In the All view the Add to Favorites item adds the selected filter to the Favorites list. The Remove from Favorites menu item removes the selected filter.
In Favorites view you can also display a context menu by right clicking on a list item. This context menu includes the Remove from Favorites menu item. Additionally there is a Add Seperator menu item for adding a seperation line below a filter.