Supported by Photoshop Elements 11 and higher, no requirements
ActionsXXL consists of a panel window, which allows you to record, manage and play Photoshop actions among other things.
Das ActionsXXL panel window is initially displayed as a floating window with its own title bar. Double click the title bar to collapse or expand it again. You can do the same by clicking on the >> symbol in the title bar. Clicking the x symbol (or choosing the Close item from the panel menu) closes the ActionsXXL window. To display it again please go to File > Automation Tools > ActionsXXL in the menu of Photoshop Elements.
You can resize the ActionsXXL panel by moving the mouse cursor to the edges of the window. Then you will see an arrow cursor, which lets you enlarge or shrink the window if you hold down the mouse button and drag. To move the ActionsXXL panel simply drag its title bar.
Apart from the title bar the panel window consists of three sections: a button bar at the top, an action list and a button bar at the bottom.
In Photoshop Elements 11 and higher you can integrate ActionsXXL into the Actions panel. To do that deactivate the menu item "Floating Window" from the panel menu. Then make sure that "Expert" is activated in the center of the top bar and choose Window > Actions from the main menu of Photoshop Elements. This shows the Actions panel, which now incorporates the ActionsXXL window.
To open action files in ActionsXXL you use the Load Actions command from the panel menu, but you also open them by dragging and dropping them on the ActionsXXL window.
The Action List
Photoshop actions are part of an action set, which is displayed in the action tree list of the ActionsXXL panel. Action sets are identifiable by the yellow folder icon and can hold a large number of actions. Actions have a gray document icon and can contain a large number of action steps. Actions steps always have a check box at the left. So the action list on the ActionsXXL panel consists of a three-fold hierarchy: Sets, actions and steps.
Sets as well as actions can be collapsed or expanded by clicking their triangle symbol or by double clicking their label. Steps cannot be expanded, you can only deactivate them with their check box. A step with a deactivated check box is not played when you click the Play icon. Additionally you can click on the icon of each step item to define if a dialog is shown when playing this step or not. An empty square icon means that no dialog will be displayed. However, you should be aware that not all steps can in fact display a dialog. So even if the dialog icon is active for a step it does not necessary mean that a dialog is displayed. For example a "Delete Layer" or "Paste" step cannot show a dialog, because there is not dialog available for these functions.
Double clicking a step item lets you play and record the step again at the same time. For example if you double click a step called "Levels", the Levels dialog will be displayed with the recorded settings. You can now change the settings and click OK to replace the old settings in the action step. Again this only works for steps with dialogs. Double clicking steps like "Delete Layer" or "Set Selection" will play them, but as they have no dialogs, you cannot change any settings.
You can move an action from one set to another or move a step from one action to another by drag and drop. You can also change the position of a set, action or step this way. Simply position the mouse cursor over the set, action or step, hold down the left mouse button, move the mouse to the new position and release the mouse button. If you hold down the Alt key while dragging an item, it will not be moved but duplicated.
To rename a set or action select it and click on it again. Now an edit box appears for changing the name. Finally hit the Enter key or click somewhere else on the panel window to commit the change. Alternatively you can also use the "Set Options" or "Actions Options" panel menu items for renaming. Steps cannot be renamed as their name is tied to their functionality.
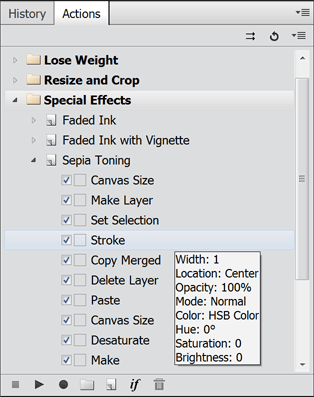
To display the parameters of an action step, keep the mouse cursor one second above it. As a result you will see tool tip, which lists the parameters and their values. If "n/a" appears, it means that there are no parameters.
The Top Icons
Clicking the first icon at the top (as well as clicking on the Batch item of the panel menu) shows the Batch dialog. For more information see the Batch Processing section.
The second icon lets you undo the steps of last played or recorded action. ActionsXXL remembers the last step in the History panel that was selected before you started recording or playing an action. Once you click on the Undo icon this previous step will be selected again. This is quite handy if you want to start recording an action again from the beginning or if you did not like the effect of the action that you just played.
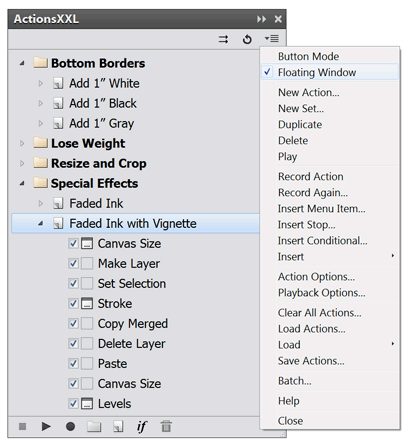
Finally, the third icon at the right panel edge displays the panel menu as can be seen above. The panel menu contains many functions which are not available as icons, e.g. loading or saving actions or inserting special action steps. For more information see the Panel Menu section.
The Bottom Icons
The icons at the bottom of the panel window perform the following functions (from left to right): Stop, Play, Record, New Set, New Action, Insert Conditional and Delete.
Once you started playing or recording an action you can stop it again by clicking the Stop icon. Before you can play an action you have to select one in the action list. If a set is selected, the first action of that set is played. You can also select a step if you do not want to play the top most steps of an action. Clicking the Play icon will then run it and the subsequent steps. As long as the action runs you can stop it with Stop icon (or the Esc key). When it is finished, it will automatically stop.
To record an action you also have to select an action or step icon before clicking the Record icon. If you want to create a totally new action, you have to click on the New Action icon or choose "New Action" from the panel menu. If you selected an action with existing steps, a new recorded step will be added as the last step. If you selected a step when clicking the Record icon, the new recorded step will be added right after the selected step. To stop recording again click the Stop icon.
The New Set icon creates a new set after asking for a name. The New Action icon creates a new action in the currently selected set. Clicking the Insert Conditional icon displays a dialog for selecting a condition as well as one or two actions that will be played if the condition is met or not met. For more information on conditions see the Panel Menu section.
Finally the Delete icon deletes the currently selected set, action or step(s). If a set, action or multiple steps are selected, you have to confirm the deletion. You can use the Ctrl or Shift key to select multiple steps before you click this icon.
The ActionsXXL panel offers a panel menu, which contains almost all of the
available features.
Button Mode
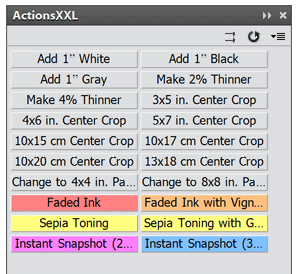
The Button Mode panel menu item makes the action tree list vanish and shows all actions as buttons. You can click on each button to play the corresponding action.
So Button Mode is a way to execute actions faster, but it does not offer all features of the normal mode. The bottom icon bar is not available, so you cannot record new actions. Additionally most panel menu items will be inactive, so besides playing actions you can only open new action files, undo an action and perform batch processing.
To exit this mode again simply choose the Button Mode panel menu item again.
Floating Window
The menu item "Floating Window" is only available in Photoshop Elements 11 and higher. If you deactivate it, the ActionsXXL panel vanishes and ActionsXXL is displayed in the Actions panel of Photoshop Element. It overlays the original UI of the Actions panel, which gets visible again if you choose the menu items "Floating Window" or "Close" from the panel menu of ActionsXXL.
Using ActionsXXL from the Actions panel has the advantage that it can be docked and does not cover a part of e.g. the document window. The Actions panel can also be made floating, but in such a case it is probably better, to activate the Floating Window mode of ActionsXXL.
New Action
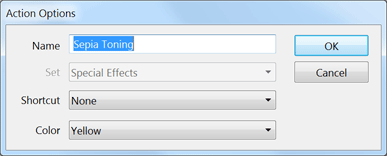
The new Action menu item displays a dialog for creating a new action.
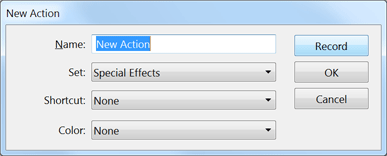
In the Name text box you can enter the name of the new action. The Set combo box shows the currently selected set, but you can choose to add the new action to any of the other available sets. The Shortcut combo box offers one of 44 key shortcuts that will trigger the action. See the Key Shortcuts section for more details.
Finally, the Color combo box lets you assign a color to the new action if you want. This color will be used as the background color for the button of your new action in Button mode (See the screenshot above!). You can choose between seven available colors, but can also decide to assign no color, in which case the button of the action will have a standard gray background.
The Record button create a new action and activates recording at the same time. The OK button only creates a new action.
New Set
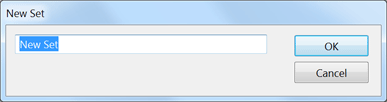
The New Set menu item displays a simple window for entering the name of the new action set. After clicking OK the new set will be added at the bottom of the action list. You can drag and drop it to any other position you prefer.
Duplicate
The Duplicate menu item creates an exact copy of the currently selected set, action or step.
Delete
The Delete menu item deletes the currently selected set, action or step(s). In the case of a set, action or multiple steps it asks for confirmation. You can use the Ctrl or Shift key to select multiple steps before you trigger this command.
Play
The Play menu item plays the currently selected action. If a step is selected, it starts playing the step and continues with the next steps until it reaches the end of the action. Click the Stop icon at the bottom of the panel window (or use the Esc key) to stop the playback before the last step of the action is reached.
Record/Stop
This menu item starts action recording. If recording is already enabled, it stops it again. Now you can choose a menu item, press a key shortcut or click somewhere to trigger a function in Photoshop Elements. After the function was performed it will appear as a new item in the action list.
If an action was selected before you triggered a function, the newly recorded step is added as the last step in the action. If an existing step of an action was selected, the newly recorded step is added below the selected step. So you can also record additional steps in an action later and decide where you want to have them inserted. Additionally you can select another step while recording is active in order to record a new step at another position. However, it is not possible to record a new step as the first step if the action contains already other steps. You rather have to drag and drop the step to the first position after recording it.
Please note: Some features of Photoshop Elements are not scriptable, so their settings are not recorded or played back. Additionally some features are unique to Photoshop Elements, so if you try to play an action with them in Photoshop, alternative effects or settings will be applied in Photoshop. These features are: Auto/Adjust SmartFix, Auto Smart Tone, (Auto) Haze Removal, (Auto) Shake Reduction, Adjust Color Curves and Convert to Black and White.
Record Again
The Record Again menu items works just like double clicking the label of an action step. It plays the selected step again and lets you edit its dialog settings. You have to click OK on the dialog, otherwise the step will not be updated with the new settings. If a certain step has no dialog (e.g. Copy, Delete Layer, Invert), the step is only played and not recorded again.
Insert Menu Item
This menu item allows you to record items from the top menu as well as the menus of other panels, which are normally not recordable, because they do not trigger an image processing functionality. Examples for such menu items are File > Print, Edit > Preferences > General, View > Zoom In, Window > Histogram and Color Swatches panel menu > New Swatch.
When selecting this menu item, action recording will be activated, in case it is not already enabled. To stop recording these special menu items, simply stop recording by clicking the Stop icon or choosing the Record/Stop panel menu item. Then start recording again to only record the standard menu items. So this feature is only active until you stop recording.
Insert Stop
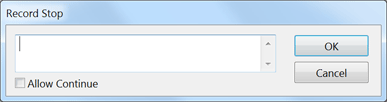
The Insert Stop item of the panel menu lets you enter a message that will be displayed when the action is played. For entering this message you will see a new dialog with a text box. Enter your message in the text box and activate the Allow Continue check box if you want to give the option to continue action playback after the message was displayed.
When the stop step was added to the action list of the ActionsXXL panel window, it has a dialog icon next to it if you previously entered a message in the text box or activated the Allow Continue check box. If you click on the icon and thus deactivate the dialog icon, it means that the action playback is interrupted without displaying a message.
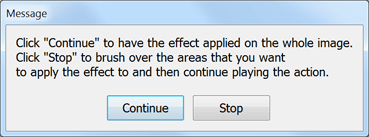

When the inserted stop with activated dialog icon is played, you will see a message box like the ones above. If you activated the Allow Continue check box, there will be a Continue button on the message box, which will immediately continue playing the rest of the action steps. Otherwise it is only possible to click the Stop button, which will interrupt the action playback. This allows the user of the action to perform some manual steps before he clicks on the play icon to resume the playback of the action.
To edit the message again either double click the Stop item in the action list or choose the Record Again panel menu item.
Insert Conditional
The Insert Conditional menu item lets you add an action step that plays another action depending on a property of the current document. For more details please see the Conditional Feature section.
Insert > Path
The Insert > Path menu item inserts the current path as a step into the action. When playing back this step, the path is recreated. This feature also works if a shape layer or a layer with a vector mask is selected, but the action step only recreates the path and not the shape layer or vector mask itself. Please use Insert > Shape for shape layers. For a vector mask you additonally have to record Layer > Vector Mask > From Path, which is available if you have ElementsXXL installed.
Insert > Shape
The Insert > Shape menu item inserts the current shape layer as two steps into the action. When playing back these steps, the shape layer is recreated.
Insert > Action
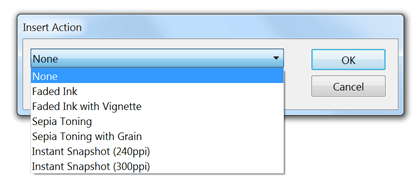
The Insert > Action menu item adds a new step to the current action, which plays back another action. In the appearing dialog you can select the action that is played.
Insert > Script
The Insert > Script menu item opens a file dialog for selecting a script file with the file extension .jsx. After you selected such a script file, a new action step is added, which run this script.
Insert > Adjustment
Layer
The Insert > Adjustment Layer menu item inserts an action step, which recreates the currently selected adjustment layer including its settings. This can be useful if you try to record the settings of an adjustment layer, but it does not work out. Photoshop Elements normally informs ActionsXXL about the changed settings in the modeless panel of an adjustment layer right before another command is triggered, e.g. a new adjustment layer is created or a filter is applied. However, this does not always work, e.g. if another layer is selected instead. So this menu command is an option to compensate this problem of Photoshop Elements.
Action/Set Options
If a set is currently selected, this menu item is named "Set Options" and displays the dialog shown at the "New Set" menu item above. If an action is currently selected, the menu item is called "Action Options" and displays the dialog shown at the "New Action" menu item above. So you can edit the set name and the action properties with this menu item.
Unlike the New Action dialog the Action Options dialog does not let you choose a new set for the current action. But you can edit the action name, shortcut and the button color.
Playback Options
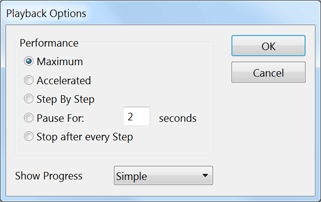
The Playback Options menu item allows changing the speed at which actions are played back. Here are explanations for the available options:
| Option | Explanation |
|
Maximum |
This is the default option that plays action 30% faster than the Accelerated option and only creates one item with the action name in the History panel. You do not see in the document window which steps the actions performs - you only see a progress window. |
|
Accelerated
|
This options plays back actions like the Photoshop Elements Actions panel, but you additionally see a progress window. This option is slower than the Maximum option and it creates a new item in the History panel for each action step. You see that something is going on in Photoshop Elements, but usually the image is only updated after the action finished. |
| Step By Step | Unlike the Maximum and Accelerated options this option updates the document window after every action step, which makes it run actions slower, but at the same time you see what the actions steps do. |
| Pause for x seconds | In case the Step By Step option runs the action too fast for you to observe what it does, you can use this option. It makes a pause of 1, 2 or more seconds after each action step. |
| Stop after every Step | If you want to check out each action step more closely, this option interrupts the action playback after each step. To execute the next action step, simply click on the play icon again. |
ActionsXXL offers two more options than Photoshop ("Maximum" and "Stop
after every Step"). The Step by Step option of ActionsXXL plays actions
approximately twice as fast as the same option in Photoshop. For emulating
the Step by Step option of Photoshop with ActionsXXL, you have to select the
Pause option and enter "1" for seconds.
The Action panel of Photoshop Elements 11 and higher does not offer playback options, so it always runs actions with the Accelerated option. So with ActionsXXL's Maximum option you can play actions 30% faster and avoid that the History panel is cluttered with new items.
Please note: Although creating a single history item is a big advantage of the Maximum playback option, some action steps require other history items in order to work properly. So ActionsXXL temporarily switches the playback mode from Maximum to Accelerated to make such actions work nevertheless. Thus it is possible that multiple history item are created in Maximum mode in case it is unavoidable for playing back the action correctly.
The Off option of the Show Progress feature displays no progress window while an action is played. The default Simple option shows a progress window with the action name and a progress bar. The Full option displays a progress window with the name of each action step plus a progress bar.
Clear All Actions
This menu item deletes all sets and actions from the ActionsXXL panel window after asking for confirmation.
Load Actions
The Load Actions menu item opens a file dialog for opening one or more .atn files. Each file contains one action set. The new set of each the file is then displayed in the ActionsXXL panel. You can also open action files by dragging and dropping them on the ActionsXXL window.
ActionsXXL also supports .atn action files that were created by Photoshop. A few special action steps from these file may not work when played back with ActionsXXL, but ActionsXXL supports more action steps than the Actions panel of Photoshop Elements 11 and higher. If you have ElementsXXL installed, more actions steps from Photoshop are supported.
Load
The Load sub menu allows loading various action files. The Default Actions menu item loads the actions, which are displayed by default in the Actions panel of Photoshop Elements. The PS Default Actions menu item loads the default actions of Photoshop. As both commands would have the same result in Photoshop Elements 6-10, you only see the first of both menu items there.
The Photo Effects menu item loads the action that are visible as thumbnails on the Effects tab of the Effects panel of Photoshop Elements. Thus you can modify them and use them for batch processing. The Harrys Actions menu item opens a set of actions, which were installed together with ActionsXXL.
Photoshop offers the "Reset Actions" and "Replace Actions" menu items, which are more or less superfluous. With ActionsXXL you can reset actions by choosing "Clear All Actions" and Load > Default Actions. Replacing actions can be done with "Clear All Actions" and "Load Actions".
Save Actions
The Save Actions menu item saves the currently selected action set as an .atn file. A file dialog shows up, where you have to choose the file location and enter the name of the new action file. The .atn file format only allows to save one set of actions and not multiple ones, so a set of actions corresponds to one .atn file. Neither is it possible to save a single action to an .atn file. The whole set is always saved.
An .atn file can be later opened again with the Load Actions panel menu item. You can also send the .atn file to other people or offer it for download. The saved .atn file can also be opened and played in Photoshop.
Batch
The Batch menu item shows the Batch dialog, which allows automatically processing multiple images or files with actions and other functions. For more information see the Batch Processing section.
Help
This menu item show the manual of ActionsXXL.
Close
This menu item will make the ActionsXXL panel disappear. To make it appear again choose File > Automation Tools > ActionsXXL from the main menu of Photoshop Elements.
ActionsXXL lets you add an action step that plays another action (before continuing
with the current action playback) depending on a property of the current
document or layer. This
way you can create various actions that deal with different document or
layer states.
You can add such a conditional step by clicking on the Conditional icon at
the bottom of the panel window or by choosing the Insert Conditional menu
item from the panel menu. Such a condition step works similarly to the
if / then / else constructs of many programming languages: If a certain
condition is met, action 1 is played, otherwise actions 2 is played. However,
you can also decide to only play an action if the condition is met or not
met.
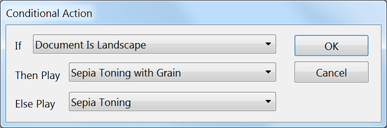
On the appearing dialog you can choose a condition from the If combo box. In the Then Play combo box you can choose an action from the current set that is played if the condition is true. The Else Play combo box lets you select an action from the current set that is played if the condition is false. You can also choose a None item from one of the two bottom combo boxes to avoid playing an action if the condition is either true or false. If you choose None for both cases, no conditional step will be added to the action.
For example, in the above screenshot the action "Sepia Toning with Grain" is played if the image has a landscape orientation, meaning that its width is larger than its height. If the image does not have a landscape orientation, if it is square or has a portrait orientation, then the action "Sepia Toning" from the current set it played.
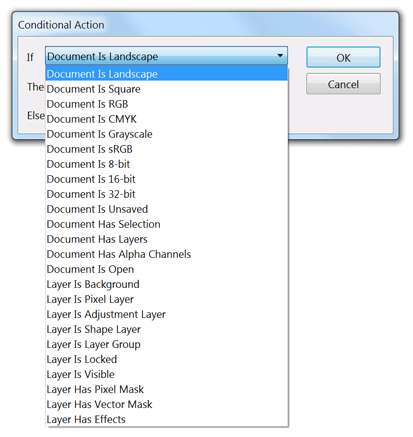
You can choose between 24 conditions in the If combo box. They range from properties of the current document to properties of the current layer. Here is a list of all conditions with an explanation for each of them:
| Condition | Explanation |
|
Document Is Landscape |
This condition is true if the width of the document is larger than its height. It is not true for portrait and square proportions. |
| Document Is Square | This condition is true if the height and width of the document are the same. It is not true for landscape and portrait image proportions. |
| Document Is RGB | This condition is true if the document is in RGB mode. For all other image modes it is false. |
| Document Is CMYK | This condition is always false in Photoshop Elements, because there is no CMYK mode. But this condition was kept for compatibility with Photoshop. |
| Document Is Grayscale | This condition is true if the document is in grayscale mode. For all other image modes it is false. |
| Document Profile Is sRGB | This condition is true if the document uses an sRGB profile. For all other profiles it is false. |
| Document Is 8-bit | This condition is true if the document uses 8 bits per channel. It is false for 16 bits per channel. |
| Document Is 16-bit | This condition is true if the document uses 16 bits per channel. It is false for 8 bits per channel. |
| Document Is 32-bit | This condition is always false in Photoshop Elements, because there is no support for 32 bits per channel. But this condition was kept for compatibility with Photoshop. |
| Document Is Unsaved | If the document was changed since it was last saved, then this condition is true. You can see it from the * sign at the end of the document name in the tab sheet button or the title bar of the document. |
| Document Has Selection | This condition is true if there is a selection available. It is false if there is no selection. |
| Document Has Layers | This condition is true if there are layers in the document. It is false if there is only a background image. |
| Document Has Alpha Channels | This condition is true if alpha channels exist. Alpha channels are usually created with the Select > Save Selection command, but they can also be created by an action or with ElementsXXL's Channels panel. |
| Document Is Open | This condition is true if at least one document is open. |
| Layer Is Background | This condition is true if the currently selected layer is the background image. |
| Layer Is Pixel Layer | This condition is true if the currently selected layer is a normal image layer. The condition is false if the currently selected layer is an adjustment layer, text layer, smart object, shape layer or layer group. |
| Layer
Is Adjustment Layer |
This condition is true if the currently selected layer is an adjustment layer. The condition is false if the currently selected layer is a pixel layer, text layer, smart object, shape layer or layer group. |
| Layer Is Text Layer | This condition is true if the currently selected layer is a text layer. The condition is false if the currently selected layer is a pixel layer, adjustment layer, smart object, shape layer or layer group. |
| Layer Is Shape Layer | This condition is true if the currently selected layer is a shape layer. The condition is false if the currently selected layer is a pixel layer, text layer, adjustment layer, smart object or layer group. |
| Layer Is Layer Group | This condition is true if the currently selected layer is a layer group. The condition is false if the currently selected layer is a pixel layer, text layer, adjustment layer, smart object or shape layer. |
| Layer Is Locked | This condition is true if the current layer is locked. You can see if there is a lock icon in the Layers panel. |
| Layer Is Visible | This condition is true if the current layer is visible. It is false if the layer is invisible or hidden. |
| Layer Has Pixel Mask | This condition is true if the current layer has a layer mask consisting of pixels. It is not true if the current layer does not have a layer mask. |
| Layer Has Vector Mask | This condition is true if the current layer has a vector mask. It is not true if the current layer does not have a vector mask. |
| Layer Has Effects |
This
condition is true if the current layer has layer effects, also know
as styles, applied to it.
|
ActionsXXL lets you define up to 44 key shortcuts.
These key shortcuts are a combination of the F2 to F12 key and the Alt, Shift
and Ctrl keys. A key shortcut can be assigned to one of 44 actions. When
pressing one of these key combinations the appropriate action will be played.
This allows you to apply a bunch of often needed image processing steps quickly
and easily.
Please note: Photoshop offers F2 to F12 key shortcuts for actions, but as Photoshop Elements already has most of these shortcuts in use for other commands, ActionsXXL uses the Alt+F2 to Alt+F12 instead of the F2 to F12 shortcuts.
If you load an action file that you downloaded from the web, it can be that it already contains actions that have a key shortcut assigned to them. So if two actions have the same key shortcut, the action that is located nearer to the top of the action list will be played.
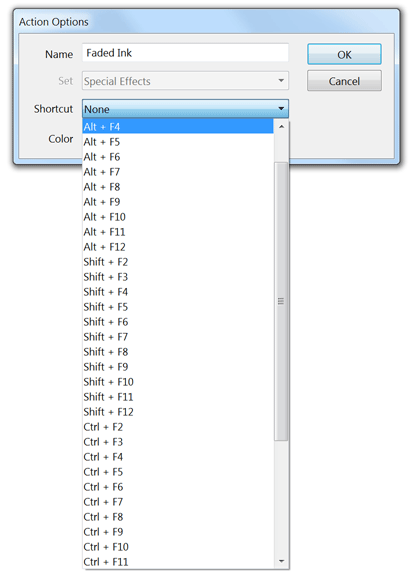
You can define a key shortcut for an action on the New Action dialog when you create a new action. A similar dialog shows up when you double click at the right hand-side of an action name in the action list or when you choose the Action Options panel menu item.
Clicking the Shortcut combo box displays a list of all available shortcuts. Choose one and click the OK button to assign it to the action.