This page shows you the
result of correcting two photo with LightMachine and similar
tools. It is meant to give you the chance to compare LightMachine
with other tools. We tried to do the photo corrections in the
other tools as accurately as possible and didn't try to cheat
by using them wrongly. We probably even used them more accurately
than most users do. The names of the other tools aren't mentioned
(only Photoshop and PSP), but they are sorted according to their
price.
|
Image 1 Correction
|
Image 2 Correction
|
|
|
|
LightMachine
($70 / $40)

|
|
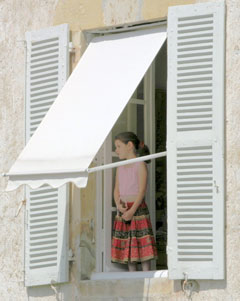
| The
colors, contrast and saturation in the shadows were restored
nicely in both photos. Although LightMachine lets you remove
the shadows without touching the highlight areas, the contrast
of the sky in the church photo was increased to achieve
a more natural look. LightMachine offers more features than
any of the other mentioned tools. That's why it is possible
to achieve such stunning results with it. |
| |
|
Photoshop
($650+)

|
|
| Photoshop's
Shadows/Highlights tool creates relative good results, but
has some problems. The sky in the church image has to be
brightened in order to make the church more visible. The
girl in the shadows doesn't look that natural, because it
wasn't possible to adjust the contrast and saturation perfectly.
Additionally the wall, which is part of the highlights,
was also affected. It can't edit shadows and highlights
really independently. |
| |
|
Paint
Shop Pro 9 ($120/$70)

|
|
| PSP's
Fill Flash filter didn't achieve much on the church photo
even at a 100% setting. It worked better on the girl photo,
but trashed the contrast, saturation and details. PSP's
Automatic Contrast Enhancement filter only produces slightly
better results. |
| |
|
$100
Tool

|
|
| This
tool lets you adjust shadows and highlights independently,
but creates a very unnatural look when lifting the shadows.
It also created small artifacts at high contrast borders
in the church image (which aren't visible in the sized down
version). |
| |
|
$70
Tool

|
|
| This
tool produced quite unpredictable results that were different
in the preview and the final result. It created a strange
vignetting in the sky in the first photo and only managed
to get the church half faded and oversaturated. In the girl
photo a lot of settings produced strangely shifted shadows,
so that some parts of the highlights were darkened and others
were not. The girl got a bit oversaturated. |
| |
|
$70
Tool

|
|
| $70
Tool: This tool completely blows out the sky
when you try to get the church visible. In the case of the
girl photo it produces a result with a very low contrast.
The highlights are brightened too much and the shadows aren't
really revealed. |
| |
|
$40
Tool

|
|
| This
tool did quite bad on the church photo. It increased the
brightness of the sky too much and produced small artifacts
in the trees (which are only visible in the full sized image).
It worked much better on the girl photo, but increased the
saturation too much. It offers no features for fixing the
mentioned problems. |
| |
|
$40
Tool

|
|
| This
tools was only able to produce strangely faded or burnt
versions of the church and an extremely brightened sky.
It also produce plenty of artifacts (which are only visible
in the full sized images). The girl was lifted out of the
shadows, but got a quite unnatural look. |
| |
|
$20
Tool

|
|
| This
tool produced very visible halos in the church photo, brightened
the sky too much and drained almost all color from the church.
The halos are less visible in the girl photo, but it plain
to see that the saturation was decreased too much, which
produces a worn-out look. There are no options to compensate
for these problems. |
| |
|
Freeware
Tool

|
|
| This
tools is hard to use and creates only bad results for tough
cases like these. It didn't manage to make the church visible
enough and changed the sky immensely. It also messed up
the contrast in the girl image. |
| |
|
Freeware
Tool

|
|
| This
tools doesn't use a shadow/highlight mask, so it strongly
fades the highlights when removing the shadows. |
| |
|